DIY 1.8L R18 Engine Cover Upgrade

Matsweeper

Well-Known Member
289
136
New Jersey
Vehicle Model
Civic
Body Style
Sedan
Hey guys, I found this is a very low cost mod, fast to do, and makes your engine compartment look nice!

I purchased this item from college hill.
-The part number is: 32120-R1A-KIT
-This kit comes with cover and 2 head cover bolts.

NEEDED:
10-30 minutes (depending if you want to wipe down the area)
10mm deep socket and a ratchet or wrench
A quarter or white plastic white stick or even flathead screwdriver (this might scratch a little)

Here is what the 2013+ civic sedans look like. This is taken from my 2014 Civic EXL sedan.
IMG_0754.JPG

Locate the 2 Head bolts (one on each side)
***Removing this will NOT make anything loose
IMG_0755.jpg

IMG_0756.JPG

Now grab you wench and start removing. It is said to not tightened these any more than 7 lbf-ft of force. Since I borrowed someone's tools, i hand measure how much force it took me to remove it and thats how much i tightened. I did NOT over tightened.

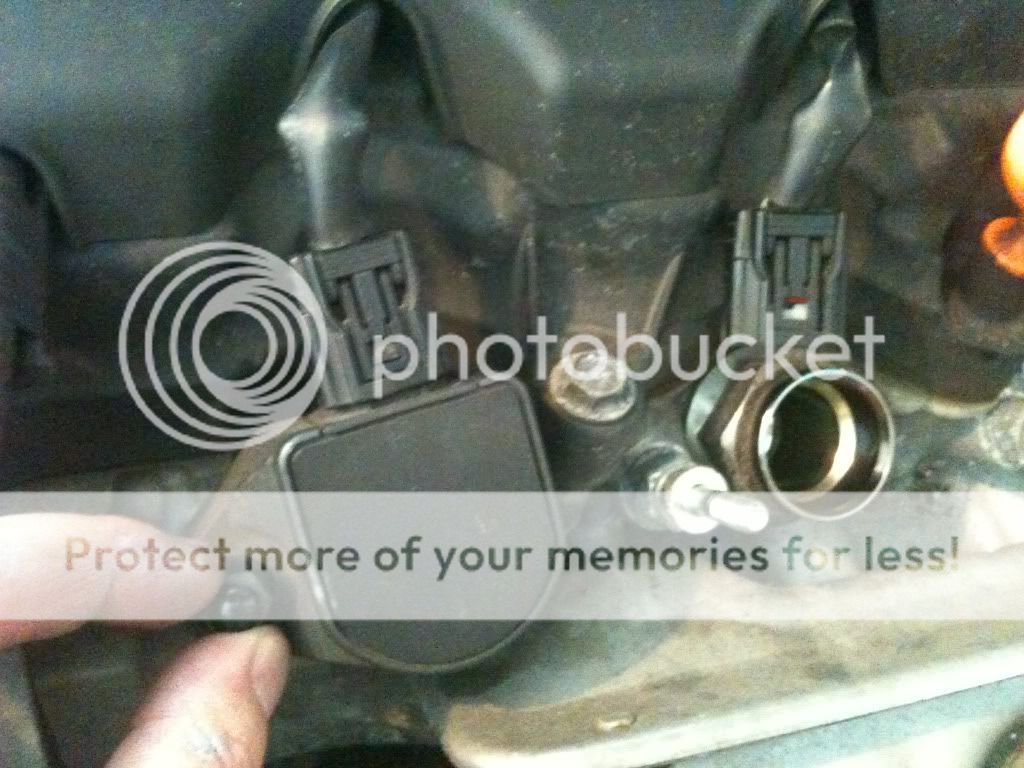
Next I grabbed a plastic white stick and used it to remove the 2 lightly tightened holders. Turn them vertical
IMG_0757.JPG

IMG_0758.JPG

This should make it possible for you to pull off the stock cover.
***If you pull from the sides you may feel like your going to break something, perhaps you will. Put your fingers through the top (honda logo) and lift up from there. Those 2 holders are the only thing holding it in place.
IMG_0761.JPG IMG_0762.JPG IMG_0763.JPG

Now lay it down and grab the new one. Here is a pic of the tools I'm using. The meguiars quik wipes are for light wiping.
IMG_0765.jpg

Here is a picture of the old head bolt compared to the new one. The new on is longer and has a head that is held by the covers rubber holes.
IMG_0766.jpg
 
Next what I did was manually tightened the screw to the engine by hand and then used the socket to tighten it with no force, very little over it being tightened.
IMG_0768.JPG IMG_0775.JPG

Next i placed the new engine cover upgrade on and made sure the new head bolts went through the rubber holes of the new engine cover.
IMG_0773.JPG IMG_0774.JPG IMG_0782.JPG

Then once secure i tightened the top 2 screws with the plastic white stick I had.
IMG_0776.JPG

Last look at your work and enjoy your new mod!
IMG_0786.JPG IMG_0788.JPG IMG_0792.JPG

This was my first DIY I made. I figure I had my iPhone with me, why not.

This took me a total of 18 minutes. That includes getting the package, wiping down some parts of the engine, getting the tools, and putting everything away.

Hope this helps someone out there and hope these pics take you step by step.
 
That's interesting....... Your new cover is how my 2012 came????
 
I guess so. I checked my wife's 2013 civic EXL and mine (2014) they both look the same (engine stock cover). If this was the way it used to be, wonder why honda got rid of it. I mean cut cost? -$40
 
I guess so. I checked my wife's 2013 civic EXL and mine (2014) they both look the same (engine stock cover). If this was the way it used to be, wonder why honda got rid of it. I mean cut cost? -$40
Maybe it was to cover the cost of the chrome strip on the back they added......
 
Frankly I would have never guessed that cover would have been down graded, makes me wonder just how picky they are about saving money..... It's like they added more stuff to the newer ones, but maybe it's only because the consumer Beeched about it, so they figure they'll make it up on other parts, and hope we won't know the diff....... That's just irritating..........

Glad you like the mod... If I didn't already have it, your post probably would have me doing it....... Nice post

I've had mine 3 years and I'm still thinking about what I could do to bring some color under the hood of mine...... I usually keep my cars for a long time, and have gotten use to putting more thought time in my mods, I usually like to make it my own, but don't mind stealing an idea if it's good.
 
Nice job man! I did the same swap but ignored the two head bolts and just used the two top plastic "screws." Nice to see how its actually supposed to work! hahah
 
So one of them covers the coil packs and the other doesn't.... I can see how it looks "cleaner" with the bigger one, though. Would be easy to paint that piece to give it some color under the hood. Honda Red, maybe?
 
@JonnyRotten thanks. Yeah I was at work and on my lunch in the parking lot I did this mod. Pictures were shot with the iPhone 6. One of the pictures came out a bit red because a car was backing up. The white trim tool I saw on Amazon however mine was a tool we use at a computer store.
 
@ZeroTX yeah that's pretty much it. It's a small mod and very cheap mod that makes my engine bay look better in my opinion. And yes, some members paint theirs or stick VTEC stickers. My car is a performance car nor do I want it to be. However this makes it look nice.
 
Looks good, man. My 2014 has the same small one. It does look cleaner with the packs covered. Less exposure to the elements too. @Monk my chrome was painted the day I bought it hahas shoulda just put plastidip in the glovebox on shipment
 
Hey where do you guys get your paint from? I assume you need some kind of heat tolerant paint for it
 
Hey where do you guys get your paint from? I assume you need some kind of heat tolerant paint for it
Most "Auto Parts" stores carry spray on auto paints, heat paint included.

Dupli-Color, seems to be in most stores I've been to(I've also used the paint and it does well).
 
This might be a long shot. I'm now trying to remove that cover that goes over the spark plugs so I can get to mine for a replacement. I can't figure a way to remove it off the rubber holders without possible breaking the plastic that's wedged into it. Any tips on removing it ?

Thanks !
 
?? The cover like this thread shows or the coil on the plug? once you get that plastic cover off there is only the clip on the coil pack, a 10mm nut, and then a 5/8" socket to remove the plug.

There should be one small black cap nut that holds the coil/plug into the block. The coil should slide right off the plug and then you need a deep socket to get the plug itself out.

Which part are you stuck on? Also, ton of youtube videos showing spark plug changes for R18 engines. It's the same for the 2006-11 cars as it is for the 2012+ cars.

1) Undo the clip

2) Undo the 10mm cap nut

3) Slide coil pack out/off plug

4) Undo plug

54469e28.jpg


ac5a9ee0.jpg
 
Back
Top