
Amomicivic
Well-Known Member
This is the DIY written by Baronvonsmash in another forum. I did it in my LX and can say it works as an OEM feature.
I will recommend to start the wiring from the green connector behind the fuse-relay box behind the dash, since it it really the hardest part (a P.I.A.). If you can do this, the rest is a piece of cake.If you can not, you save some work and frustration. Also, use a trim tool to remove the upper steering wheel cover in order to avoid scratches and damage to the part.
Finally, I edited the DIY to insert the pictures in the text, so it is easier to follow. Any questions? Glad to help.
This is the DIY:
Variable Intermittent Wiper install
This was my first actual install, the LX and HF (mine) have a windshield wiper controller with only one intermittent speed setting. EX and above have what is called a Variable Intermittent Wiper, which allows you to set intermittent wiper timing from around 6 to around 20 seconds. It's a minor "luxury" option, but it's cheap and it's a good project to familiarize yourself with installing new features if you're thinking about something more extensive.
I've tried to make this as detailed a walkthrough as possible so that a first-time modder can feel confident about being able to do this successfully. If you're concerned you might not be able to do this, skip to step 12 and try to find, release, and work with connector T behind the under-dash fuse/relay box. That's the hardest part to get to and work with in this whole project.
Parts needed:
Tools needed:
1) Prepare a length of wire by stripping no more than 1/4 inch from one end. The crimp terminal has two crimping points, one at the rear that's a bit larger, this is designed to grab the section of the wire that still has insulation. The second one is designed to crimp over the stripped wire. Lay the stripped end in and crimp both locations as appropriate. If you're not using a crimping tool, you'll have to crush-crimp each crimp point several times, turning 90 degrees each time, to secure the wire. Give a slight tug to the crimp terminal when done, it should be solidly attached.
2) Take off the steering column top cover. Turn the steering wheel hard to the right. In the upper right corner of the steering column where the steering wheel normally hides it, you'll see a spot where you can gently slip the slotted screwdriver in to release a plastic tab. Push in then up. The cover should begin to release and you should be able to finish removing it by hand with little difficulty.
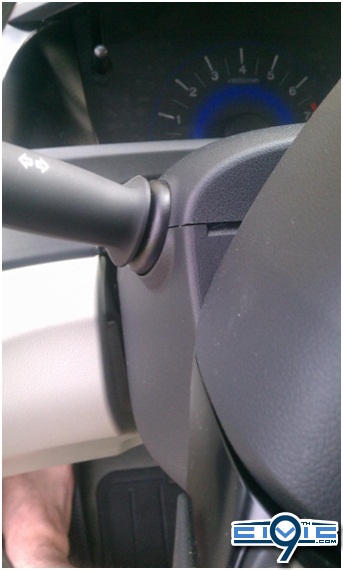
3) With the steering wheel still hard to the right, use the Philips screwdriver to remove the exposed screw that is visible with the cover removed.
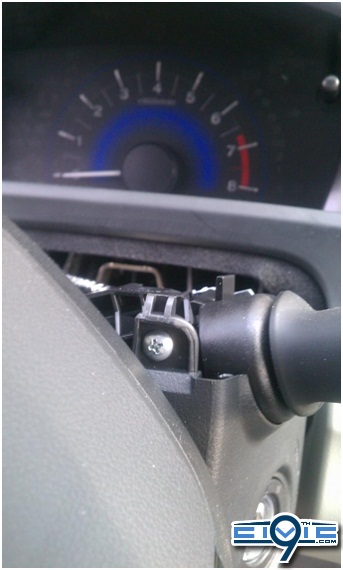
4) Reach behind the wiper switch assembly. You'll find a white plug that connects wires to the wiper switch. To pull out the plug you'll need to find and depress a small catch. Press this down and pull out with steady pressure, wiggle it back and forth to help release it if necessary.
5) Look at the plug, at the rear you'll see where a locking mechanism mates with angled locking points. Use the small slotted screwdriver to gently release each side and push up. The lock should move up at an angle of about 30-40 degrees from the top of the plug. This will allow you to insert the crimp terminal in it's slow easily.
6) Insert the crimp terminal in terminal slot 10. The plug has two rows of 5 wires. Slot 10 will be the vacant slot on a row where 4 other wires are already installed. Gently push it all the way in and when done push the locking mechanism back down.
7) Remove the old wiper switch by depressing two locking tabs, on on the top and one on the bottom, and pulling it to the side.
8) Install the new wiper switch by reversing this process, pushing it in until the locking tabs snap, installing the screw, and plugging in the wire connector.
9) (Optional) remove the lower dash cover for easier access. Start at the left and simply pull with strong, steady pressure. Once the first plastic catch snaps and releases, the rest will be easier to pull out. Be careful you don't pull anything so hard you damage the cover. Unplug the VSA switch and set the cover aside.
10) Run the wire carefully to the rear of the under-dash fuse/relay panel, plan a path to secure the wire when done. Be careful not to choose a path that will interfere with the throttle, brakes, or steering mechanisms.
11) Trim your excess wire, leave a bit of working slack, and strip no more than 1/4 inch from this end of the wire. Crimp another terminal on this end of the wire just like on the other end.
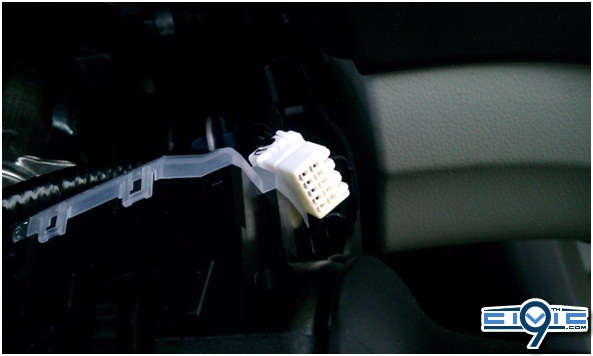
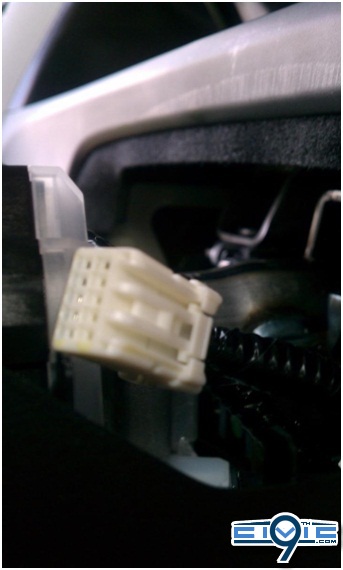
12) Now comes the hardest part. You'll need to reach behind the under-dash fuse/relay box and find connector T, it will be toward the top of the unit. This is a green 24-pin version of the same type of connector that was on the back of the switch assembly. It will similarly have a tab you have to push to release and will have a locking mechanism you will also need to release. You won't have a lot of room to work here and the cable will have very little slack. You may have to contort yourself, use a flashlight, and hopefully not have fingers that are too large to easily work in the space behind the fuse box. If you're concerned about your ability to perform this install, this might actually be a better place to start.
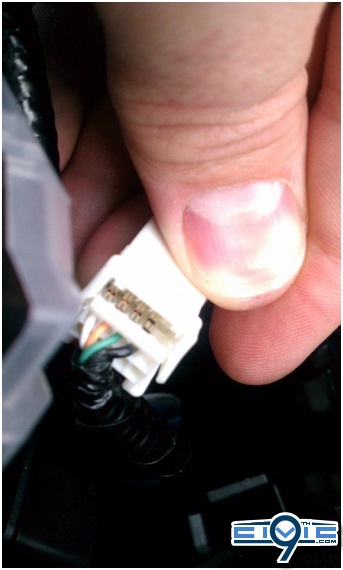
13) You'll need to insert the terminal in slot 6 of this connector. There will be a row with 5 wires next to one another, the last one black, and the rest of the row will be empty. Carefully insert the terminal all the way into slot 6, next to the black wire. Press the locking mechanism back down to secure the crimp terminal and wire. Reinsert the connector back in its slot behind the under-dash fuse box.
14) Tidy up your wire, use the optional split loom tubing to protect it and use zip ties to secure it out of the way so your feet won't catch it when driving.
15) Test by turning the ignition to position II, trigger the window washing fluid sprayer so your windshield isn't dry, then move the wiper to Int and turn the intermittent time controller to the minimum. Count the seconds, turn it to the maximum and count the seconds. You should have a range of around 6-20 seconds, if the wire is not connected properly there will be no difference in timing between minimum and maximum. If it doesn't work, you'll need to check your newly installed wire carefully end-to-end to ensure the crimping is secure, the terminal is fully inserted, and it is inserted in the correct slots.
16) Replace your dash cover and upper steering column cover and go over everything carefully to ensure you haven't forgotten to return anything to its original location.
If you have problems or questions, post them on this thread. I'll try to get some pictures added as well.
I will recommend to start the wiring from the green connector behind the fuse-relay box behind the dash, since it it really the hardest part (a P.I.A.). If you can do this, the rest is a piece of cake.If you can not, you save some work and frustration. Also, use a trim tool to remove the upper steering wheel cover in order to avoid scratches and damage to the part.
Finally, I edited the DIY to insert the pictures in the text, so it is easier to follow. Any questions? Glad to help.
This is the DIY:
Variable Intermittent Wiper install
This was my first actual install, the LX and HF (mine) have a windshield wiper controller with only one intermittent speed setting. EX and above have what is called a Variable Intermittent Wiper, which allows you to set intermittent wiper timing from around 6 to around 20 seconds. It's a minor "luxury" option, but it's cheap and it's a good project to familiarize yourself with installing new features if you're thinking about something more extensive.
I've tried to make this as detailed a walkthrough as possible so that a first-time modder can feel confident about being able to do this successfully. If you're concerned you might not be able to do this, skip to step 12 and try to find, release, and work with connector T behind the under-dash fuse/relay box. That's the hardest part to get to and work with in this whole project.
Parts needed:
- 35256-TR0-K11 Wiper Switch Assembly (Honda OEM part - available through dealerships or on-line parts stores, just Google the part number)
- 16-02-0096 Molex crimp terminal (minimum 2, but they're cheap, get extras - you'll need spares and you can use them on other projects). Available here: Mouser Electronics, Inc. (This isn't the exact correct terminal, but I couldn't find the correct one in lots of less than 10,000. This terminal is very close and worked fine for me)
- A few feet of 24 AWG wire (you can use other wire gauges, but I'd recommend 24)
- A few zip ties
- A length of 1/4 inch split loom tubing to match your wire (optional but recommended for a professional-looking install and to protect your wire)
- Amazon.com: American Terminal SL250-100 1/4-Inch Split Loom Tubing, 100 feet: Car Electronics
Tools needed:
- Small slotted screwdriver
- Medium Philips Screwdriver
- Wire stripper
- Crimp tool (optional, but this makes crimping the terminals easier)
1) Prepare a length of wire by stripping no more than 1/4 inch from one end. The crimp terminal has two crimping points, one at the rear that's a bit larger, this is designed to grab the section of the wire that still has insulation. The second one is designed to crimp over the stripped wire. Lay the stripped end in and crimp both locations as appropriate. If you're not using a crimping tool, you'll have to crush-crimp each crimp point several times, turning 90 degrees each time, to secure the wire. Give a slight tug to the crimp terminal when done, it should be solidly attached.
2) Take off the steering column top cover. Turn the steering wheel hard to the right. In the upper right corner of the steering column where the steering wheel normally hides it, you'll see a spot where you can gently slip the slotted screwdriver in to release a plastic tab. Push in then up. The cover should begin to release and you should be able to finish removing it by hand with little difficulty.
3) With the steering wheel still hard to the right, use the Philips screwdriver to remove the exposed screw that is visible with the cover removed.
4) Reach behind the wiper switch assembly. You'll find a white plug that connects wires to the wiper switch. To pull out the plug you'll need to find and depress a small catch. Press this down and pull out with steady pressure, wiggle it back and forth to help release it if necessary.
5) Look at the plug, at the rear you'll see where a locking mechanism mates with angled locking points. Use the small slotted screwdriver to gently release each side and push up. The lock should move up at an angle of about 30-40 degrees from the top of the plug. This will allow you to insert the crimp terminal in it's slow easily.
6) Insert the crimp terminal in terminal slot 10. The plug has two rows of 5 wires. Slot 10 will be the vacant slot on a row where 4 other wires are already installed. Gently push it all the way in and when done push the locking mechanism back down.
7) Remove the old wiper switch by depressing two locking tabs, on on the top and one on the bottom, and pulling it to the side.
8) Install the new wiper switch by reversing this process, pushing it in until the locking tabs snap, installing the screw, and plugging in the wire connector.
9) (Optional) remove the lower dash cover for easier access. Start at the left and simply pull with strong, steady pressure. Once the first plastic catch snaps and releases, the rest will be easier to pull out. Be careful you don't pull anything so hard you damage the cover. Unplug the VSA switch and set the cover aside.
10) Run the wire carefully to the rear of the under-dash fuse/relay panel, plan a path to secure the wire when done. Be careful not to choose a path that will interfere with the throttle, brakes, or steering mechanisms.
11) Trim your excess wire, leave a bit of working slack, and strip no more than 1/4 inch from this end of the wire. Crimp another terminal on this end of the wire just like on the other end.
12) Now comes the hardest part. You'll need to reach behind the under-dash fuse/relay box and find connector T, it will be toward the top of the unit. This is a green 24-pin version of the same type of connector that was on the back of the switch assembly. It will similarly have a tab you have to push to release and will have a locking mechanism you will also need to release. You won't have a lot of room to work here and the cable will have very little slack. You may have to contort yourself, use a flashlight, and hopefully not have fingers that are too large to easily work in the space behind the fuse box. If you're concerned about your ability to perform this install, this might actually be a better place to start.
13) You'll need to insert the terminal in slot 6 of this connector. There will be a row with 5 wires next to one another, the last one black, and the rest of the row will be empty. Carefully insert the terminal all the way into slot 6, next to the black wire. Press the locking mechanism back down to secure the crimp terminal and wire. Reinsert the connector back in its slot behind the under-dash fuse box.
14) Tidy up your wire, use the optional split loom tubing to protect it and use zip ties to secure it out of the way so your feet won't catch it when driving.
15) Test by turning the ignition to position II, trigger the window washing fluid sprayer so your windshield isn't dry, then move the wiper to Int and turn the intermittent time controller to the minimum. Count the seconds, turn it to the maximum and count the seconds. You should have a range of around 6-20 seconds, if the wire is not connected properly there will be no difference in timing between minimum and maximum. If it doesn't work, you'll need to check your newly installed wire carefully end-to-end to ensure the crimping is secure, the terminal is fully inserted, and it is inserted in the correct slots.
16) Replace your dash cover and upper steering column cover and go over everything carefully to ensure you haven't forgotten to return anything to its original location.
If you have problems or questions, post them on this thread. I'll try to get some pictures added as well.
Last edited by a moderator:

 .
. ")