2014 Civic Si Non-Navi Model - Add Factory OEM XM Project

slick

Well-Known Member
20
17
Longview, Wa
Vehicle Model
Civic Si
Body Style
Coupe
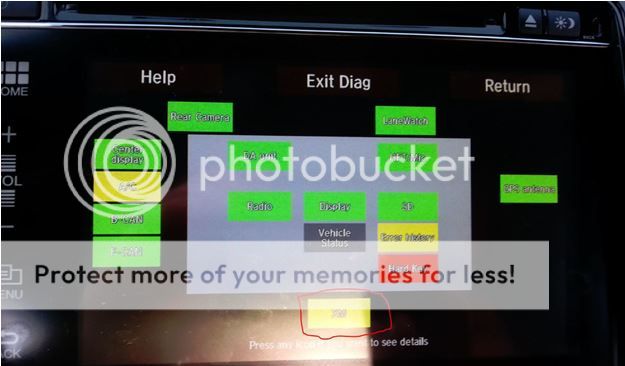
Did you get a 2014 Honda Civic Si Without Navigation and have to settle with using your data plan on your cell phone or transmit from a Sirius XM unit over a FM channel to get the worst quality XM possible. Hopefully I have overcome this issue and I am laying it all out there for everyone to see.

I have been told it would cost way too much to ever do this. "I disagree - just need the know how and determination"

I have been told that you cant do this. "You can get it from factory with it installed"

I have been asked what's the point. "I don't want to pay for Sirius and upgrade my data plan on my cell phone"

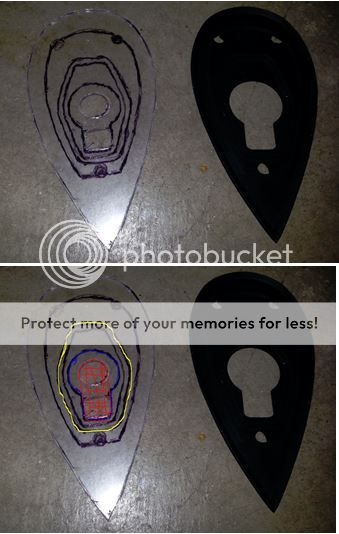
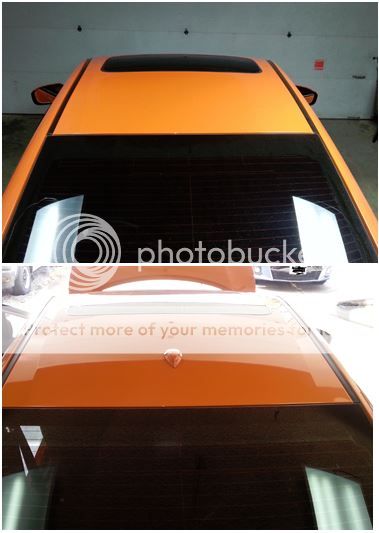
Plus that shark fin antenna looks sweet on my ride ;)
 
Part 1 - Introduction and installation of Shark Fin antenna

Forgive me this is my first DIY post ever and I am going to link to other competitive forums and if this is bad etiquette I apologize for that. My intent is to educate the 2014 Honda Civic Si community so with that said here we go with my first ever DIY post.

2014 Civic Si without Navigation (Base Build)

Project – Add OEM XM to base build 2014 Civic Si Coupe (Project Difficulty – 4 to 5) (NOT VERFIED WORKING YET!)

INSTALLATION – this is the warning off the XM Kit Installation information Customer Information: The information in this installation instruction is intended for use only by skilled technicians who have the proper tools, equipment, and training to correctly and safely add equipment to your vehicle. These procedure should not be attempted by “do-it-yourselfers.”
First I wanted to verify that the touch screen radio head unit in my car is XM Ready so I got into the radios Diagnostics mode (Power Off + Eject + Home while not on home screen) to have a look. (Sorry for sun reflection in the picture)

DiagPic_zps87cb565f.jpg


If you look at my radios diagnostics menu under help it explains the color codes (Yellow – I interpreted that it’s not connected but is available?!?!)
So this sent off a fire storm in me since this was a huge deal since I wanted XM before I bought the car and was lied to by the sales man and ended up with no XM Unit. The Aux port is not 3.5mm it’s an HDMI jack so that meant I had to use data plan on my cell or aftermarket XM unit and transmit the signal to an FM frequency and pick this up on my OEM head unit (this was not acceptable to me).
So I researched and I looked through all the information I could find here are the 4 locations I did most of my research on what to get (http://estore.honda.com , http://collegehillshonda.com , http://collegehillshondaparts.com , and http://www.bernardiparts.com ).

Parts (Purchased through collegehillshondaparts.com by selecting car (2014 Honda Civic SI NAVI) then browse to Antenna. PRICE Approximately 350.00 spent total on all the parts.
  • 39150-TS8-A02ZL - (This is Orange Fire Pearl color since that is my car color) Shark Fin Antenna
  • 39153-TA0-A02 – The Nut to hold Shark Fin antenna onto vehicle (don’t forget it because the antenna itself doesn’t come with this)
  • 39820-TR6-A01 – This is the actual XM Unit
  • 39163-TS8-A02 – This is the feeder assembly XM antenna wire from Shark Fin Antenna to XM Unit in the trunk.
After I got these parts I found the location that the XM unit is supposed to mount (Trunk Passengers side) – I removed the 3 slide pin clips and fold back the carpet and I saw the 2 distinct mounting holes. I searched and couldn’t find any additional wiring so I had to research some more and found out that Honda has not changed much in 8 years and it’s the same S shaped plug for the XM Unit as in past models 2006 and up Honda Civics. This told me that I need to order a few more parts in order to accomplish my project goals. I ordered these from my local Honda dealer due to the rush I needed them by. I accomplished this goal of getting the Y bracket but not the XM install Kit listed below and I have to wait till next weekend or so for it to arrive and then to finish the project.
  • 08A31-0F1-000 – this is the Y Bracket to attach to an S bracket in back of the radio head unit
  • 08B15-SNA-100B – This is an older kit to install XM Unit in the trunk of a 4 door unit (great for what I need it for)
Time to start the build (Forgive all the links but I don’t want to write-up what others have already done and there are instructions for already) I found almost all of the information from YouTube, Forums, and Installation instructions found all over the internet (so if I don’t explain something very well please look it up all the information is there.

INSTALL Part 1 – Install Shark Fin Antenna

Remove Rear panels – Follow rear speaker replacement guides
Disconnect Battery before you start this project since you are working around the air bags and you don’t want these to go off.
  1. http://9thcivic.com/forum/threads/2012-civic-rear-speaker-replacement.3859/
  2. Remove back window speaker deck lift until all red areas (below) are out of their notches and you should hear the pins under upper section by the speakers pop out as well – then lift out
RearSpeakerDeck_zpsbd1c0fb8.jpg


Remove Dome light, Sunroof controls with map lights, grab handles, sun visors

3. Blue sections pry out with small screw driver and reveal 2 screws and 2 plugs to undo (See Ref 2 or Ref 2a for this cover removal)
MapLight-SunRoof_zps244ea937.jpg


4. The dome is simple remove the cover with a screw driver and undo 2 screws and undo a single plug and you can remove it (See Ref 2a for this cover removal)
DomeLight_zps5aa7646d.jpg


5. The Pull down the grab handles and reveal the pins the cover will have to be pinched on both the front side and back sides at the same time to remove then the plug comes out revealing 2 metal clips that need to be removed too. Much like the air bag symbol in the rear linked in the document above step 1 (sorry the picture doesn’t show the pins below)
GrabBars_zps4aa51fb6.jpg


6. Remove the Sun Visors (See this video
View: https://www.youtube.com/watch?v=cpSMOy-TMvs
) Also (See Ref 2 for this)
SunVisor_zps84176d86.jpg


7. Remove Drivers side lower seat belt bolt (pull rubber cover off and unbolt with 15mm socket)
SeatBeltRemoval_zps858b932e.jpg


8. Remove drivers and passengers trim panels
DoorTrimFloor_zps098d335c.jpg


9. Remove back seat (See Ref 1 for this) also the u-shaped ones are pull sliders (Pull forward towards front of car) to release the pins.

10. Remove the rear side panels both drivers and passengers side loosen the rubber around the door trims first before removal of these
BackSeatSidePanels_zps5061c76e.jpg


11. Loosen the rubber around door trim moldings then to remove the top seat belt guide and pillar molding by it pulling out and down from the bottom of the piece.
UpperSeatBeltTrim_zps90a96816.jpg


12. Now you should have the headliner free of molding pieces except for 2 screws on each side of the back wing windows (Go ahead and remove those) (Having another hand for this next part is recommended)

13. When you drop the headliner there are 2 pins in the back right above each of the back seat positions that will need to be finessed loose

14. Then loosen the areas around the sun roof

15. Then front and pull it back towards the back window
16. Remove headliner through the passenger’s door.

Now we should be able to see the exact location that the Shark Fin antenna goes in the ceiling it should resemble a teardrop. The large area of the teardrop shape is calipered at 1-1/2” so half of that is 3/4” there we used a spring loaded punch to mark the location from inside the car (Spend the time to make sure you are where you want to be before you press this all the way down).

Template time here is what mine looks like
PlasticTemplates_zps25cf77d0.jpg


RED = Remove this area for the antenna to fit into bolt and wire (Be mindful that the bolt needs to grip something), BLUE = is matching the keyhole shape, YELLOW = water seal (You’ll understand when you have it with you).

I also created a paper template for this too (Notice the slot in the middle – this material was all removed)
PaperTemplate_zps7388a04d.jpg


Drill out the antenna bolt (Used ½” bit for this and the lower section) then used a Dremel to route the remaining material out (BEWARE My Dremel jumped out and hit the roof and it damaged the paint but it’s still under the antenna so I was fortunate (I painted the exposed primer with my touchup paint)) then bolted the antenna down on top of it.

After the antenna is bolted down here is the route that we followed for the XM antenna assembly (Pics Below)
AntennaRoute1_zps07aa584b.jpg
AntennaRoute2_zpsb7996d4d.jpg
AntennaRoute3_zps8c94f934.jpg
AntennaRoute5_zps7151a56b.jpg
AntennaRoute6_zpsea987382.jpg


Here are before and after shots of my roof

RoofBeforeandAfter_zps357d1062.jpg


Waiting on the Bus Cable that will be part 2 of this as I follow Ref 1 for the route to the trunk and then I will be finished. Hope this works I am already committed to this all the way to the end result (Having XM on my OEM touch screen radio) if possible.

BTW – I hate using links but I didn’t document what I could look up on my own. Using links often the information goes away or is changed. If you end up following this and would like to add to this forum how to do some of the tasks that I linked to rather than document to other websites that would be awesome and very much appreciated by everyone viewing this and myself.

Ref 1 - http://www.bernardiparts.com/Images/Install/2011_CivicSi_XMRadio_AII44332.pdf
Ref 2 - http://9thcivic.com/forum/threads/2012-2014-automatic-day-night-mirror.4289/
Ref 2a - (Video) don’t use a knife like him-
View: https://www.youtube.com/watch?v=c_Asc5bmUyM
 
Part 2 - Install Bus cable to XM Unit -

ATTENTION I need further assistance to finish this write- up since I believe that everything that I set forth to do in this install is still possible even though I have not come to the finish line YET!
  1. I need pictures wiring behind the 2014 Honda Civic Si w/Navigation (To include all the plugs and wires to those plugs as well as the back of the HU - Model Number of HU is 39100-TS9-A61). The Radio Cavity and a picture of the front unit itself would be nice as well.
  2. I need someone to verify that the XM Unit in the trunk is still the same unit, which is easy to get to by removing the three pins on the passenger’s side carpeting and pulling back to reveal it there (Unbolt and verify that the 14pin White S Connector is there). I still think this is right, I just need confirmation. How it’s hooked into the stereo would be awesome too if you want look for it and provide that feedback that would be absolutely amazing.
    • If you don’t find it there I believe that there might be an alternate location for the XM Unit (Passengers wheel well front seat. Open the glove box and at the top back corners press in until the grommets clear the glove box opening to bring it down. Verify to the far right that the XM Unit is there (Don’t Mistake the Amplifier for the XM Unit (they are different boxes but may be in the same location) I will provide a picture of both below so you know what each looks like. The First is the XM Unit in the trunk Width is approx. 1" wide. Factory amp in second picture is Approx 3" wide and in my front passenger side wheel well. This is how you will know the difference.
XMUnitLocal_zpsa60618c0.jpg
FactoryAmp_zps8e80a17a.jpg

3. Or I would like it if someone could obtain the pin out and post of the two radios 39100-TS9-A51 and 39100-TS9-A61.

I am providing some additional information for the write-up for installing the Bus cable even though I am not able to successfully install this at this time due to the fact that on the back of the HU there is NOT a 14pin S plug to hook the XM Unit into. I will provide pictures of what I run into and will leave it open for the above information to be answered and finish my write-up if possible.

Here is the model of the radio that is in my car and I believe the navigation one as well and their FCC information on them. https://apps.fcc.gov/oetcf/eas/repo...=N&application_id=366245&fcc_id=UJHNR241NR243 You might get an error on this link since the FCC has a timeout of 500 seconds on this request. if that is the case open google and search for "UJHNR241NR243" you will get a link that comes up with the following information OET Exhibits List. Click this and there is a lot of information on the radio HU.

So to install the bus cable I am going to follow the following instructions set to get it installed (Don’t Use this for ordering parts but in how to run the cable) - http://www.handa-accessories.com/civic/07xmsi.pdf

I am not able to continue until I get some answers to the questions above, I am going to provide pictures of the back of the stereo and wiring harnesses from this point. I hope to get answers to finish the full install of this and then onto Part 3 of my write-up Navigation and based on the FCC information I believe that this is possible too.

HUModelNumber_zps5f8fdb52.jpg


The following pictures are the HU and wiring - I would like more information about these. I will put the pictures in order of the head unit's backing.

HUBack_zps40e140fb.jpg


TOP Row of HU (No Duplicates can get the top (since pic is upside down) of the one pictured bellow let me know and ill get it)

1Pin_zps26b33d32.jpg
24Pin_zpsa4a0a0f7.jpg
HDMIAux_zps6a1c68b3.jpg
USB_zps27b57fec.jpg
GreenCam_zps9cf574e8.jpg


BOTTOM Row of HU (Dupes to include top and Bottom of plug (12 Pin Top, Bottom)(Main Plug Top, Bottom)) Beige Plug I put in here upside down) sorry will get updates to correct

Antennas_zps06e6c2c8.jpg
12PinTop_zps7bb662b0.jpg
12PinBottom_zps2313e908.jpg
BeigePlug_zps69fd8b04.jpg
8Pin_zps86ef2fdd.jpg
MainTop_zps485812c9.jpg
MainBottom_zpsf0151a00.jpg


Now the Issue since there is not a plug of this type on the back of the HU (The speculation is the beige plug for this hence I need the pin out information above to confirm or deny and how to put it together.) - then the shape of the S Connector that goes to the XM Unit - 14 Pin

SPlug_zps0812f027.jpg


Top Wires S Connector

TopSPlug_zpsaa761f6a.jpg


Bottom Wires S Connector -

BottomSPlug_zpsaa761f6a.jpg
 
Last edited:
Part 3 - Add Navigation?

I am going to finish the XM and then I will reveal plans for this one (Saving this spot for this)

This is from the GPS Antenna "Yes that is installed and working in the Base Model 2014 Civic Si"

GPSInformation_zpsb88dea8d.jpg


Something tells me that I just need Maps and some software. ;)
 
Last edited:
I had a question that may or may not be related to the work that you are doing to your car. I purchased the 14 EX-L Coupe with out the Nav Upgrade. I did not want to waste the extra $1500.00 on nav. My question to you is when you complete this project will you gain the "HD Radio" feature or is that something that comes with the Nav portion of the car? If this question is too off subject please feel free to ignore.

Nice work so far on your write up.
 
Looks like gps is on green. Is there a way we can add a navigation icon on our 14civic.. thats a nice write up.. cant wait to see ur project working...keep up the good work
 
I had a question that may or may not be related to the work that you are doing to your car. I purchased the 14 EX-L Coupe with out the Nav Upgrade. I did not want to waste the extra $1500.00 on nav. My question to you is when you complete this project will you gain the "HD Radio" feature or is that something that comes with the Nav portion of the car? If this question is too off subject please feel free to ignore.

Nice work so far on your write up.

That is a debate and there is different speculations on this and I even have a bet as to if I will gain "HD Radio". It is something I am looking to gain access to and I will update this thread if I do or don't gain access.
 
Looks like gps is on green. Is there a way we can add a navigation icon on our 14civic.. thats a nice write up.. cant wait to see ur project working...keep up the good work

You have great eyes my friend. I have updated the Part 3 post with information that you noticed. ;)
 
Lots of information has been posted and hope for some help from the community. I will research and wait and update as I get more information.
 
@Billy Ray from review of the fcc documents there are (2) different head units out there for the 2014 product line to my understanding.. The 241 and the 243 and ONLY the 243 Model has the additional HD Radio Tuner Information on the fcc label attached to the unit which would indicate to me that only the 243 Model has the HD Tuner built into the head unit. The XM was an accessory expansion that could be attached to either model but I somehow suspect this is why Honda did NOT offer this as a upgrade option as they only "Developed" two versions of the Head Units Operating system that as many have speculated to be a windows CE or Automotive enviroment.. Each Option is linked to a certain executable in the windows OS and if you did the low and dirty somehow of using the 243 software on the 241 HU you would have the HD Radio exe shown but would NOT work since this unit does NOT have the digital tuner. Since it would appear Honda/Developers obviously didn't intend to have an easy way to backdoor enable/dissable features or to offer adding XM to Non-Navi units even once the XM unit is added I can only speculate that you will not have the XM button on the UI to select this accessory. I am really hoping I am wrong but Slick is a pioneer here and I will be very eager to find out the results as I have a 2014 Honda EX that I would love to add SiriusXM to.
 
Also came across this option on collegehills website...
http://www.collegehillshonda.com/product/08A15-TR0.html

This accessory appears to be for the HF Civics only and from looking at other sites it does NOT appear to offered elsewhere and I would assume this is because the HF model doesn't have the touch screen unit and so therefore doesn't have a windows ce environment to access the radio functions. I suspect that in order to obtain the XM Application on the headunit you would need to purchase p/n: 39107-T5R-A51 but I can NOT be sure that the SD card or the HU contains the OS.. From reading various parts sites it would appear this part is quite costly 500+ and is a "controlled" item.. if I were to have to guess that due to licensing it would be restricted to you vin or something.. Can no confirm this so only throwing more doubt out there but I am trying to help :P Fingers crossed and you prove me wrong. Hope you get the basic functionality connected so the diag screen shows green on the XM unit and not yellow soon so we know at least in the basics that parts are all nailed down.
 
Last edited:
Also depending on the site it would appear that if you wanted to buy the "Audio Plus" unit you would pay $280 or so and possibly an additional $1000 dollars (CORE Fee) which is refundable if you send them the exact same unit back.. not sure if this could be gamed and send them the regular radio or not.
 
Also came across this option on collegehills website...
http://www.collegehillshonda.com/product/08A15-TR0.html

This accessory appears to be for the HF Civics only and from looking at other sites it does NOT appear to offered elsewhere and I would assume this is because the HF model doesn't have the touch screen unit and so therefore doesn't have a windows ce environment to access the radio functions. I suspect that in order to obtain the XM Application on the headunit you would need to purchase p/n: 39107-T5R-A51 but I can NOT be sure that the SD card or the HU contains the OS.. From reading various parts sites it would appear this part is quite costly 500+ and is a "controlled" item.. if I were to have to guess that due to licensing it would be restricted to you vin or something.. Can no confirm this so only throwing more doubt out there but I am trying to help :P Fingers crossed and you prove me wrong. Hope you get the basic functionality connected so the diag screen shows green on the XM unit and not yellow soon so we know at least in the basics that parts are all nailed down.


This appears to be the case here where the HF unit is only supported due to the fact that it has the S Shaped cable in the back still, allowing for the easy addition to the Head Unit. I have since found a lot of info and working with someone at the moment to find out what is needed to make this work. I hope you are wrong on the XM Icon and I think that I am on the right track for it being available, that it will be the final piece if and when I can get it hooked to the HU. I am still holding out hope that this can be accomplished and I will keep this updated as to my progress. Also I need to correct some information above in the pictures. That will be coming soon.
 
Its really too bad someone couldn't image the Navi SD card in your HU to check... sadly Im guessing they are locked by VIN or something so even buying one might not be enough... I really want the "Factory" XM Look on my head unit too so hoping I am wrong.. Keep us updated and don't give up, I have my fingers crossed.
 
I haven't given up I am still going in the background, There is not much to post about but I do have corrections to make in the photographs above. Sorry it has been taking some time to post more information. I have to verify a plug and its information to find out if they are the same or not between Nav Unit and Non-Nav Unit. I am getting close to other information as well and will post as I get further.

Slick
 
VAIS makes a integration unit. Model #GSR-021. You will also need the SiriusXM Satellite radio module SXV200. The unit should work with all USB units. It looks like it emulates the IPOD functionality. It looks like it is definitely accommodating solution. My thoughts is to try the usb cable located behind the glove box or use the one within the arm rest for integration.

I have a SXV200 unit in my tool box full of equipment from my 14 year installation career I ended this past January (moved onto other things).

I will most likely order this unit within the next few weeks and will inform how it goes. I would have ordered it tonight; however, their tech support agent was not very friendly. I have dealt with many in the car audio world and just not willing to give him any type of potential commission.

Please let me know if anyone decides to order this before I do.

http://www.vaistech.com/site/gsr.php
 
Last edited:
I haven't given up I am still going in the background, There is not much to post about but I do have corrections to make in the photographs above. Sorry it has been taking some time to post more information. I have to verify a plug and its information to find out if they are the same or not between Nav Unit and Non-Nav Unit. I am getting close to other information as well and will post as I get further.

Slick

Please don't give up. I too am a disappointed 2014 SI owner without my XM. I think that it's ridiculous that Honda didn't give us the option to have the XM built in, and force us to use our data plans. I am hoping that you are successful and that you do post the solution when finished so that I can do it too! You have done great work so far - too bad the manuals aren't as thorough as you are!
 
Please tell me youre still working on this project! i would really love to have navi on my civic
 
Please don't give up. I too am a disappointed 2014 SI owner without my XM. I think that it's ridiculous that Honda didn't give us the option to have the XM built in, and force us to use our data plans.

If you wanted XM, then buy the model that features XM, which is the Navigation model. Honda did not force you into anything, nor did they force you to use your data plan. If you don't like how Honda offers extra features in their cars, especially the Civic, then don't buy a Honda.

The XM tuner typically has the standard 14-pin aux connector and the antenna connector. If the 14-pin connector is in use, then you would likely need the Y-harness for the 14-pin connector. Once you plug in the XM tuner, it should work if the Non-Navi DisplayAudio head unit is XM-ready. XM has typically been accessed by pressing the CD/Aux button to toggle between CD, Aux, and XM. The DisplayAudio unit probably has a source button and XM1 and XM2 should automatically appear among the list if the unit is XM ready. If it does not work after plugging it in, then Honda screwed the pooch and only made the Navi DisplayAudio unit XM-ready. In that case, you would need to replace the head unit with the Navi model. That would of course give you XM, HD Radio, and Navi. But that type of upgrade would be thousands more than buying the car originally with Navi.
 
Last edited:
I just saw the short comment in which the OP claimed he wanted XM and alleged the sales person lied to him when he bought the car, alleging it had XM. If that were true, then he would have recourse against the dealer for misrepresentation. Instead he keeps the car and now tries to add XM himself. I wonder why he didn't know this when he bought the car? The brochure was readily available on the Honda website to read and understand what each model offered. When he inspected and test drove the car, it would be blatantly obvious that the car did not have the XM antenna on the roof (as all cars with XM have the antenna on the roof). If he wanted XM at the time of purchase, why didn't he ask the salesman to show him every feature, including XM? Then he would have known the vehicle did not have XM when the salesman could not show him a feature the car didn't have. I have a hard time believing he was lied to by the salesman, when he could go back to the dealer to file a complaint for misrepresentation if the salesperson told him it had XM. What he needs to do is make a custom 14-pin cable and plug in the XM tuner. Since his diagnostic screen had an icon for XM, the non-navi DisplayAudio unit might be XM-ready.
 
Back
Top