Seeking a helping hand in the LA area

s0nSoFtHeWoRlD

Well-Known Member
84
55
California
Vehicle Model
Civic
Body Style
Sedan 4 DR
Hey everyone, I'm wondering if anyone in the LA area who has experience with installing the Progress Rear Sway bar would mind lending a helping hand, since I do not have the floor jacks/stands or the ramp to conduct this installation. I have the Rear Sway Bar as well as the end links. Just the means of conducting this installation is iffy for me. Any tips would also be greatly appreciated.

Willing to make the drive for the install. I've had this sway bar for weeks now, and it bugs me that it is not installed yet T-T
 
If I was there Id help you do it before lunch time today.

I have three big tips:

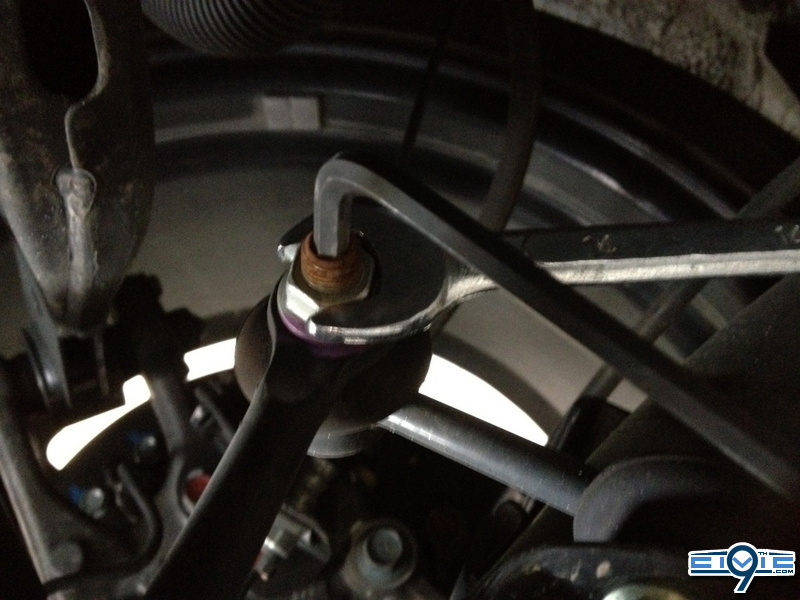
1) Its really not too hard at all. The hardest part will be removing the old nuts from the stock end links. Take a wire brush and clean the threads first. Or a dang toothbrush and some windex. Whatever works. Just clean them! It makes it a lot easier when you aren't trying to cram the nut over dirt jammed in the threads. A little PB blaster or similar penetrating oil on each one makes quick work of them too. Stick a 5mm, I think, allen key in the end. You'll understand when you look at them. Then use a wrench to undo the nut while you hold the center post with the allen key from turning. P.I.A.

2) Use Ramps not jack stands. Pick up a set of ramps at a pepboys/autozone/ or "vat ozone" (since you're in LA)/or similar place for like $40, maybe $50. They are pretty dang useful.

http://www.pepboys.com/product/details/9867916/00214

harbor freight:

http://www.harborfreight.com/magnum-16000-auto-ramp-set-with-built-in-safety-chock-67722.html

Its actually easier to do on ramps than jack stands. If you use stands the control arms sag and pull the end link away from the bar. Its trickier to do. The ramp holds the wheel, control arm, and endlinks in place and makes the connection much easier. This is not a part that needs to be installed under load/compression or anything like that. If there are no cornering or lateral forces then there should be no tension on the bar.

Its part of what makes this install so easy and safe. You don't have to worry about anything being loaded when you unbolt it. Nothing is going to fly off at you or try to hit you. Well, the bar itself is heavy and theres that gravity thing to watch out for.

3) GREASE the bushings. Also, once you are done installing drive around the block for a few minutes and make some turns. Then go home, back onto the ramps again, and check the tightness of all the nuts and bolts. Then drive around all week. Check the nuts and bolts again next weekend to make sure nothing came loose. If you hear a noise or think you do go home and check all the nuts and bolts again.


install stuff: The DIY guide on here is pretty complete.

Once you're under the car take a picture of the stock sway bar. That way you can make sure and put the new one on in the correct orientation. I believe its possible to install it upside down pretty easily but you'll get clunking after that lets you know you F'ed it up. Just make the new bar look the way the old bar did.

I would undo the end links first. Then there are the two bushings and their brackets. The bushings have an upper and lower bolt. Those thread into the L-shaped brackets that are bolted to your car. The bracket has the threads in it. You don't need to worry about dropping a nut on the back of them. Also, with the updated 2012+ civics the frame bracket is nice and long on the non-Si models so you do not have to run the extender hardware that Progress supplies. Those are the long flat pieces. Not needed.

You should run the reinforcement plates that they sent. Those are the large flat ones that have a triangular point sticking off one side of them. They look confusing but make sense once you line them up. You will need to remove the end link completely to install them. The go between the end links lower mounting point and the rear lower control arm. These are important. Use them!

Its 4 nuts on 2 end links and then 4 bolts for the bushings to remove the stock bar. We are talking about removing 8 total nuts/bolts. That is minimal. Install is 10 connections. You should be using the reinforcement plates and putting a nut and bolt through at least one of the extra holes on the plate and your lower control arm. Its easy easy easy even with just hand tools. They just take longer.

Put the new bar on with the bushings first. They hold it in place while you do up the end links. This is the tricky part cause the new bar is heavy. Holding it up and getting the bushing/bracket lined up and starting the bolts is a pain by yourself. Once both bushings are on lining up the end links and reinstalling is just a matter of getting even sweatier while you crank the nuts on 1/8 turn at a time while holding that allen key at a funky angle.

Got it done? Go for a drive and feel how planted the car is. Hit an off ramp with a little speed and you should notice a huge difference. Drive 70mph and change lanes on the 101 or the 405 (hah!) and tell me the car doesn't feel more stable. Thats it man. I think you should be able to handle it yourself. A second pair of hands is nice especially for holding the bar in place when you put the brackets and bushings back on.
 
Another one. This one shows the removal of the end link nuts with an allen key and wrench if you don't have a nice impact gun like the first one. Also you can see the rust on the threads. Clean em up first and hit them with PB blaster. You'll have a much easier time.

http://9thcivic.com/forum/threads/eibach-19mm-rear-sway-bar-install-part-numbers-included.4808/


IMG_0197.sized.jpg
 
Back
Top