- Staff
- #1
Difficulty: On a scale of 1-10, about a 1 or 2
Tools and Supplies Needed:
4 quarts of 5W20 oil (2013 and up now recommend 0w-20)
Honda oil filter or equivalent from local parts store
Drain plug crush ring from dealer or parts store
17mm wrench to remove oil pan drain plug
Oil catch pan
Oil filter wrench
Papertowels
Rubber gloves (optional)
Generally oil changes are easiest when the engine is slightly warm, attempting this after your 45 minute drive home would be a bad idea.
1. Get your car in the air, use your preferred method of choice to do this, ramps/lift/jack and jack stands. Make sure you are familiar with whatever method you intend to use and are able to make sure the car is stable and safe to get under. Under no circumstances should you get under the car supported by only a jack. If using ramps or jack stands, be sure to set the parking brake and put some sort of wheel chock or block behind the rear wheels.
2. Pop open the hood, and loosen the oil cap, this helps the oil drain more easily.
3. Get under the car and look for the oil pan drain bolt. It is actually cast into the pan "Engine Oil" The bolt is circled in red.

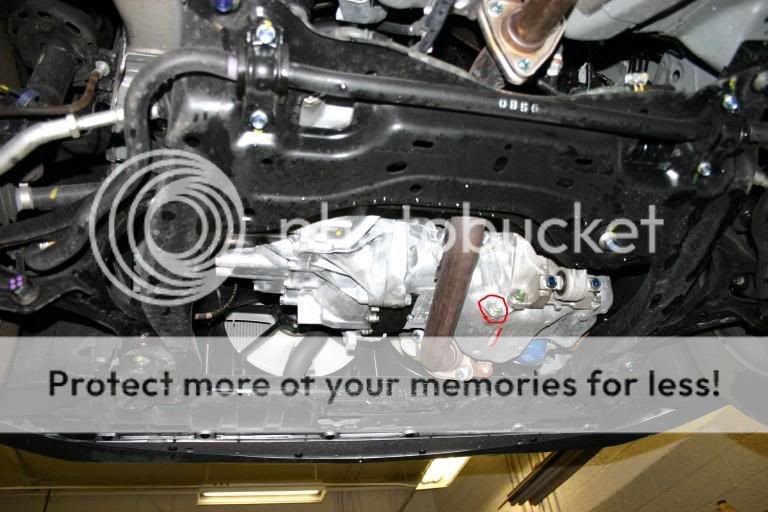
From under the car, loosen the drain bolt with your 17mm wrench and position your catch pan underneath the drain plug. Usually it is easier to loosen it with the wrench and remove it by hand. The oil will shoot out a bit so if you center the catch pan under the drain you will likely spill oil.
If your oil is hot this is a good time to use the gloves so you can quickly get the hot oil off your hands.
4. Using your oil filter wrench, remove the filter (blue thing in the pictures), since it is vertically mounted it will be full of oil and try to drip on you.
5. Unwrap your new oil filter, dip a finger in the old oil and run it around the rubber seal on the bottom of the filter, this helps avoid leaks and makes a better seal against the mounting.
6. Opinions differ at this point, some people feel that vertically mounted filters should be filled with oil before installing. Personally i have never done this. Reinstall the new filter making sure not to cross-thread it! The threads are aluminum and will rip out if you over tighten things. Put the filter on to hand tight, then use your wrench to give it 1/4 of a turn past hand tight.
7. Remove the old aluminum crush washer from the drain bolt and put on a new one. Sometimes after a dealer has used their air tools i have had to use a pair of vice grips to thread the crush washer back off.
8. Once the oil has stopped actively draining from the pan you can put the drain bolt back in. You want to torque this down fairly tight since the aluminum crush washer will deform and create a better seal when you torque it down. Air tools should be avoided here however since extreme over torquing can rip the threads out of the oil pan.
9. Pour the new oil into the top of the engine, the r18 is listed as taking 3.9 quarts of oil. You can safely pour all 4 quarts into the engine and have it fill to between the upper and lower marks on the dip stick. Put the oil cap back on. Remember, if your car is up at an angle the dip stick will not read accurately.
10. Put the car back on the ground, start the engine and make sure the oil light turns off and stays off.
11. Reset the oil life meter: Directions for this are in the owners manual. This is accessed via the maintenance menu in the i-MID system
Once the car has settled for a little bit you can check the dipstick to make sure the oil level is appropriate.
Si oil changes follow the same principles however the oil filter is in a different location and the engine takes more oil.
Tools and Supplies Needed:
4 quarts of 5W20 oil (2013 and up now recommend 0w-20)
Honda oil filter or equivalent from local parts store
Drain plug crush ring from dealer or parts store
17mm wrench to remove oil pan drain plug
Oil catch pan
Oil filter wrench
Papertowels
Rubber gloves (optional)
Generally oil changes are easiest when the engine is slightly warm, attempting this after your 45 minute drive home would be a bad idea.
1. Get your car in the air, use your preferred method of choice to do this, ramps/lift/jack and jack stands. Make sure you are familiar with whatever method you intend to use and are able to make sure the car is stable and safe to get under. Under no circumstances should you get under the car supported by only a jack. If using ramps or jack stands, be sure to set the parking brake and put some sort of wheel chock or block behind the rear wheels.
2. Pop open the hood, and loosen the oil cap, this helps the oil drain more easily.
3. Get under the car and look for the oil pan drain bolt. It is actually cast into the pan "Engine Oil" The bolt is circled in red.
From under the car, loosen the drain bolt with your 17mm wrench and position your catch pan underneath the drain plug. Usually it is easier to loosen it with the wrench and remove it by hand. The oil will shoot out a bit so if you center the catch pan under the drain you will likely spill oil.
If your oil is hot this is a good time to use the gloves so you can quickly get the hot oil off your hands.
4. Using your oil filter wrench, remove the filter (blue thing in the pictures), since it is vertically mounted it will be full of oil and try to drip on you.
5. Unwrap your new oil filter, dip a finger in the old oil and run it around the rubber seal on the bottom of the filter, this helps avoid leaks and makes a better seal against the mounting.
6. Opinions differ at this point, some people feel that vertically mounted filters should be filled with oil before installing. Personally i have never done this. Reinstall the new filter making sure not to cross-thread it! The threads are aluminum and will rip out if you over tighten things. Put the filter on to hand tight, then use your wrench to give it 1/4 of a turn past hand tight.
7. Remove the old aluminum crush washer from the drain bolt and put on a new one. Sometimes after a dealer has used their air tools i have had to use a pair of vice grips to thread the crush washer back off.
8. Once the oil has stopped actively draining from the pan you can put the drain bolt back in. You want to torque this down fairly tight since the aluminum crush washer will deform and create a better seal when you torque it down. Air tools should be avoided here however since extreme over torquing can rip the threads out of the oil pan.
9. Pour the new oil into the top of the engine, the r18 is listed as taking 3.9 quarts of oil. You can safely pour all 4 quarts into the engine and have it fill to between the upper and lower marks on the dip stick. Put the oil cap back on. Remember, if your car is up at an angle the dip stick will not read accurately.
10. Put the car back on the ground, start the engine and make sure the oil light turns off and stays off.
11. Reset the oil life meter: Directions for this are in the owners manual. This is accessed via the maintenance menu in the i-MID system
Once the car has settled for a little bit you can check the dipstick to make sure the oil level is appropriate.
Si oil changes follow the same principles however the oil filter is in a different location and the engine takes more oil.
Last edited: