ECU Ground Location

k24ManSam

Well-Known Member
53
13
Tulsa, OK.
Vehicle Model
Civic
Body Style
Si Coupe, EX Sedan
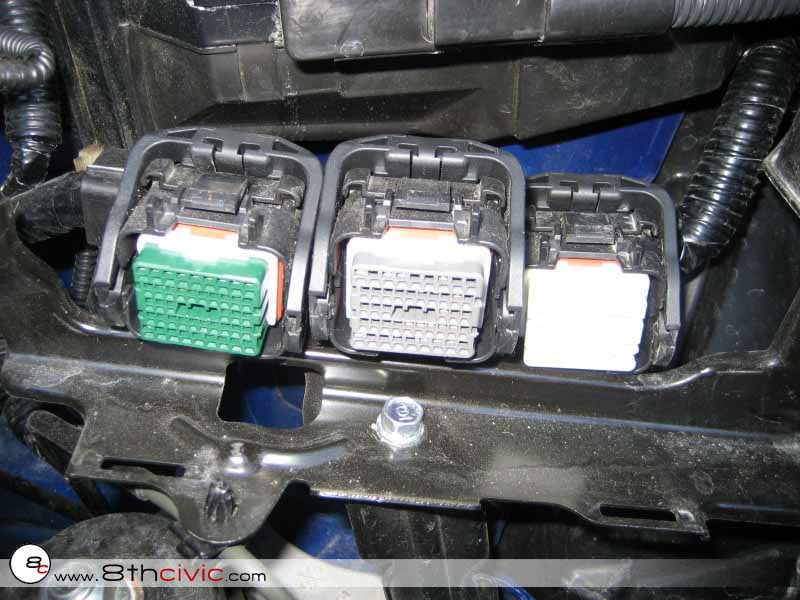
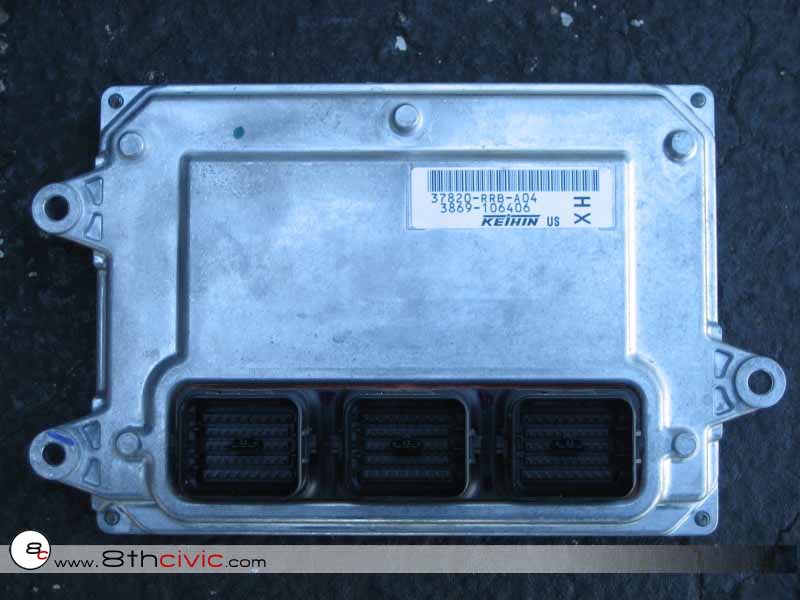
I have been working with Vit Viper and getting my ecu tuned up. Progress is good and can tell a huge difference since getting the FlashPro. He has noticed a drop in voltage on my datalogs when going to WOT from 14 to 12. He is hoping it is a ground issue. On that note, does anyone have any pics or other visual references that I can use to check the ground for my ecu?
 
best pics I could find

injen2.sized.jpg


ecubolts.png


As you can see in the picture above, the ECU is in our engine bay on the driver's side, between the airbox and fusebox near the firewall.

Step 1 (optional): Using the 10mm socket and ratchet, remove the positive and negative battery terminals and loosen the battery tie down bolt enough to move the metal hook. Swing the battery tie down away from the battery and gently pry up on the black plastic battery box to remove it. Now completely remove the battery.

Step 2: Gently pull up on the black plastic cover surrounding the ECU, it should pull right off with very little force at all. You should now see the three 10mm nuts exposed highlighted in the picture above.

Step 3: Using the ratchet again with the 10mm socket, loosen the nuts until you can turn them with you fingers, but don't completely remove them. You may need to use the 10mm wrench if your ratchet isn't low profile enough to fit on the #1 nut above, the one closest to the firewall. That reservoir there can be kind of a ***** to get a socket on the nut.

Step 4: Hopefully you didn't remove the nuts completely, because the next part will be much easier if you still have some leverage to work with. I tried using my thumb for the next part and had no success, busted out a flat tip screwdriver and problem solved. There are 3 wiring harnesses that clip into the ECU, the way to remove them is to push/pull the black plastic clip towards the driver fender, if done correctly the clip should move completely to the right and you will be able to wiggle the harness out of the ECU with a little force.

Step 5: Now that you have removed the three different wiring harnesses, completely remove the nuts from the threads holding the ECU in place. The bolts don't move, they are a part of the bracket holding the ECU in place, so removing the nuts won't cause the ECU to drop. To remove the ECU push it away from the fuse box to push it off of the threads and just pull out to remove it from the car.

Completing the Reflash
Hondata will not sell their services directly to the public, I'm assuming for tax reasons. So you are forced to purchase the reflash service through an authorized dealer, which can be found on this list: Dealers. I purchased my reflash through CorSport USA (CorSport: Honda - 2012+ Honda Civic Si - 2012sireflash), but I am sure there are several other places you can purchase it from. Once you complete the purchase, print 2 copies of your receipt if you want a copy for your records.

Step 1: Now that you have purchased your reflash, package your ECU in a small box preferably with bubble wrap or newspaper. I personally wouldn't use packing peanuts as the metal pins are exposed on the ECU and that could just get messy in the sockets. If you don't have a box, I would HIGHLY recommend taking your ECU to the post office and using their small/medium flat-rate express box.. more on that later.

Step 2: If you purchased online, you should receive an e-mail with this form: Hondata ECU Reflash Form. If you are impatient like myself and don't want to wait for the e-mail, you can fill the form out yourself. The only caveat is that you will need the dealer's name who you purchased your reflash from. If you purchased through CorSport, the name on the form they sent me was Hybrid Racing. Fill in the other details like name, address, phone, email, etc. Place a check next to ECU/Signed copy of the form/Dealer Receipt. Also next to 2012+ Si, no ****. For application put K24Z7, also no ****. Print the form and sign and date it.

Step 3: Place the ECU in the box,It is very import that you include a copy of your receipt and the signed hondata authorization form. Pick your poison when it comes to shipping, I got a quote for USPS, UPS, and FedEx and for me from AL to Hondata in CA and USPS came up the cheapest by a longshot. Their flatrate express service guarantees the ECU by 3 P.M. the next day and for the box that is the perfect size for our ECU is 39.95, UPS quoted me 66 for overnight and FedEx was 60 as well. You will need to send your ECU to the following address: Hondata, Inc. 2840 Columbia St. Torrance, CA 90503

 
someone else will need to chime in. What you've circled definitely looks to be a ground to something. I just don't know if that has anything to do with the ecu.

the ecu for the 8th gen si had 3 connectors shown below

y025uEv.jpg


removing the 3 connections
6oRGH0t.jpg


3 plugs
mw13uYM.jpg


ecu removed
2vsb8ac.jpg
 
Compared to what I can see from my ecu it appears the same with the same 3 connectors. I am trying to help Vit Viper on the mechanical end of my tune as I stated in my original post, and would like to know what I am looking for before I tear into my car and put it out of commission. Hopefully someone else can chime in, maybe College Hills Honda.
 
Compared to what I can see from my ecu it appears the same with the same 3 connectors. I am trying to help Vit Viper on the mechanical end of my tune as I stated in my original post, and would like to know what I am looking for before I tear into my car and put it out of commission. Hopefully someone else can chime in, maybe College Hills Honda.

CollegeHillsHonda
 
VitViper - this is the thread I was talking about. Is this response from you for this user who started the thread?

This if for ANYONE installing a thermal intake manifold gasket. In fact, even if you have the stock gasket it's a good idea to move the ground when using FlashPro. From what I recall, there are two wires that come off the fuel rail wire loom and ground to the intake manifold. Move those 2 to the head.

I wish I had seen these DIY threads earlier -- I could of warned you of the dangers of not relocating the ground to the head. I bet everyone that's done this has left the ground on the intake manifold. When you install the thermal manifold gasket it insulates the manifold and creates a VERY high resistance ground -- this is bad, as the electrical system wants to seek out the lowest path of resistance. Fizzle goes stuff in your electrical system when this happens. I've seen people fry their ECU's an FlashPro's when grounded to the intake manifold (usually the FlashPros).

So be smart, ground to the head! It's VERY easy.
 
Yes this is pertinent info for Chad as that voltage drop is exactly what I see. The ECU ground I'm concerned about is on the intake manifold -- the ground at the transmission is fine the way it is. I had this issue pop up with several customers at what seems like almost the same time and still trying to follow up with all of them :(
 
So I finally changed the grounding for the fuel rail from the manifold to the head. Only tools need were a 10mm socket with ratchet and 10 minutes. We will see how this affects my tune.
 
VitViper, I will send you a datalog as soon as the snow clears out of Tulsa, Oklahoma.
 
VitViper this shouldn't apply to those who are using the PRL intake adapter plate correct? I'll check with a multimeter to be sure. But I assume since its all metal to metal contact. It should be fine. Maybe even better than with the stock gasket.
 
I did a datalog today. The voltage drop is gone and now is actually a rise. Not a full 14v but definitely a rise to above 13v. I was informed by VitViper through Hondata that the voltage drop is intentional and the only way to run at full 14v is to run with headlights on.
 
Back
Top