The purpose of removing the front sway bar on your 9th gen civic:
- 8th generation coilovers do in fact fit out cars. For the rear, it is already known that you must order 8th gen rear rubber isolators for the springs because the 9th gen top hats and springs are smaller. This will allow for a snug fit of the 8th gen rear springs on your 9th gen chassis.
- 8th generation civics do not have a factory front sway bar. Our 9th generation civics DO have a front sway bar from the factory. This means when you install the 8th gen coilovers, there will be no mount for the end links and the front sway bar will not bolt to anything. If you simply remove the end links and install the 8th gen suspension, your front sway bar on the 9th gen will be moving around and sliding back and forth un-controllable.
- This DIY will show the process of how I removed my front sway bar, due to the fact that there is no link mounts.
Disclaimer:
This is a step by step process on how to remove the 9th generation front sway bar, in order to successfully install 8th generation coilovers on a 9th gen civc. This “DIY” (do-it-yourself) is a detailed explanation on how I did it, MYSELF.
I do not take any responsibility for potential actions performed due to this write up. If you decide that you have learned enough, have enough experience, and have the proper tools to do this install…..your are doing so at YOUR OWN RISK. This DIY will be written in first person (as myself) or in the third person (One must, one may, one should…..). Sometimes I will say “you can, try this…, get someone to, etc.” but that will only be for basic tasks, tasks that I know you cannot screw up on or break anything if you *attempt this DIY* at your own risk.
Pre- DIY **Notes** PLEASE READ ALL before starting:
- When removing the front sway bar, one MUST use a hoist and a sub-frame support jack. If access to these tools is not available, one will not be able to complete the installation with ease.
-If the car has a locking lug nut set, please retrieve the locking nut key in the glove box and/or trunk prior to starting any steps.
- The car should be parked in an area with good lighting and possibly some cover just in case of bad weather (if work is done outside)
- Before removing key from ignition, roll down both front windows, fully open sunroof, open trunk and pop the hood.
(While completing the installation, the car will either be on a hoist or on 4 jack stands. One should never enter a car while on a hydraulic hoist OR jack stands for obvious safety reasons. By popping the hood, opening the trunk and rolling down the front windows AT THE START….one will have access to the entire car without ever opening up a door )
- Turn off the car, apply the emergency hand brake and put the car into gear.
DIY: 9th gen Front sway bar removal
Step 1. Start off by using a 19mm socket to remove your lugs nuts on both front rims (Note: If the vehicle has a locking nut set, this is where the pre-DIY preparation comes in handy. The locking key shouldn’t be in the car, and one shouldn’t have to open a door while the car is already on the hoist. )
Also** ( you may skip this very detailed reading if you think you’re a genius already, or if you have some technical/mechanical experience)
It was stated in Pre-DIY to put the car into gear, this will lock the transmission and front wheels…….”but wait a minute!? When ‘one’ goes to remove the lug nuts, the wheels start to spin?? I thought by putting the car into gear the wheels will lock?”
Oh, good observation young grasshopper! Try getting a friend to spin your driver’s side wheel towards the front of the car, while standing on the passenger side of the car you will notice the wheel will start to spin towards the back of the car. That my friend, is your tranny lock. If the car was on a hill and let’s say it started to roll backwards, the front wheel (let’s say) would start to roll back but the passenger side would roll in the reverse order (forward). This in turn would actually cancel out and cause no roll when the car is in gear, either of the front wheels cannot roll in any direction (significantly) without affecting the other. *takes a breath*, So your front wheels while on a hoist/or jack will never actually lock up solid, UNLESS someone is inside the car applying the regular foot brake (very unsafe while car is in the air). You have 2 options, #1 while the car was still on the ground (or just put it back on the ground since you must be using a hoist) just loosen the lug nuts slightly* while the tires are touching the floor. I put stars around loosen lugs *slightly* because while the car in on the floor, it is putting pressure on the studs and rims. You only want to loosen them so that you can continue once the car is in the air. #2 option is to get a friend to hold onto the rim while you are breaking the lug nuts free.
Step 2. Once all of lugs nuts have been removed, one can remove the wheel and place it off to the side.
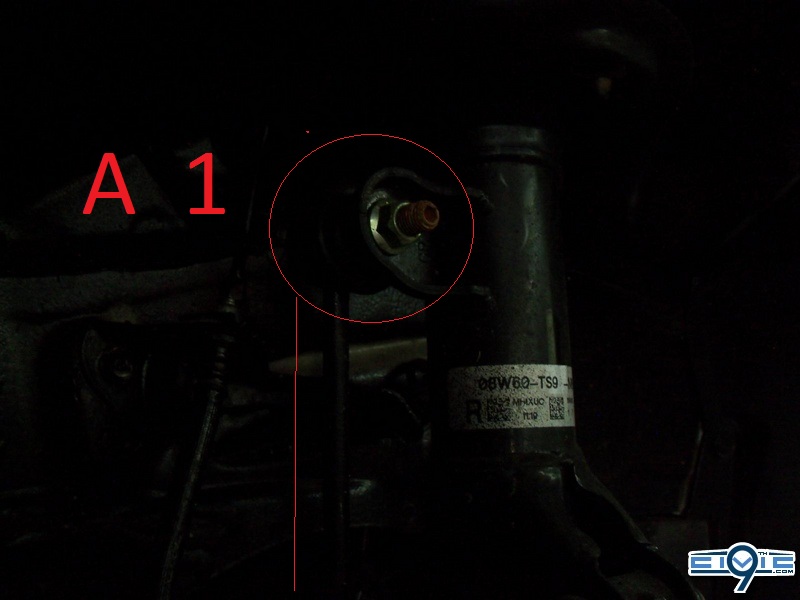
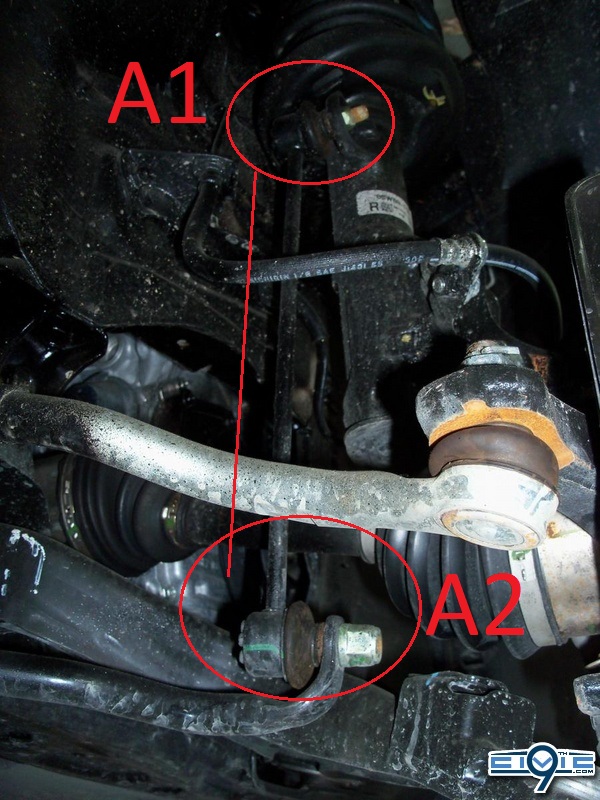
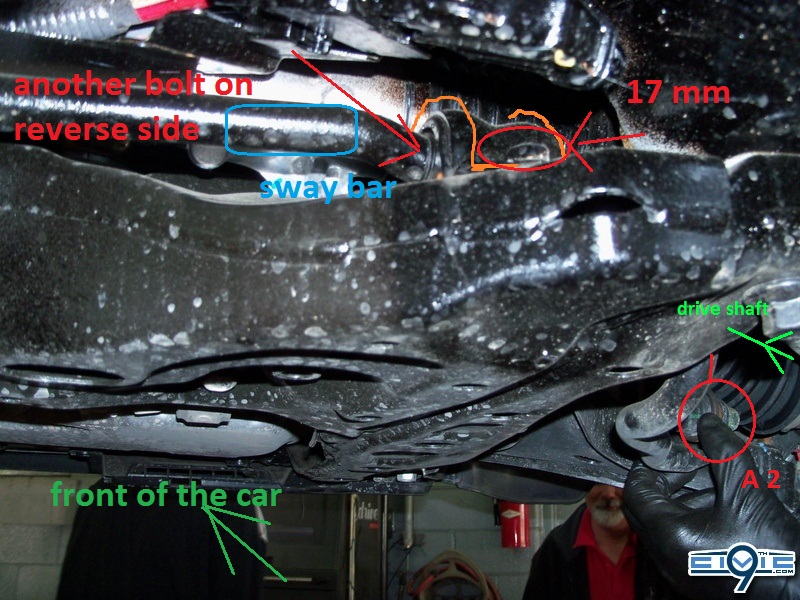
Step 3. A 1 labels the top of the end link bolted to your suspension. Remove the top nut bolting your end link to the shock. The other end of the end link is bolted to the front sway bar.
Pictured below is the location of the top of the end link and the shock assembly, A1
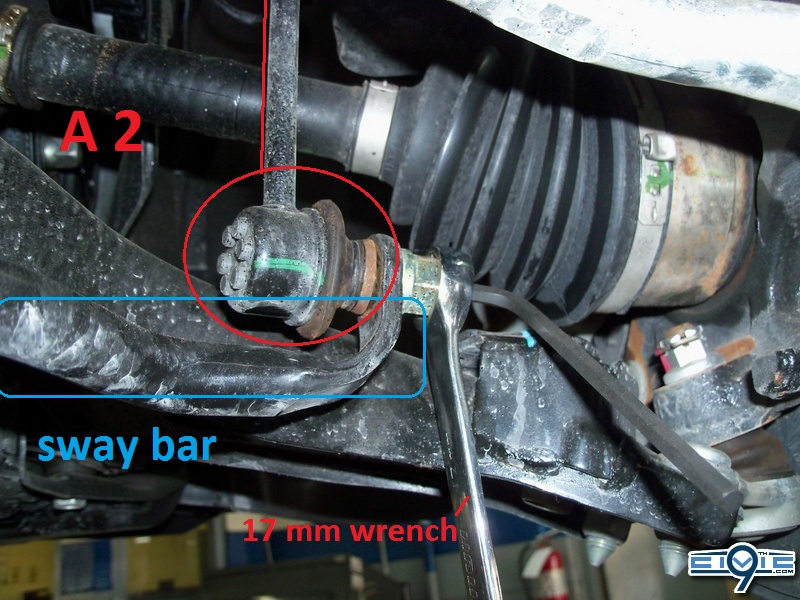
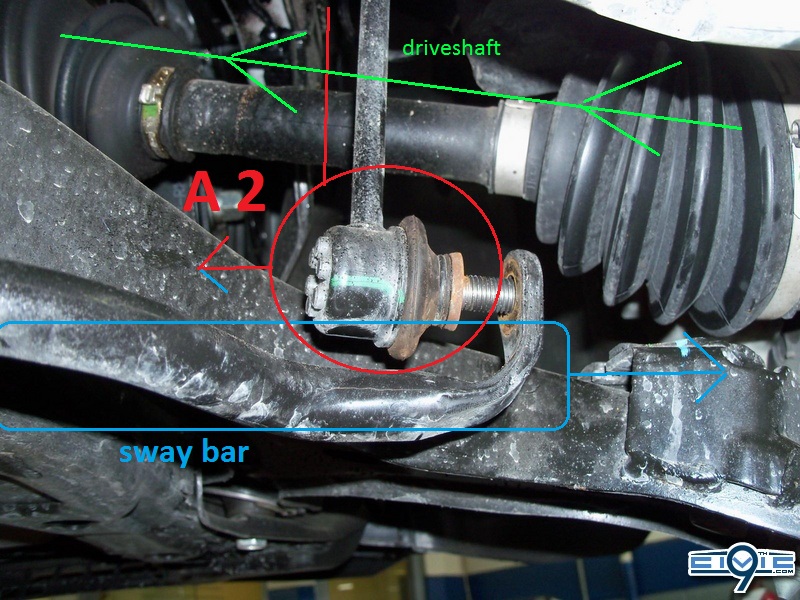
Step 4. A2 is where your front sway bar bolts onto (the other side of the end link)
Step 5. To remove the lower portion of the end link that is bolted to the sway bar, one must use a 17mm wrench over the nut, and place an allen key in the middle portion. While holding the allen key in the same position, one must loosen the nut by turning it to the left. (Remember to hold the allen key)
(I will update this thread later on exact size wrench and allen, I misplaced the paper I used to record the measurements)
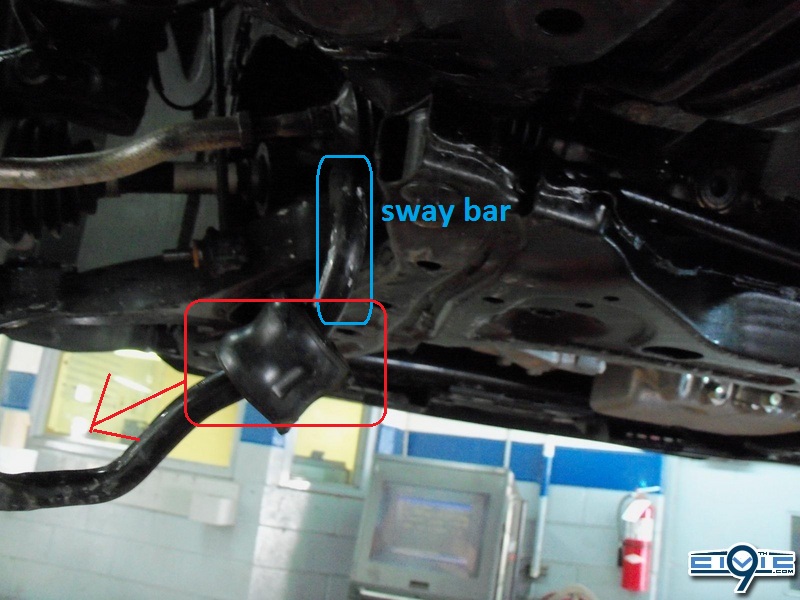
Step 6. Once the nut is removed, the front sway bar should just slide right off.
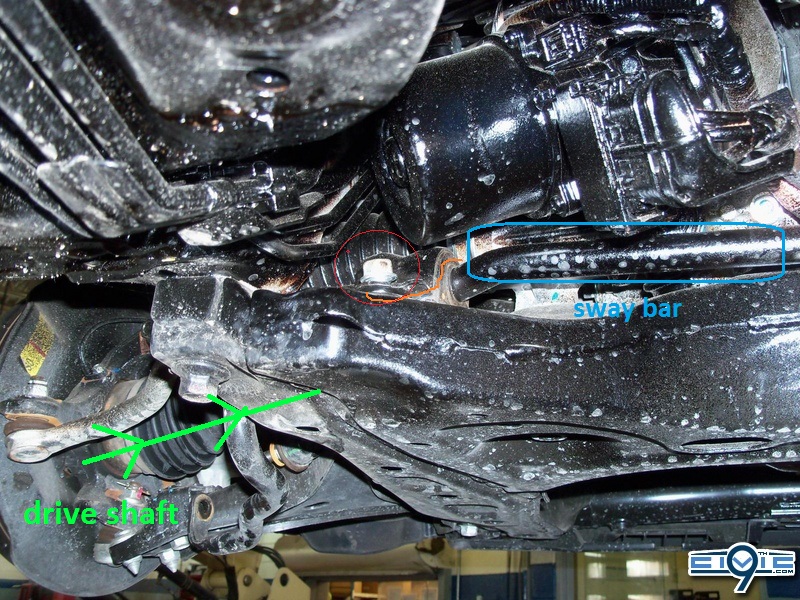
Note** the direction of the arrows and the driveshaft
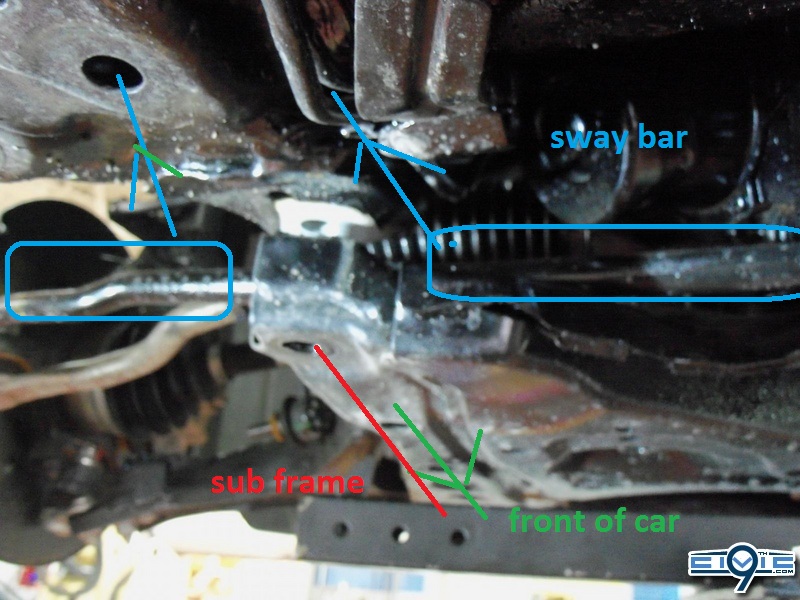
Step 7. Now, looking down the direction of the drive shaft (using the arrows) one will see an upside down u shape clamp in ORANGE. This is the clamp and rubber grommet that is holding in your front sway bar. On other cars this bracket is mounted underneath the sub-frame. That would allow for easy removal, remove 4 bolts and drop the sway bar. On 9th gens, the u clamp and grommet is mounted on top of the sub-frame and the bolts are a little tricky to get access to. One must use a regular flat wrench and patiently remove the bolts half turn at a time.
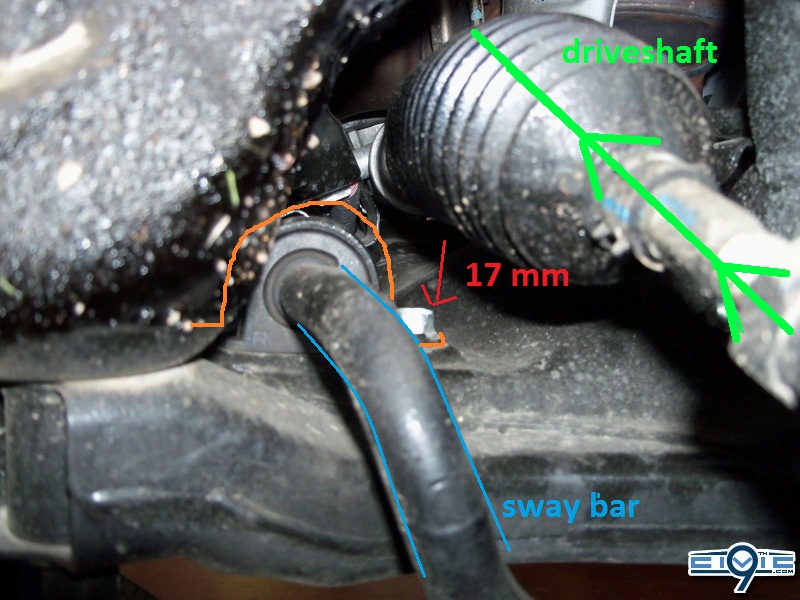
Step 8. The front sway bar has two u clamps and grommets holding it in place, and each clamp has 2 bolts. In step 7, the picture shows the bolt closest to the front of the car. The U Clamp is outlined in ORANGE and there are two bolts in RED you must remove on either side of the ORANGE U Clamp.
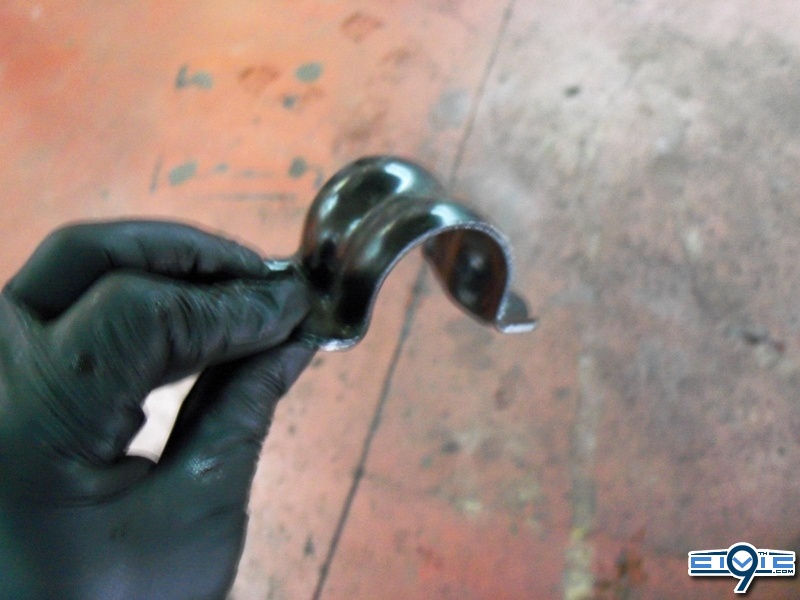
Step 9. The only way to access these bolts is to use a flat wrench and to turn it half turn at a time. It will take a few minute for each bolt, but you will start to make some progress….

Step 10. Once both bolts are removed successfully, one will be able to lift the metal u clamp (orange) and reveal the rubber grommet. Don’t worry too much about the rubber grommet because it has a cut on one side of it, and one can simply pull it off of the sway bar by hand. (both sides)

Step 11. Now once you removed the metal u clamp, you will see the rubber grommet (on both sides)
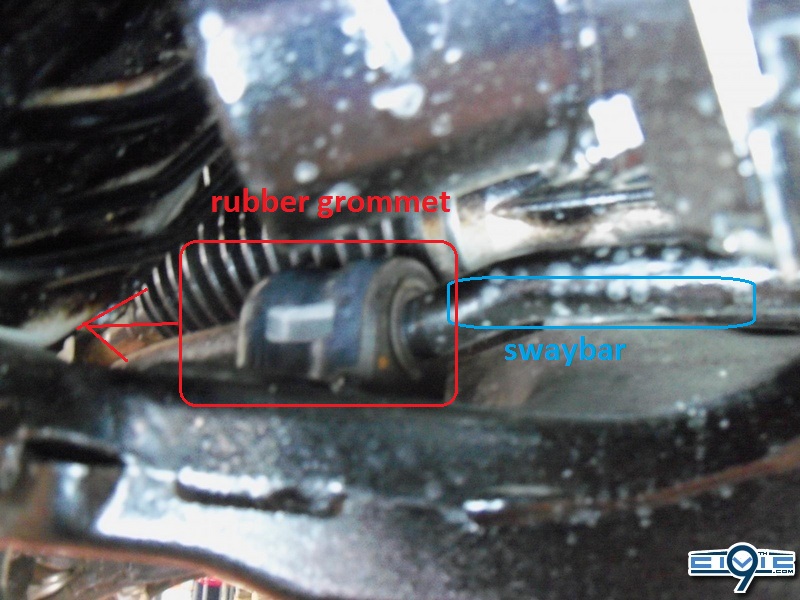
Step 12. Slide the rubber grommet down the front sway bar in order to access it a bit easier… ( you must do so for both sides)
NOTE** So far you have removed:
- 10 lug nuts ( 5 on each wheel)
- 2 front end links ( 4 bolts – two connecting sway bar, two on the shock assembly)
- 2 metal u clamps mounted directly on top of the sub-frame ( 4 bolts in total)
- 2 rubber grommet ( remove by hand)
At this stage, you have un-bolted the front sway bar and all of its components. The only problem that arises is that there is no way to pull of the metal sway bar. The space between the drive shafts and sub-frame is not enough for the sharp bends of the front sway bar to phish around.
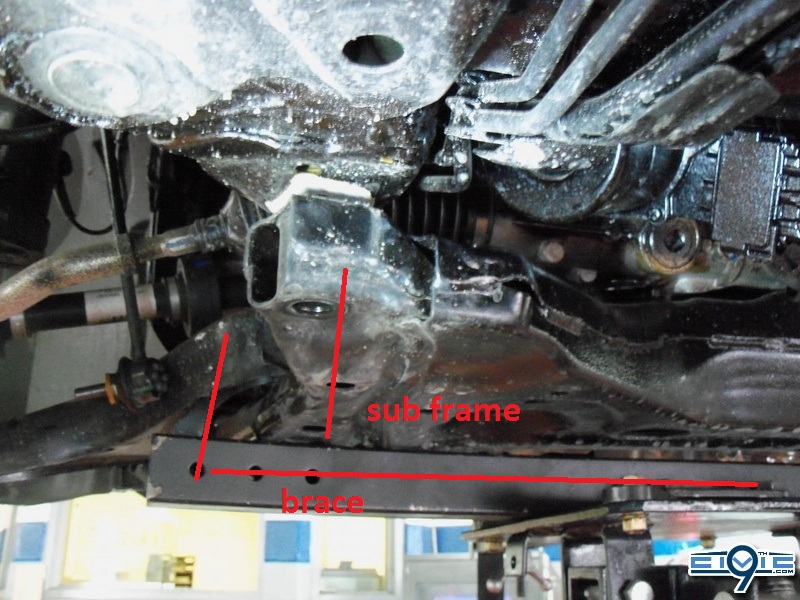
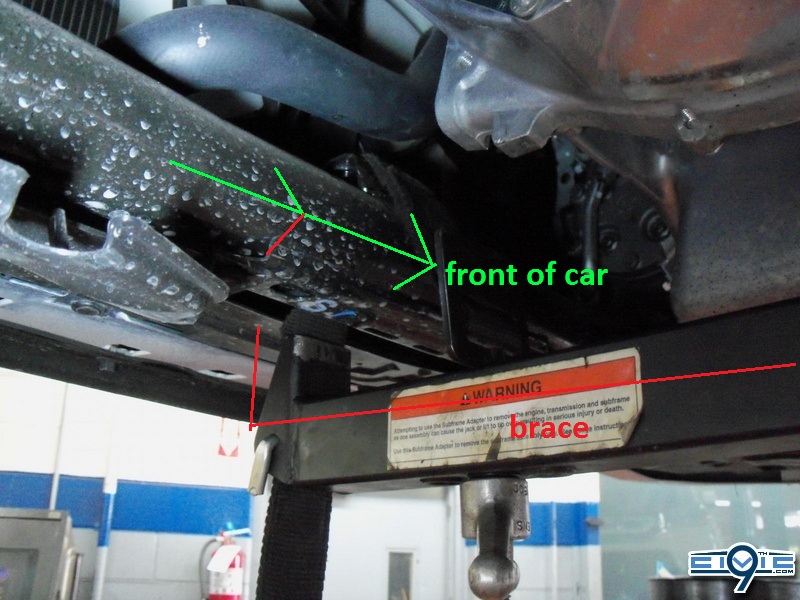
The following steps will involve dropping the front sub-frame and sliding out the front sway bar. This DIY is almost finished, but one SHOULD NOT rush this part. You must use a sub-frame support jack and insure that another person is present to assist you ( I couldn’t imagine someone attempting this on their own)
Step 13. Step 13 is below…… ** CAUTION – MUST READ ENTIRE NOTE ** : Before one may remove any bolts from the sub-frame, one MUST use a sub-frame support jack. I cannot stress how important this is! There is tremendous weight and pressure being applied vertically down (law of gravity) onto the sub-frame. The sub-frame is held up by approx. 10 bolts. The entire weight and stress of the sub-frame and all of its components and transferred to the threads of these 10 bolts (I believe it’s 10 in total? I will double check when I get a chance). If one attempts to loosen the sub-frame support bolts without using a sub-frame jack, one will most definitely strip not only the bolts, (which are somewhat easy to replace) BUT the actual chassis threads . If the bolts happen to strip, even though the sub-frame jack was used, you can order them from myself (I work at a Honda dealer) or simply your local Honda dealer. If one happens to strip or cross thread the chassis threads, good luck!
- Step 13 (after you’ve read the caution note)
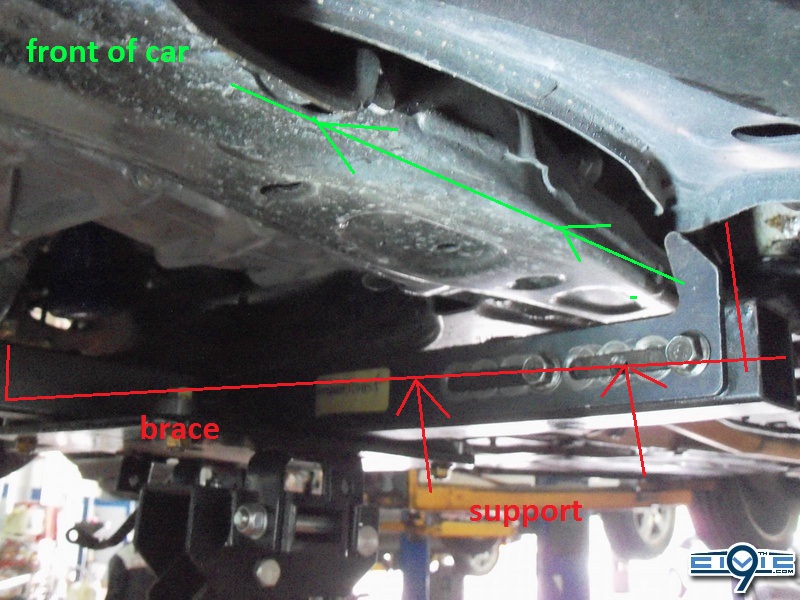
Since the car will already be lifted onto a hoist, by using a sub-frame jack you will not be “raising” the car at all. Place the sub-frame jack towards the back portion of the sub-frame. You will not be lowering the sub-frame completely, so placing the sub-frame in the middle for the most support (like most mechanics or techs would say must be done) is wrong in this case. Jack up the sub-frame jack just enough to put some pressure on the sub-frame (realize that the jack will be on the floor and forcing the sub-frame to go up into the chassis). Be carefully not the jack it up too much to the point where the car begins the rise/lift off the hoist.
One will be removing only the bolts from the back portion of the sub-frame, and one is essentially just lowering the back portion in order to slide out the front sway bar. Temporarily, 4 main bolts will be removed and 2 will be loosened half way. This will allow for the rear of the sub-frame to drop about 1.5” on an angle.
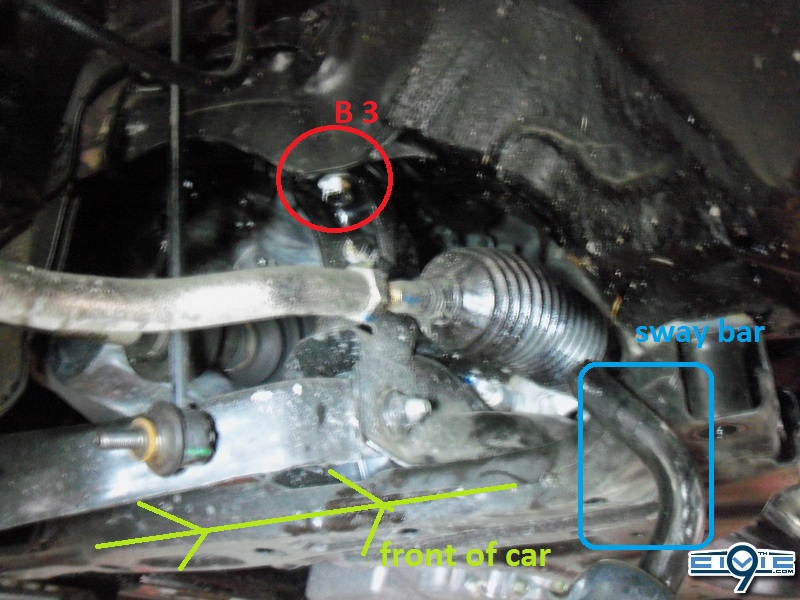
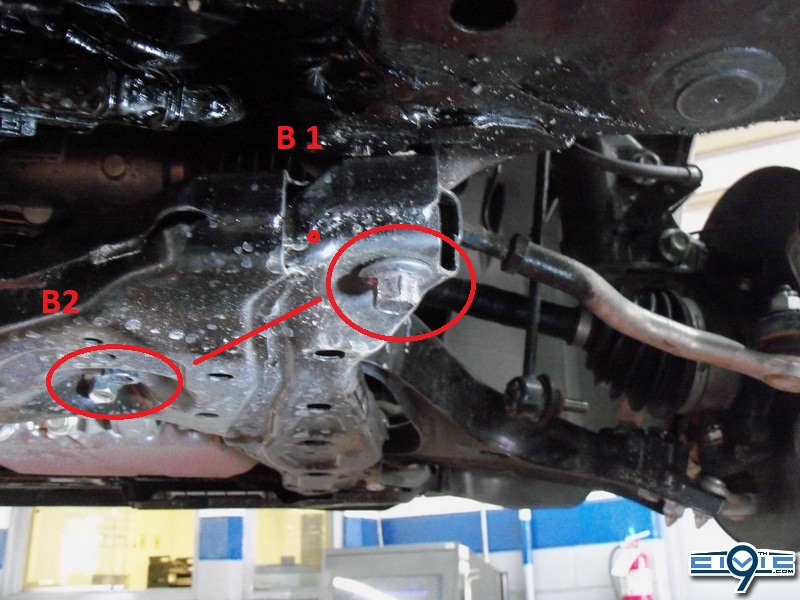
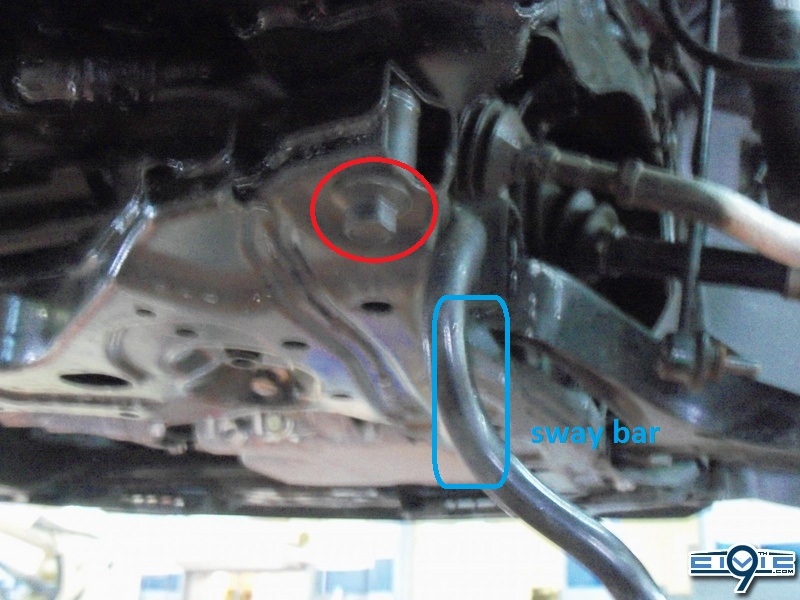
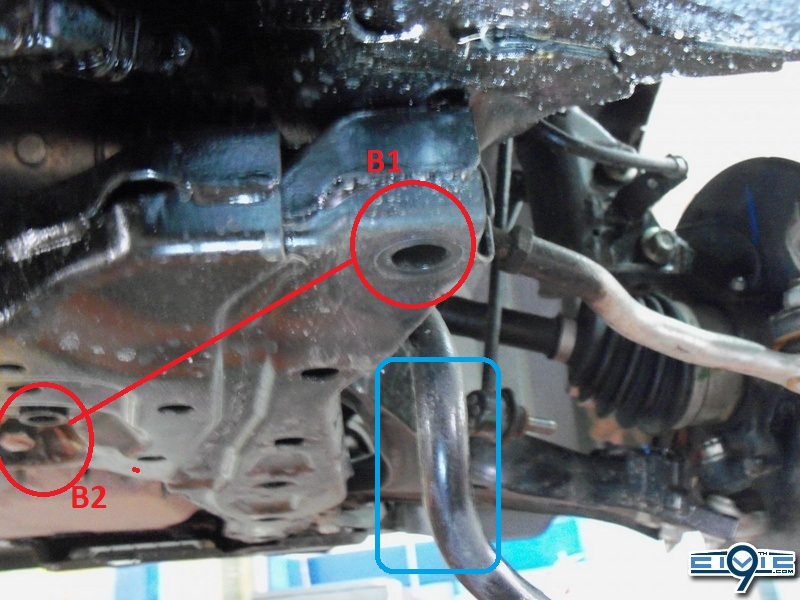
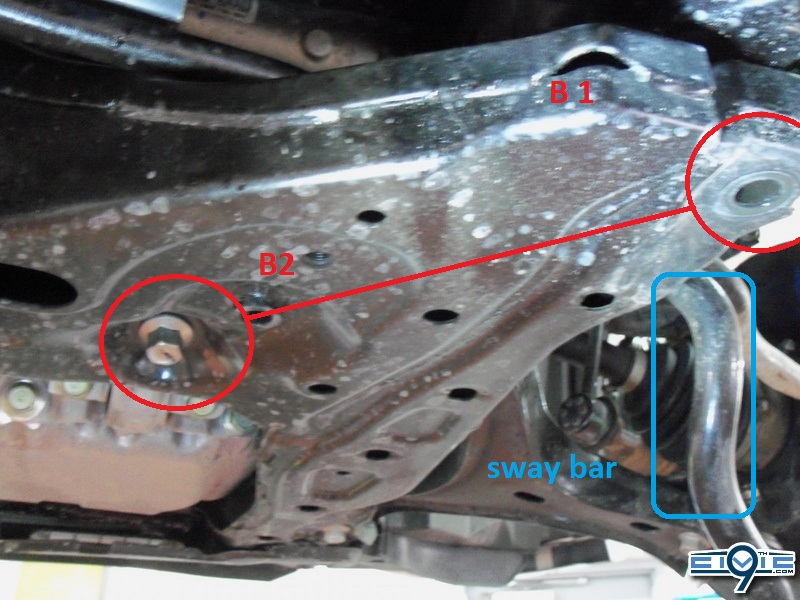
Step 14. In the following picture, you can see the front sway bar and a black nut that is circled (B1) . You need to remove that big black nut on both sides
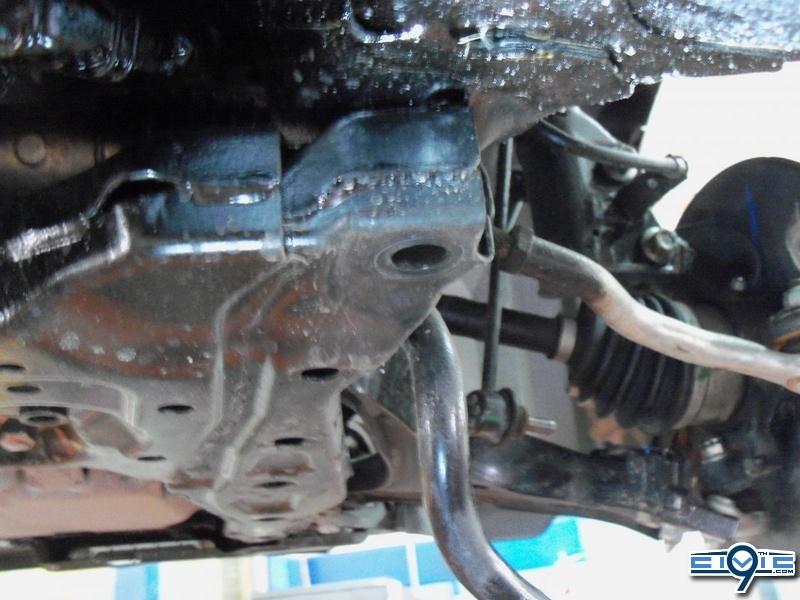
Step 15. The sub-frame jack is still being used in the next picture, it has just been moved farther back. Here is the driver’s side bolt almost removed ( we used an impact gun obviously, pictures are taken for the purpose of the DIY).
Note* The location of the B2 Area circled in red
Passenger side fully removed
Step 16. Using the position of B1 and B2 as a reference, you must loosen the B2 bolt half way.
- 8th generation coilovers do in fact fit out cars. For the rear, it is already known that you must order 8th gen rear rubber isolators for the springs because the 9th gen top hats and springs are smaller. This will allow for a snug fit of the 8th gen rear springs on your 9th gen chassis.
- 8th generation civics do not have a factory front sway bar. Our 9th generation civics DO have a front sway bar from the factory. This means when you install the 8th gen coilovers, there will be no mount for the end links and the front sway bar will not bolt to anything. If you simply remove the end links and install the 8th gen suspension, your front sway bar on the 9th gen will be moving around and sliding back and forth un-controllable.
- This DIY will show the process of how I removed my front sway bar, due to the fact that there is no link mounts.
Disclaimer:
This is a step by step process on how to remove the 9th generation front sway bar, in order to successfully install 8th generation coilovers on a 9th gen civc. This “DIY” (do-it-yourself) is a detailed explanation on how I did it, MYSELF.
I do not take any responsibility for potential actions performed due to this write up. If you decide that you have learned enough, have enough experience, and have the proper tools to do this install…..your are doing so at YOUR OWN RISK. This DIY will be written in first person (as myself) or in the third person (One must, one may, one should…..). Sometimes I will say “you can, try this…, get someone to, etc.” but that will only be for basic tasks, tasks that I know you cannot screw up on or break anything if you *attempt this DIY* at your own risk.
Pre- DIY **Notes** PLEASE READ ALL before starting:
- When removing the front sway bar, one MUST use a hoist and a sub-frame support jack. If access to these tools is not available, one will not be able to complete the installation with ease.
-If the car has a locking lug nut set, please retrieve the locking nut key in the glove box and/or trunk prior to starting any steps.
- The car should be parked in an area with good lighting and possibly some cover just in case of bad weather (if work is done outside)
- Before removing key from ignition, roll down both front windows, fully open sunroof, open trunk and pop the hood.
(While completing the installation, the car will either be on a hoist or on 4 jack stands. One should never enter a car while on a hydraulic hoist OR jack stands for obvious safety reasons. By popping the hood, opening the trunk and rolling down the front windows AT THE START….one will have access to the entire car without ever opening up a door )
- Turn off the car, apply the emergency hand brake and put the car into gear.
DIY: 9th gen Front sway bar removal
Step 1. Start off by using a 19mm socket to remove your lugs nuts on both front rims (Note: If the vehicle has a locking nut set, this is where the pre-DIY preparation comes in handy. The locking key shouldn’t be in the car, and one shouldn’t have to open a door while the car is already on the hoist. )
Also** ( you may skip this very detailed reading if you think you’re a genius already, or if you have some technical/mechanical experience)
It was stated in Pre-DIY to put the car into gear, this will lock the transmission and front wheels…….”but wait a minute!? When ‘one’ goes to remove the lug nuts, the wheels start to spin?? I thought by putting the car into gear the wheels will lock?”
Oh, good observation young grasshopper! Try getting a friend to spin your driver’s side wheel towards the front of the car, while standing on the passenger side of the car you will notice the wheel will start to spin towards the back of the car. That my friend, is your tranny lock. If the car was on a hill and let’s say it started to roll backwards, the front wheel (let’s say) would start to roll back but the passenger side would roll in the reverse order (forward). This in turn would actually cancel out and cause no roll when the car is in gear, either of the front wheels cannot roll in any direction (significantly) without affecting the other. *takes a breath*, So your front wheels while on a hoist/or jack will never actually lock up solid, UNLESS someone is inside the car applying the regular foot brake (very unsafe while car is in the air). You have 2 options, #1 while the car was still on the ground (or just put it back on the ground since you must be using a hoist) just loosen the lug nuts slightly* while the tires are touching the floor. I put stars around loosen lugs *slightly* because while the car in on the floor, it is putting pressure on the studs and rims. You only want to loosen them so that you can continue once the car is in the air. #2 option is to get a friend to hold onto the rim while you are breaking the lug nuts free.
Step 2. Once all of lugs nuts have been removed, one can remove the wheel and place it off to the side.
Step 3. A 1 labels the top of the end link bolted to your suspension. Remove the top nut bolting your end link to the shock. The other end of the end link is bolted to the front sway bar.
Pictured below is the location of the top of the end link and the shock assembly, A1
Step 4. A2 is where your front sway bar bolts onto (the other side of the end link)
Step 5. To remove the lower portion of the end link that is bolted to the sway bar, one must use a 17mm wrench over the nut, and place an allen key in the middle portion. While holding the allen key in the same position, one must loosen the nut by turning it to the left. (Remember to hold the allen key)
(I will update this thread later on exact size wrench and allen, I misplaced the paper I used to record the measurements)
Step 6. Once the nut is removed, the front sway bar should just slide right off.
Note** the direction of the arrows and the driveshaft
Step 7. Now, looking down the direction of the drive shaft (using the arrows) one will see an upside down u shape clamp in ORANGE. This is the clamp and rubber grommet that is holding in your front sway bar. On other cars this bracket is mounted underneath the sub-frame. That would allow for easy removal, remove 4 bolts and drop the sway bar. On 9th gens, the u clamp and grommet is mounted on top of the sub-frame and the bolts are a little tricky to get access to. One must use a regular flat wrench and patiently remove the bolts half turn at a time.
Step 8. The front sway bar has two u clamps and grommets holding it in place, and each clamp has 2 bolts. In step 7, the picture shows the bolt closest to the front of the car. The U Clamp is outlined in ORANGE and there are two bolts in RED you must remove on either side of the ORANGE U Clamp.
Step 9. The only way to access these bolts is to use a flat wrench and to turn it half turn at a time. It will take a few minute for each bolt, but you will start to make some progress….
Step 10. Once both bolts are removed successfully, one will be able to lift the metal u clamp (orange) and reveal the rubber grommet. Don’t worry too much about the rubber grommet because it has a cut on one side of it, and one can simply pull it off of the sway bar by hand. (both sides)
Step 11. Now once you removed the metal u clamp, you will see the rubber grommet (on both sides)
Step 12. Slide the rubber grommet down the front sway bar in order to access it a bit easier… ( you must do so for both sides)
NOTE** So far you have removed:
- 10 lug nuts ( 5 on each wheel)
- 2 front end links ( 4 bolts – two connecting sway bar, two on the shock assembly)
- 2 metal u clamps mounted directly on top of the sub-frame ( 4 bolts in total)
- 2 rubber grommet ( remove by hand)
At this stage, you have un-bolted the front sway bar and all of its components. The only problem that arises is that there is no way to pull of the metal sway bar. The space between the drive shafts and sub-frame is not enough for the sharp bends of the front sway bar to phish around.
The following steps will involve dropping the front sub-frame and sliding out the front sway bar. This DIY is almost finished, but one SHOULD NOT rush this part. You must use a sub-frame support jack and insure that another person is present to assist you ( I couldn’t imagine someone attempting this on their own)
Step 13. Step 13 is below…… ** CAUTION – MUST READ ENTIRE NOTE ** : Before one may remove any bolts from the sub-frame, one MUST use a sub-frame support jack. I cannot stress how important this is! There is tremendous weight and pressure being applied vertically down (law of gravity) onto the sub-frame. The sub-frame is held up by approx. 10 bolts. The entire weight and stress of the sub-frame and all of its components and transferred to the threads of these 10 bolts (I believe it’s 10 in total? I will double check when I get a chance). If one attempts to loosen the sub-frame support bolts without using a sub-frame jack, one will most definitely strip not only the bolts, (which are somewhat easy to replace) BUT the actual chassis threads . If the bolts happen to strip, even though the sub-frame jack was used, you can order them from myself (I work at a Honda dealer) or simply your local Honda dealer. If one happens to strip or cross thread the chassis threads, good luck!
- Step 13 (after you’ve read the caution note)
Since the car will already be lifted onto a hoist, by using a sub-frame jack you will not be “raising” the car at all. Place the sub-frame jack towards the back portion of the sub-frame. You will not be lowering the sub-frame completely, so placing the sub-frame in the middle for the most support (like most mechanics or techs would say must be done) is wrong in this case. Jack up the sub-frame jack just enough to put some pressure on the sub-frame (realize that the jack will be on the floor and forcing the sub-frame to go up into the chassis). Be carefully not the jack it up too much to the point where the car begins the rise/lift off the hoist.
One will be removing only the bolts from the back portion of the sub-frame, and one is essentially just lowering the back portion in order to slide out the front sway bar. Temporarily, 4 main bolts will be removed and 2 will be loosened half way. This will allow for the rear of the sub-frame to drop about 1.5” on an angle.
Step 14. In the following picture, you can see the front sway bar and a black nut that is circled (B1) . You need to remove that big black nut on both sides
Step 15. The sub-frame jack is still being used in the next picture, it has just been moved farther back. Here is the driver’s side bolt almost removed ( we used an impact gun obviously, pictures are taken for the purpose of the DIY).
Note* The location of the B2 Area circled in red
Passenger side fully removed
Step 16. Using the position of B1 and B2 as a reference, you must loosen the B2 bolt half way.
Last edited by a moderator: