Hey guys, really appreciate the info here. So I registered just to post my experience with the 2012 Civic Coupe.
Granted, I probably went a little overboard by aiming for better than factory installation. But, here are my results:
- Driver's seat both bottom and back cushions are installed. No sensors to worry about. Pic 3
- The occupancy sensor is only present on the passenger seat back cushion, and it only occupies the top half of the cushion so I installed about 2/3 of the pad on the back and the full pad on the bottom. See pic 1 and 2.
- At least for the 2dr, the upholstery is attached with hog rings. No stupid clips.
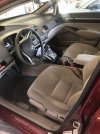
- I did not have to remove the seat side plastic covers for either seat - I could not figure out how to take off the levers anyway. On Driver's seat I was able to flip the cover to the left (there was one small annoying push pin that you have to remove from the corner), and pas seat I was able to move the cover to the back. See pictures.
- Back cushions both slid down after removing the headrest and unzipping the back.
- Factory seat heater buttons are the way to go, back lighting matches the rest of the interior and button placement is perfect.
No onto the fun part, the wiring. My goal was factory-like integration (Pic 4). The problem with aftermarket seat heater controls (at least the low-high only ones) is that the high amps are pushed through the button itself, which I do not like. Furthermore, you cannot use the factory seat heater fuse #14 as it is hot at all times.
Factory solution, on the other hand, gives power to the seat heaters at all times but the relays that turn them on go through switched ignition (same one as the AC controls), and only the low-amp power (100ma) that turns on the relays is pushed through the button - a safer design, and one where the seat heater will never turn on without ignition on eliminating power drain if seat heater is not switched off. However, this meant that I could not use supplied wire harness and had to not only make my own harness but also wire in 2 relays per seat. The ordeal took me way, way longer than I thought - about 12 hours total for pad installation and electrical work.
- I inserted the pin into the harness that runs to the fuse panel for B+. This allowed me to use factory fuse location, no need for fuse taps. Win. Pin #13 on "Under-Dash Fuse/Relay Box Connector B (44P)" , ran the wire under driver's door sill. Pics 5 and 6.
- There is a ground point under each seat. I only used one and ran the wire over to the other side and to the control buttons over.
- I tapped the AG2 power and Illumination wires from the AC control, as they are run off the same circuit from factory, so I don't have to worry about overloading the circuit. Either way, this only draws about 250ma for 2 relays and button lights. Pins # 1, 3 (LED + and -), and 17 (AG2). Ran the wires under center console and branched out to either seat.
- Finally, I mounted the 2 relays under each seat and wired each seat per factory wiring. Royal PITA, but the result is a functional, safe, well-thought through wiring job. See last pic.
Electrical part is always difficult to explain to someone who is not able to read the electrical diagrams, but I hope it makes at least some sense and this post was useful.