- Staff
- #1
DIY 2012+ Civic Door Edge Guards

What you need:
That's it, you're done! Here are some photos of them installed on my PMM Sedan.


What you need:
- Honda Genuine Accessory color-matched Door Edge Guards Kit
- Rubber mallet
- Felt-tip pen
- Touch-up paint
- Car wax
- Shop towel(s)
- Installation Instructions - Sedan
Installation Instructions - Coupe
- Door edge guards cannot be installed if the vehicle is already equipped with body side moldings.
- If you want to install body side moldings, install them after you install the door edge guards.
- This DIY article shows the left rear door edge guard being installed. The same procedure applies to installing all of the door edge guards.
- Be careful not to damage the body paint finish.
- Clean and wax the areas to be covered.
- Identify each door edge guard by holding it up to the door and matching its contour with the door edge.
- Click on any of the pictures to see them in higher resolution.
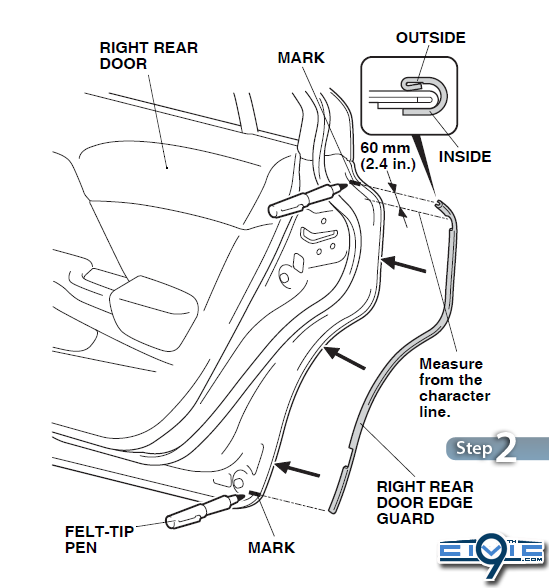
- Gently place the door edge guard on the door so as to line it up with the contour of the door.

- Using a felt tip pen, mark the sealant at the top and bottom ending point of door edge guard, then remove the guard.

- Position the cutting edge of the seam sealant cutting tool against the door edge, and trim the seam sealant from mark to mark. The cutting tool only cuts in one direction. For the left-hand doors, start from the top and work your way down; for the right-hand doors, start from the bottom and work your way up.
With the cutting tool, keep pressure against the door and stay flush. You're only trimming a sliver of the sealant. When you're done, it should look like the photo below.


- Apply touch-up paint to the cut seam sealant area, and let it dry for at least 15 minutes. The reason for the touch-up paint is to hide the yellow color of the sealant that was exposed.

- Position the door edge guard on the door and align it to the marks made in step 2.
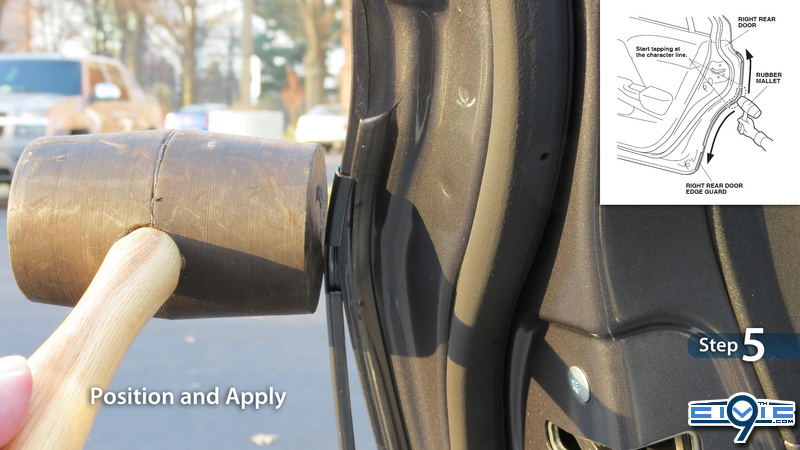
Starting at the top character line, gently tap the door edge guard into position with a series of light
taps using a rubber mallet, then work your way down. Make sure the position of the door edge guard is correct. The guard will slowly bend into the proper position as you apply taps. Once in place, do not remove, reposition, or reinstall the door edge guard or it will not hold securely. After the entire guard is in place, you can give it slightly harder taps to ensure a firm fit.

- Repeat steps 1 through 6 to complete the installation of all the guards for all the doors on your car.

That's it, you're done! Here are some photos of them installed on my PMM Sedan.


