DIY DIY AT transmission cooler DX/LX/EX (not for CVT)

Nix

Jötunn Moderator
VIP Member
10,765
8,162
Lew-vul, KY
Body Style
It's A Fast Pig!
External ATF Cooler:

This is a guide on installing a transmission cooler on your 2012 or 2013 AT equipped Civic. This is not recommended for cars equipped with a CVT. My car is an 06-11 Civic but the part we are going to tap into is nearly identical on the 2012/2013 DX/LX/EX Civics.

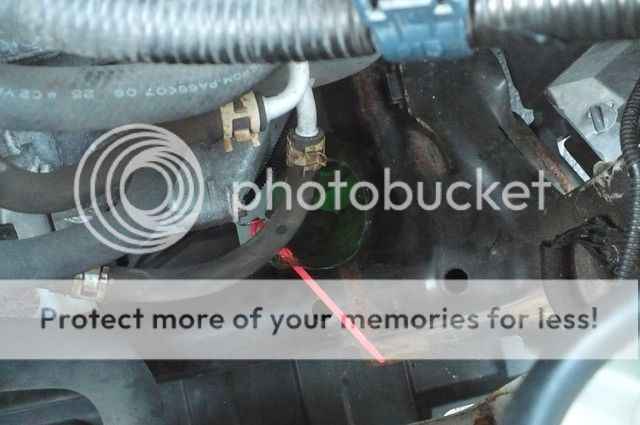
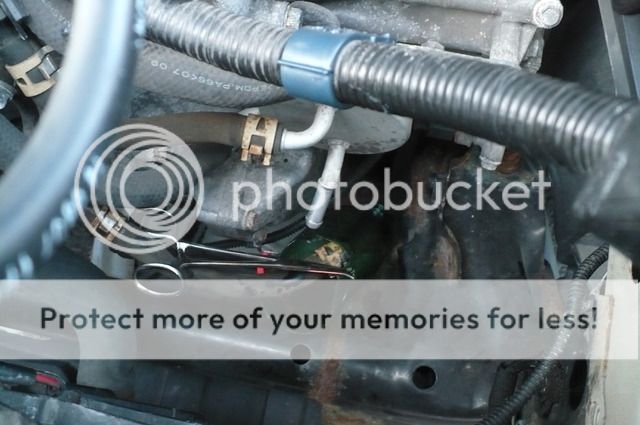
Fiirst thing to do is decide if you want to tackle this project. It's not hard but you need to be comfortable removing your bumper and cutting/removing a couple hoses.

Next, read up on transmission coolers, the different types, lines, hoses, and so on. The etrailer website is very helpful and a quick google search for transmission coolers will lead you to several Honda Odyssey forums and off road forums. The transmission fluid coolers are very similar to external oil coolers so most of the information carries over.

Ok on to the project:

Why do this? Heat kills automatic transmissions. If you drive your car hard you will wear out the fluid fast and shorten the lifespan of your transmission. Changing the fluid more often than 30k or 60k helps a lot too.

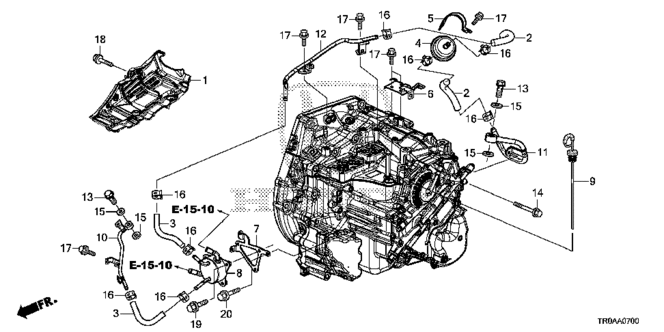
Honda's automatic transmissions are unusual in that they do not use planetary gears like nearly all other makers. Instead, the Hondamatic and its successors use traditional, individual gears on parallel axes like a manual transmission, with each gear ratio engaged by a separate hydraulic clutch pack. This design is also noteworthy because it preserves engine braking by eliminating a sprag between first and second gears.

TL: DR The Honda AT uses clutch packs to swap between gears like a manual as well as the torque converter for lockup.


Parts needed for this setup:

Fluid Cooler (pick this first, it will determine everything else)
(Derale 51008)

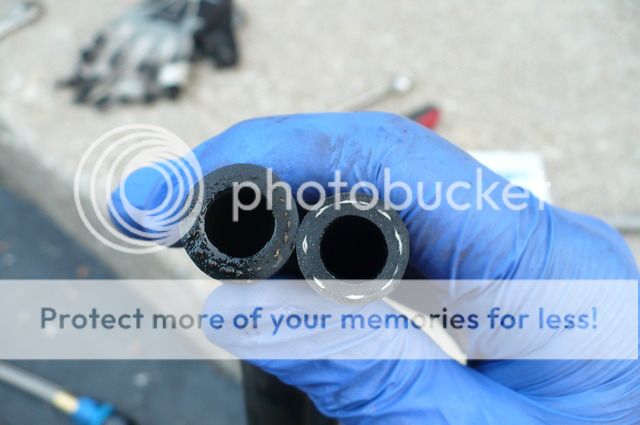
Major EDIT: I initially used 3/8" trans fluid hose. It is close but not correct. It leaks slightly under high temp and pressure. You need 11/32" rubber transmission fluid hose - you can get this at auto zone/pepboys/wherever. I had to order mine online from Summit Racing.


3/8" hose is 9.5mm
11/32" is 8.7mm

The 11/32" is very tight but it fits. I believe that the correct hose is a metric sized 9mm as the 9.5mm is just slightly too large and the 8.7mm is frickin impossibly tight but makes it. If you can find 9mm transmission hose in the US get it. Other than that the 11/32" has given me no issues.


Fittings:

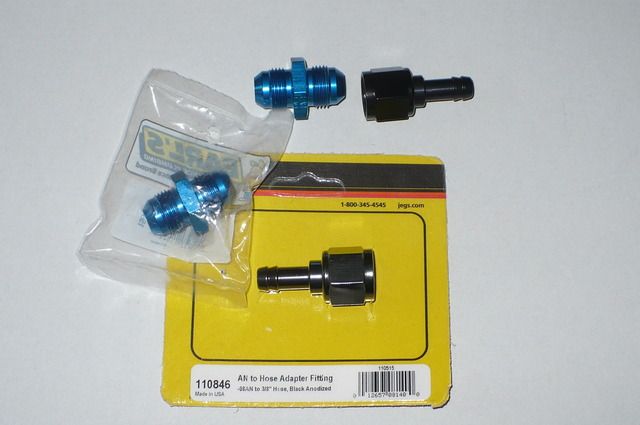
2x -8AN to 3/8" hose barb adapters (Jegs is the only place that had this size)
http://www.jegs.com/i/JEGS+Performance+Products/555/110846/10002/-1


Lots of fittings and pre made hoses are available on anplumbing.com

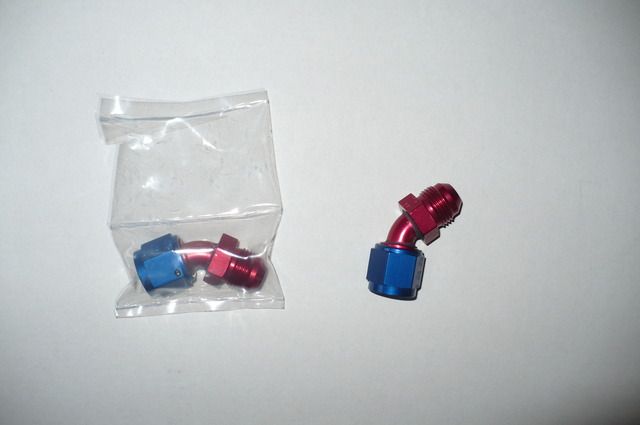
2x 45 degree -8AN swivel fittings ( I highly recommend you get 90 fittings)


2x -8AN Male to Male Union Adapters

-8AN hoses, lengths to vary depending on your setup


If you want to include a temp gauge and sensor then you will need an adapter with a port fitting on it. The sensor I went with is a 1/8" NPT size and I picked up a hex adapter from anplumbing.

1x -8AN Male to Male w/ (1/8") .125 NPT in. Hex adapter.

(this is a hard part to find but ANplumbing has it, Earl's part number 100196ERL)

1566_thumb.jpg


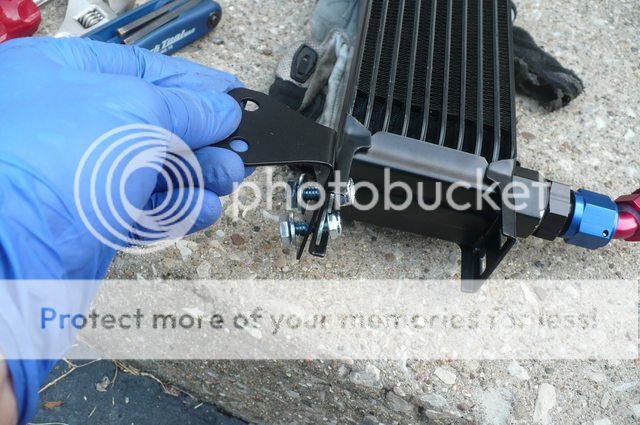
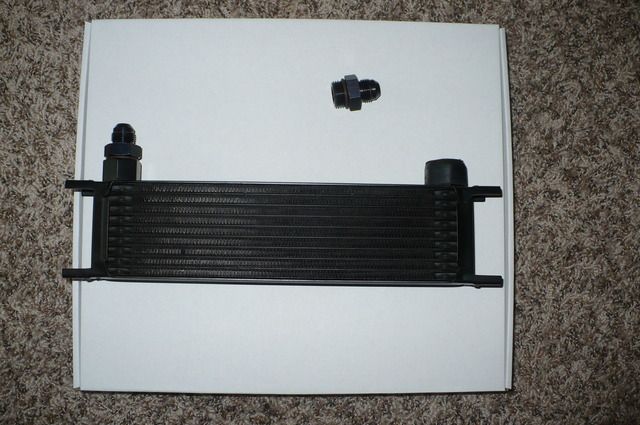
Pick a cooler. I went with a Derale Stacked Plate cooler. Stacked plates are the most efficient cooler design. It was also the smallest cooler I could find with AN fittings.

Derale 51008
http://www.summitracing.com/parts/der-51008/overview/

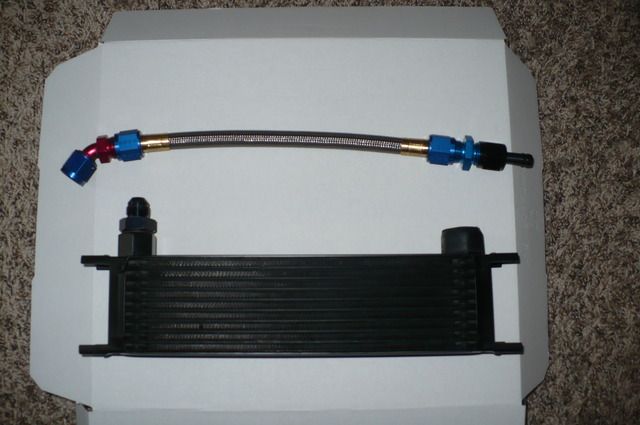
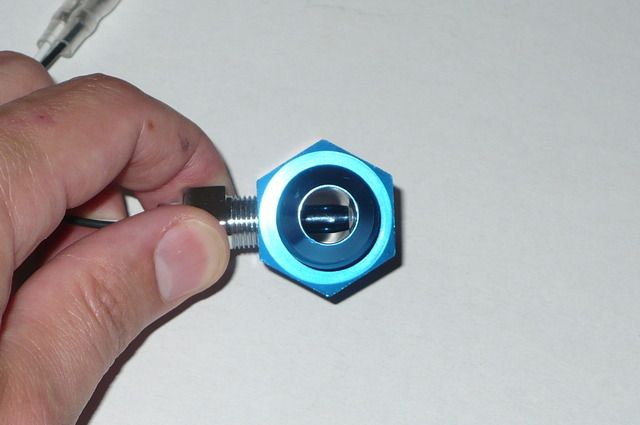
You have to install the threaded ports into the ends of the cooler. Depending on if you go with -8AN or -6AN the opening in the cooler will be the same but the end of the port you install will be different sizes. I called summits tech line and they said to just use a small amount of oil or vaseline on the threads into the cooler and tighten them down. There is an o-ring on the port so don't kill it putting them on. They said "if they leak tighten them more" but there was no torque spec. You need a 1" size wrench.

P1020830_zpsftvv0clb.jpg


I decided to use all -8AN lines and fittings.

P1020839_zpsd24rbk8p.jpg


I went with -AN fittings as they are very high quality and you don't have to use any type of thread lockers, sealant, tape, or paste on them. I also wanted to install a temperature sensor. All the gauges and sensors I could find have 1/8" NPT threads and finding an -8AN tee fitting with 1/8"NPT threads was not too difficult. Rubber lines would not allow for installing a threaded sensor.

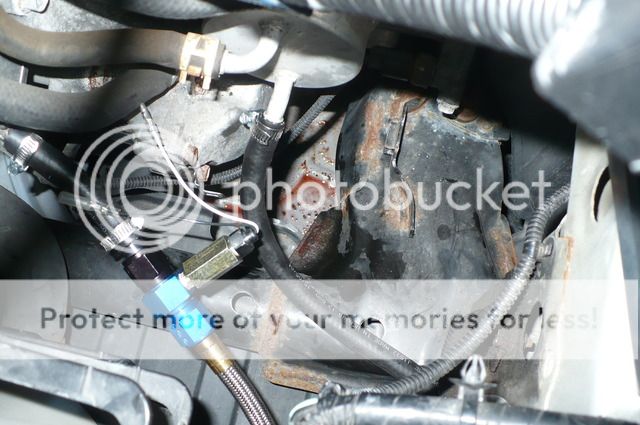
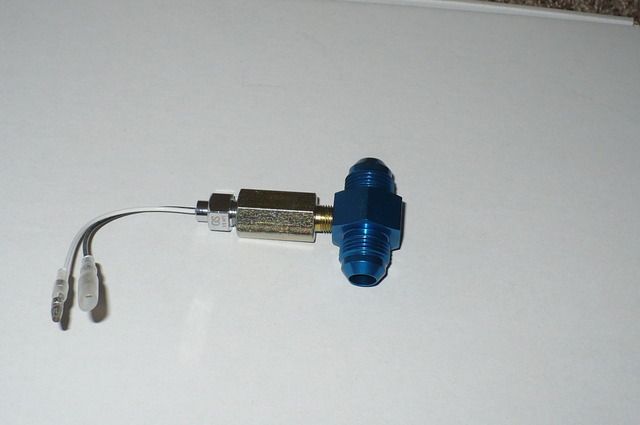
This is the sensor from the gauge I bought with the brass port extender. The blue tee fitting is a –8 Male To –8 Male w/ (1/8") .125 NPT in. Hex adapter. This was a tricky part to find but it is made by Earl's and is part number 100196ERL
P1020843_zpswfm6z37y.jpg


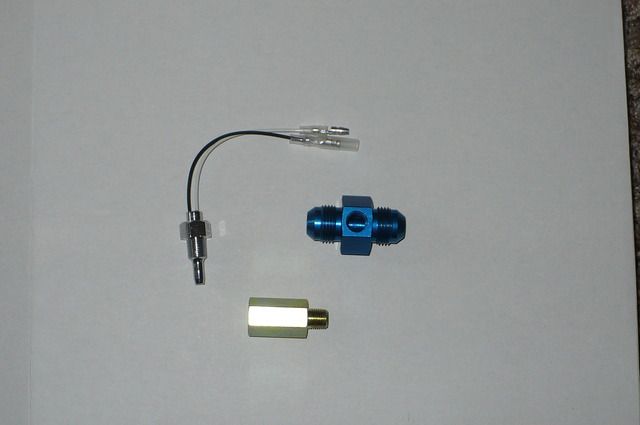
I did need a "transmission test port extender" which is the brass piece. It is 1/8"NPT threaded.

Without the extension the sensor hits the inside of the tee fitting.
P1020845_zpsu8uugofw.jpg


NPT threads are tapered and seal by being jammed against each other and deformed. The AN fittings are tapered and fit together perfectly. the NPT threads are much more likely to leak but I had no option for a non-NPT temp sensor. I did put thread locking paste on the NPT threads and tightened them very well. This is as far as the sensor and extension would thread in and it looks terrible in my opinion but the rest of the install is very nicely finished with the AN fittings.

P1020846_zpsamcnupwm.jpg


I bought the cooler from summit racing and I got all the fittings and lines from ANplumbing.com
They have all the fittings and pre made hoses in which ever size you decide to go with.

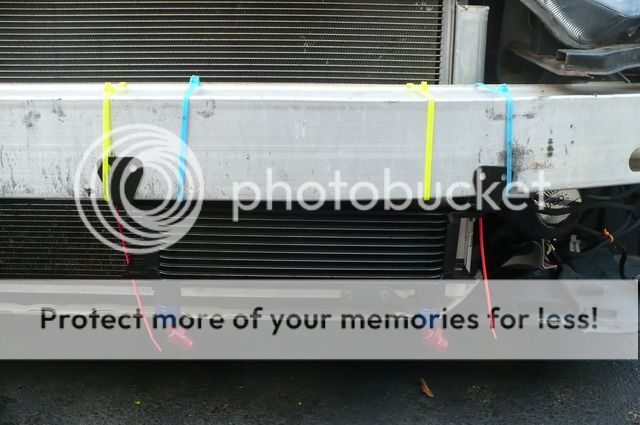
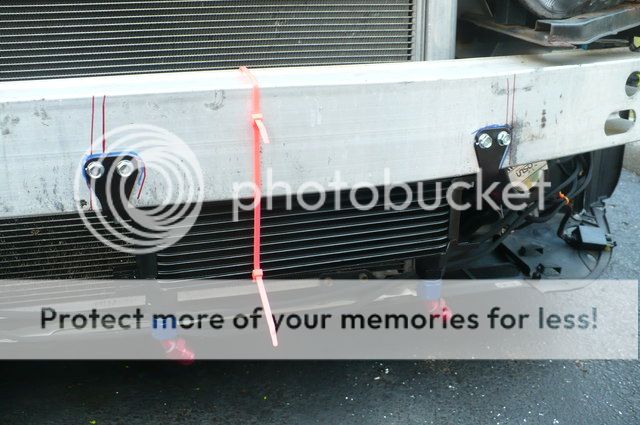
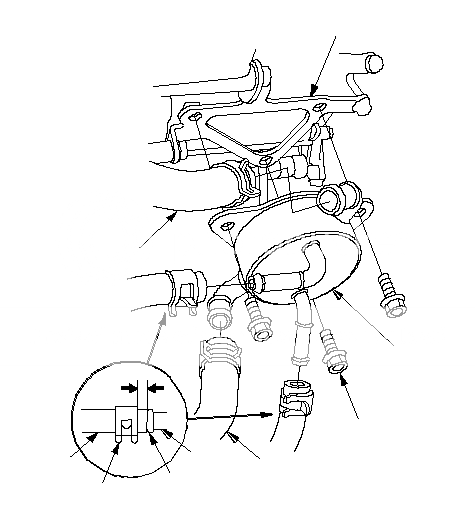
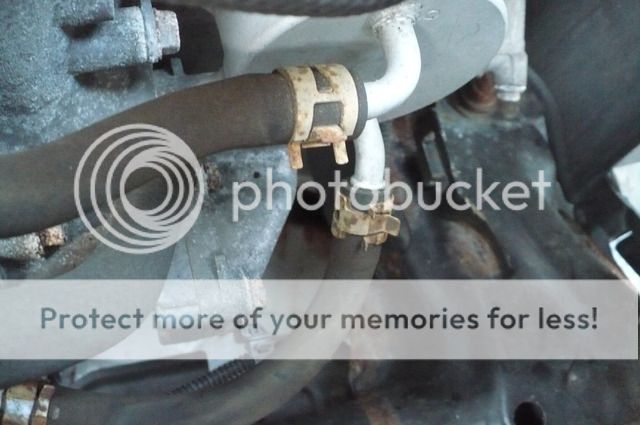
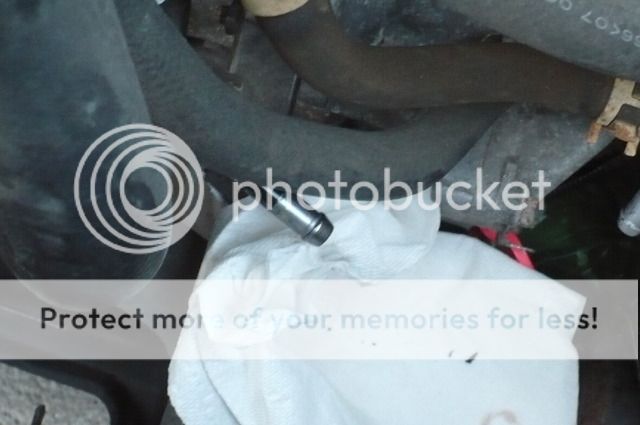
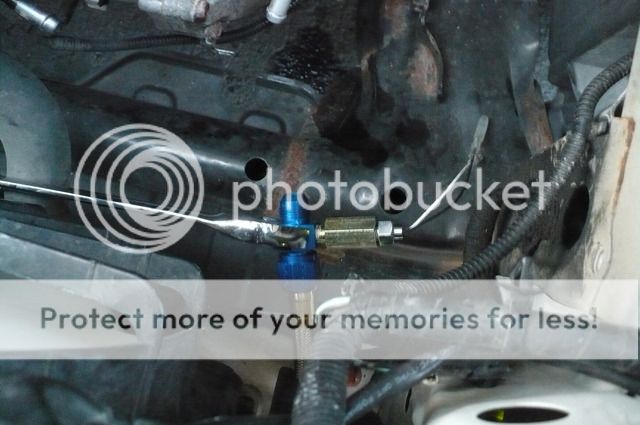
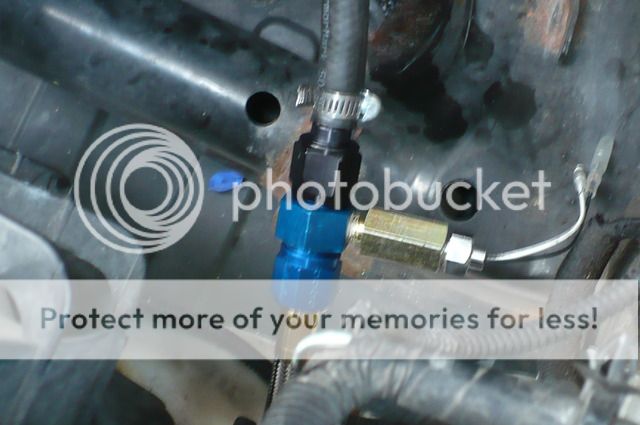
-8AN hoses: I measured from behind the lower grill opening in the bumper to the ATF warmer. I got 3 different lengths but connecting to the stock system is still done with a section of rubber hose so if you are a little off you have a very forgiving and adjustable connection.

The sections are 34" 21" and 10"
P1020837_zps3u2xrlf9.jpg


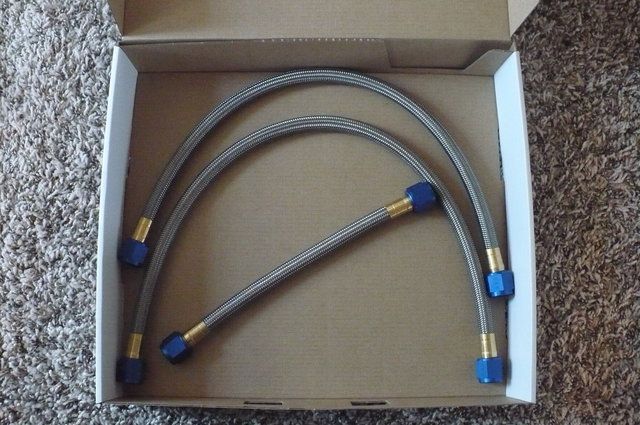
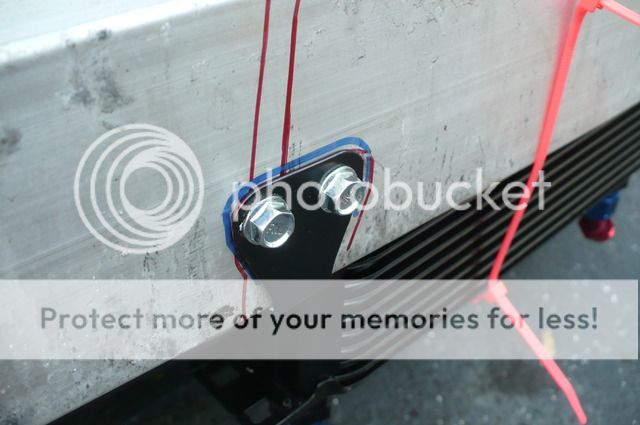
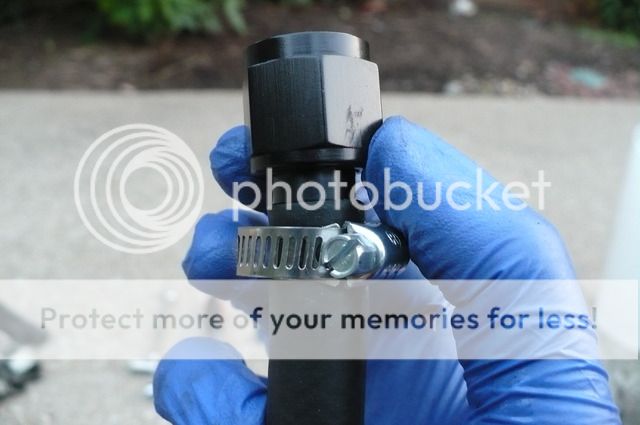
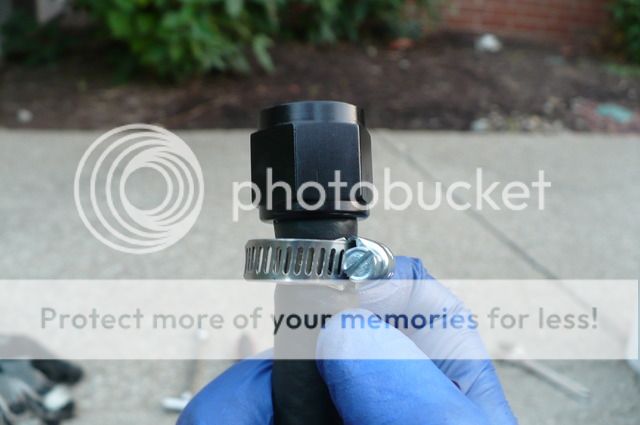
To connect the AN hose to the stock system you need a couple AN to hose barb adapters. The stock hoses are damn close to 3/8" and the 8AN fittings are slightly larger than that. A full system of -6AN would probably work fine as well. You also need 2 A.N. Male To A.N. Male Union Adapters in whatever size you went with.
P1020835_zpsrdy3eq8p.jpg


I used 45 degree swivel fittings to attach the hoses to the cooler itself but I would highly recommend 90 fittings instead. It will make hose routing much much easier. They cost a little it so I didn't want to go back, re buy and reinstall. Maybe in the future if the hoses give me rubbing issues. Use quality fittings from Aeroquip or Earls. Some of the "house brand" fittings have poor reviews on the muscle car and turbo/GM LS V8 forums.

P1020832_zpss6ribr6w.jpg


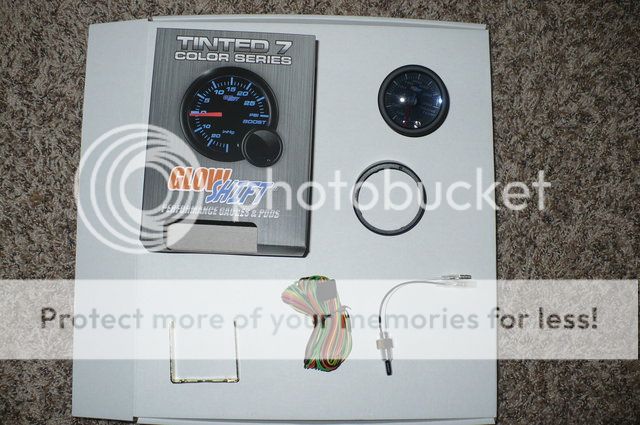
This is the gauge I decided to use from Glowshift. I know its not the most high quality gauge out there but it was affordable and their wiring made the most sense to me. Also, they were able to tell me the threads and length of the sensor. They also sell the port extension on their website.

P1020840_zpslx8q7cb5.jpg


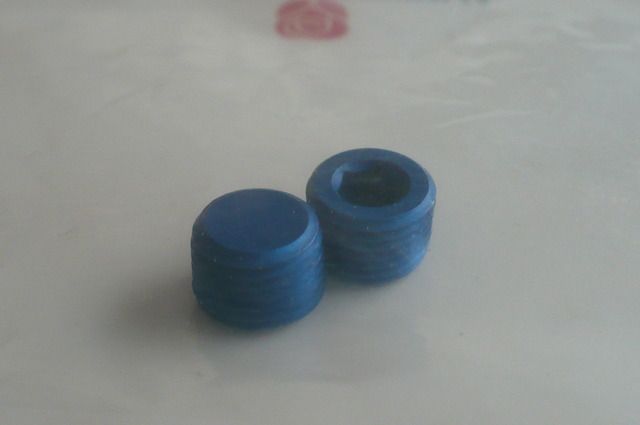
I have read that the sensor can sometimes leak and the NPT threads are the most likely spot to have an issue. As a backup plan I ordered two NPT plugs that I can insert into the port on the tee fitting and remove the sensor completely if it give me issues.

P1020849_zpszfgsny2u.jpg


Last edited:
The install:

First pull off your bumper and mock up where you think you want the cooler to go. I did purchase the derale mounting hardware kit. It just made it easier than trying to piece together my own brackets and nut/washer/bolt combo. They are all 11mm nuts and bolts. The cooler has mounting points on the top and bottom. You can put the bracket on several different ways. This is just how I did it.

P1020888_zpslbwu5mrs.jpg


Mock up where you think you want the cooler to end up. I pulled the black foam bumper support off and used zip ties to test fit the cooler. I then put the bumper back on to see if it was in the right place. I was able to tuck the mounting brackets behind the zip ties holding my HID system wires. At this point you can see I have installed the 45 degree fittings into the cooler.

P1020889_zps5lmmelur.jpg


Bumper back on for test fit. You can barely see it in there but you may be able to notice the blue AN fittings at the bottom.


P1020878_zpsx7dgwihg.jpg


I traced the brackets. Since I would be removing the zip ties I wanted to be sure I knew where the cooler was going to go.

P1020893_zpsx8awzmxp.jpg


With the zip ties out of the way the fitment was a little different so I used a second color of marker to designate the new hole locations.

MEASURE TWICE, DRILL ONCE. You get one shot at this.

P1020895_zpsbfaysojg.jpg


You may need to bend the brackets a little to sit flush against the crash beam depending on how your car and placement are.
If you've never had to adjust a bracket like this before one of the easier ways is to use a large adjustable wrench. Tighten it up and gently flex the metal into place.

P1020906_zpsyptm6cj2.jpg


This is the inside of the crash beam we are going to mount the cooler to. Its pretty thick but it is just aluminum.

P1020901_zps3egxdaup.jpg


Drill a couple "pilot" divots in the center of where the mounting screws need to go. I used a 1/8" drill bit.

P1020902_zpsnlrllkvl.jpg


Its just a little divot to help keep the screw from jumping around. If they aren't perfect its ok. Mine weren't and the screw went in straight anyway.


P1020903_zpskpmsqhnc.jpg


The screws I am going to use are self drilling self tapping. They cut their own hole and cut their own threads into metal. Just drive them in with some pressure on the drill.

P1020904_zpscpqv0xwx.jpg
 
The Install Continued:


I zip tied the cooler to the beam to hold it while I drove in the screws.

P1020907_zpsbund64va.jpg


They are nice and tight. Just let the drill stop once they start going in. If you keep turning them they will strip out the threads they just made. So stop when they hit the bracket. Trust me they will be tight and they pull themselves in pretty quickly. They do take a few seconds to start drilling in initially. You'll see a fair amount of shavings coming out then the screw grabs and jams itself in.

P1020908_zpseiy3lx2r.jpg


So the cooler is mounted, now we need to start working on connecting it to the stock system. You need to find a part called the "ATF Warmer." It looks like a metal hockey puck with several hoses and tubes going in and out of it. Coolant goes into it along with ATF to get them both to similar temps. From what I've read you cannot cool ATF too much. I believe the warmer is for very cold climates so consider that if you live in the great white North. A simple cardboard cutout could be put in front of the cooler to block airflow in the winter. Im sure you guys have seen the quilts people put on their grills in the winter up there. Same idea.


Ok.... the ATF Warmer:

atf%20warmer_zpsc19jwc2o.png


More information here:

http://civic.hondafitjazz.com/A00/HTML/3P/SNB6E3PE10400013049KBAT00.html


This is the part that we are going to use to connect the cooler.

I have the stock air box and the battery out for these pictures so you can see where the warmer is on my car and theoretically on the 2012+ Civics as well.

Looking down just behind the radiator cap:

P1020912_zpspzlhaepk.jpg


Looking more straight down below where the stock air box would be:

P1020913_zps38ufd9m1.jpg


We are going to be removing the lower hose from the warmer. The larger hoses are coolant. If you see the wire behind the lower hose, I removed that clip and pushed the wire out of the way. I was unsure how much fluid to expect to dump out. It was very very little. Getting the upper hose clamp off was the toughest part of the project. Just keep grabbing it with pliers and pulling/twisting until the hose comes off the end of the silver nipple.

P1020914_zpsio2lwlif.jpg


Put a basin below the car to catch any ATF that comes out. I used a cut bottle zip tied to the wire mounting bracket to help guide the fluid where I wanted it to go.
P1020917_zpsfeqafnhh.jpg


Just keep working it and pulling until you get it off the end. Its on there pretty good. You can see how long the nipple is in this pic once I got the hose off. Very little fluid came out but leave the basin under the car. It will continue to slowly drip. If you pull the basin you'll end up with a mess.

P1020918_zps3fvdeuzu.jpg


Now for the other end of that hose: This one the clamp came off easier and I just cut the hose off. I put the paper towels down first and you can see how much fluid came out on the towels


P1020920_zpshv4qsmti.jpg


NONE! No fluid from this end. The other end will keep dripping slowly.


Time to connect the hoses to the cooler and then to the car. This is how I originally tried to run the longer hose. It ended up being way too long and you cannot bend these braided lines very much.

P1020910_zpslkpyskug.jpg


Be ready to play with the lengths and the rubber replacement hose to get a kink free setup.
 
The Install Continued:


So lets look at that stock rubber hose we took off. I could not find information about the diameter anywhere. The local Honda dealer did not know either. I measured with calipers and my best estimate was 3/8" and the guy at auto zone agreed. I was wrong. Use 11/32". You will probably have to order it online.

EDIT: The 3/8" hose leaked very very slightly. You should use 11/32" transmission hose. The difference is 9.5mm to 8.7mm. The 11/32" is very tight but it will not leak.


This is the only visible marking on the stock hose I removed:

P1020925_zpsaxmt3sm1.jpg


Compared to the new 3/8" hose it looks pretty close if not perfect. (Its not perfect though, its slightly larger. Still fits snug.) Its not right. 11/32" is what you need.

Stock LEFT New RIGHT

P1020928_zpsat6rflbw.jpg


So lets connect the new rubber hose to the -8AN to 3/8" hose barb fitting. This is as far as the hose will go onto the fitting. Don't worry about it. Use a proper size hose clamp just behind the barb itself.

P1020933_zpsvb2hwppe.jpg


The AN fitting is loose at this point and will drop down to meet the hose, hence you cannot force it past that point.
P1020934_zps17hdcbzg.jpg


I had to make an adjustment and only use the longest section of the braided line. I disconnected the 10" section here and ended up attaching the black fitting and hose at this junction.

You can see I also removed the basin as I did not know it was going to slowly drip and I made a mess. Now you know, LEAVE THE BASIN! hahaha. Thats seriously like an hours worth of dripping. It is very little that comes out.

P1020932_zpsn45zpxtc.jpg


New connection: Measure how long you need the rubber hose to be and run it to the LEFT barb. Don't forget to slip a hose clamp on there.

P1020936_zps8f8zungv.jpg


I ended up using the shortest 10" section to connect the other end of the cooler to the warmer. The barb that comes out of the warmer is at a very odd angle so the rubber hose is needed to be able to route it cleanly without tight kinks or bends. Adjust the swivels but be careful as turning them can cause the port on the cooler to turn and loosen also. Hold them with a wrench when turning anything. Route the hoses and lines where they make the most sense or best fitment for your car. Don't forget to put a hose clamp on the end of the new hose when you connect it to the warmer.

Lines run: You can see the funky turn the rubber hose needs to take to come out of the warmer and head towards the cooler. I bought 2 feet of 3/8" hose so I had plenty to work with. Returning everything to stock would be as simple as undoing two clamps, two rubber hoses, and running a new section in the stock location.

You can see how short the rubber hose needed to be on the left side. Note the two hose clamps. One on either end. The hose is snug but use them anyway.
P1020941_zpsdako9nor.jpg


Mounted and lines run: I put the basin back when I saw the dripping.

P1020937_zpsnvpzogb7.jpg


I just need to do some general clean up and wire the temp gauge tomorrow. I ran out of daylight.

Comments and critiques welcomed.
 
Last edited:
Install completed and I've driven with it for a couple days so far no leaks!


Install notes:

I ended up not using one of the sections of braided hose. I think you can get away with just two short sections and a longer bit of the rubber hose. Measuring before hand is tricky since you may end up moving things around a little bit . Remember that the hoses need to have some slack in them as they do shrink a bit when they get fully up to temp. I've read up to 10% which on a 20" long hose means you need 2" of slack.

The braided hoses do not bend very much and you should not force them either. If you buy all the parts I listed you will most likely have an extra section of hose and an extra male to male union adapter left over. I would rather be prepared and have components to make adjustments with than tear my car apart and be stuck with no flexibility. Just a heads up on that.

So why the braided hoses and all the fancy hardware anyway?

I wanted to run a temp sensor and it seemed like the easiest solution was to use the nitrous port style hex adapter and thread in the sensor. Other than that I would have probably picked a cooler with barb fittings and run rubber hose the whole way.

Buy 90 degree fittings for attaching the hoses to the cooler. It will save you some space in an already tight area and it will make routing the hoses a bit easier.


Full test coming up this week at the Dragon....
 
Last edited:
Awesome write up! I need to take some time later to read it all the way through. How did the temp gauge work out?
 
  • Like
Reactions: Nix
It seems to be working pretty well. I haven't had a chance to take a long drive but its reading. I see the temp staying below 160 for most of the driving I've done so far. I need to figure out where I'm going to mount it permanently. I've just got the wires bungled with zip ties and the gauge taped to the change holder
 
I'm sure you'll clean it up nicely. I'm interested to see what happens at the dragon and what kind of temps you get.
 
  • Like
Reactions: Nix
Update since i've been lazy and sort of forgot about this....

Uhhh....


Cooler works great! Temps stay low on the highway. At the Dragon, which is definitely an unusually prolonged high speed high stress situation, the temps got very very high. The main killer of AT's, fluid, and things in general, is heat. The temps got way over 200 degrees. Being that speed at the Dragon and in the mountains is not very high, finding spots where you can accelerate up to 50mph+ definitely helps. You can visibly watch the temps drop back to a safe range. From what I've read 170 degrees+ is where ATF starts to break down. I cannot imaging how hot the trans used to get before the cooler.

It is a small unit but the stacked plate type is the most efficient. I think it pulls between 40 and 60 degrees of heat out of the fluid - depending on speed. It does require a bit of airflow and from what I can tell, less than 40mph does not move enough air to force it through the cooler effectively. Which is great for tooling around town and cold weather. It is just starting to get cold here so Ill try and remember to update with cold weather temps and performance. So far nothing but smooth sailing and it really eliminated a lot of the hard shifts and hanging I experienced in the past.

Highway temps = 140-ish

Hard insane track type driving = 200+! Yikes! But..... the cooler pulled it back down below 200 with some quick blasts of air. It works.


Problems: I have a leak. A very very very small slow leak. It is definitely from somewhere around the temp sensor. I had read online that the glow shift sensor tends to leak. I can't tell where the leak is exactly but it is somewhere around the hex port with the sensor threaded in. I don't know if I overtightened something or if it is that crap NPT thread that the sensor uses. I tried to apply JB weld steel stick while I was at the Dragon and found the leak. Its seriously 2 drops per day. I can wipe it clean every morning with a paper towel and have no mess at all. I ignored it for a couple weeks and there is some visible drippage on the plastic below the lines.

Nothing serious and as such I've ignored it. I'm going to attempt to patch it first with regular JB weld but the fact that it seeped through the steel stick putty makes me suspect that the petroleum based fluid on everything will prevent a good bond. However, for $5 and not having to take the system apart Im going to risk it.


Things to consider if you try this:

I would suggest trying a different gauge or no gauge at all and just running rubber lines. This is only because of the leak. And it may not be from the sensor. I can't tell! The glowshift gauge is great and the wiring, while complicated looking, is easy to sort out and run. If you want a gauge the glow shift works and looks great with a nice option for the extended harness and sensor port extension all on the same website. Eh, I sound like a shill for glowshift but I like their gear so far. Also, this is a non-essential gauge. If it fails, my car won't die.

What I would do different is assemble the hex port and sensor assembly and then use regular JB weld on the entire thing and around the wires. Just to prevent any future leakage issues. I used steel stick cause I keep it in my car for this sort of thing and I was in the mountains when I found the leak. It could be pressure based and I was driving the heck out of my car. That said..... JB weld the whole thing. Or use whatever petroleum resistant and heat tolerant epoxy you want. With the AN hardware if you have an issue with the port you can easily disassemble the next port and connect the braided line right to the rubber line or replace the hex port completely. Thats the beauty of the expensive but modular AN setup I put together. Pieces can be swapped, traded, eliminated.


Allright thats my update.
 
I keep this in my car with my tool kit. If something starts leaking you just mush a blob of this together until it starts getting hot, yeah you can feel it, and then push it around the area and it'll harden up pretty well.

WEAR GLOVES! I keep a baggy of latex/nitrile gloves in there too.

http://www.jbweld.com/products/steelstik-epoxy-putty-stick

The gray stuff on the outside is separated from the black core by a thin plastic layer. You need to really mash them together until you get a dark colored putty. Stuff works pretty well.

weld-stick-weld-134255.jpg
 
200+ temps are kinda scary. I'm glad the cooler is helping to bring that down. I'm curious how mine is doing real world as I have a different style.

Interesting that it only functions above 40 mph. Makes sense, it's just info you can't pin down without the temp sensor.
 
Cold weather update:

Well, no issues driving in cold weather or with the car sitting overnight in below freezing temps. The Derale cooler seems to have enough pass through capacity that I haven't noticed and sluggish shifts or hanging gears. The fluid must be moving enough. One thing I noticed is that at low speeds around town, 30-ish, there really isn't enough airflow to push through the cooler. It helps get the temps up to operating range without cooling the fluid too much. If you get up to 45+ the air starts to cool the fluid noticeably. Well, at least what I can see on the gauge and the needle. I haven't don't any extended highway trips in the cold but Ill post up what I see.

Leaks: The leak has worsened at the temp sensor. This was something I had read might happen prior to install and I tried to patch with steel stick. I'm going to order a new sensor, extender, and hex port. Ill JB weld the whole thing before install and hopefully not have any more leaks. I'm also going to swap out the 3/8" hose for 5/16" hose. I think the 3/8" is not quite tight enough on the return barb and there appears to be a slight bit of spray pattern leakage. I think maybe when I was hammering the crap out of it at the Dragon the pressure was high enough to push past the barb and clamp.

The Gauge: Works great. No complaints at all. Genuinely impressed that it wasn't a piece of crap. I had low expectations. But, I could not find a good place to mount it and I think its just too darn big. I'm going to order one of their digital gauges and try to remove the LED panel. Id like to find a small digital readout that just has the temp displayed as a number. I'm going to order the round gauge from Glowshift and hack it apart as I already ran their harness and don't want to redo 8 wires.

Wish I could find just this panel with the same harness connector on the back:

s-l225.jpg
 
Major update: All leaks fixed! New rubber hose size: 11/32"

So for anyone attempting this, I had a slow, progressively increasing leak over the last couple months. I was getting a leak around the temp sensor and the port that I used. I had read about this being a possibility online prior to installation. At first there was no leak but after a few weeks a drip developed. I do think this is directly related to the sensor being tapered pipe thread and needing to be jammed together tight enough to not leak but not so hard that the aluminum port cracks. ugh. I tried to JB steel stick the leak but it did not work.

The fix was buying new temp sensor and port. I threaded the sensor in much harder than last time and I did not use any thread lockers or teflon. I got it almost flush with the port piece and then I JB welded the entire joint between the two and let it dry for about a week. Outside weather prevented install earlier so I know it had long enough to cure! haha!

I also swapped the transmission hoses from 3/8" to 11/32" as I had some seepage around the hose ends. The 3/8" was close but not correct. If you do this install get 11/32" transmission hose. I had to order mine online, no local places carry that size. The difference is 9.5mm down to 8.7mm. The 11/32" hose is difficult to get onto the flared barbs but I have no more leaks or seeping. Everything else still works and fits fine with the new hose size so nothing else needed to swap out.

Also be careful when shopping for transmission hoses online. There are a few options and some have much better psi and temp ratings. Get the best one you can find. I ended up getting one in a branded Derale box but it was a Continental hose inside. I have seen Goodyear hose in this size with good ratings as well. O'reilly auto carry this size hose but the burst and working strength were half of the Conti/Goodyear hoses. I believe those were Hayden branded hoses. Just a heads up and something I noticed.
 
After reading this article I am wondering if a transmission fluid change could be done by removing the fluid hose from the warmer and letting the transmission pump the fluid out. This is typically done on many other vehicles by removing the line at the transmission cooler. Of course you drain the pan first and refill the amount drained out. Then turn on the engine and pump out about a quart, stop the engine, and refill the amount pumped out. You do this several times until the fluid being pumped out is clear. This results in a near 100% fluid changeout.

This seems like it would work better than the (dumb in my opinion) Honda recommended method of 3 sequential drain and fill which only ends up with about 75% new fluid in the system. I had done this on a 1998 Accord and it worked well.
you'd like this

View: https://www.youtube.com/watch?v=MsdPAadc9fY
n
 
Back
Top