DSpizzle
Well-Known Member
Alright. This is my First DIY. This is a pretty straight forward Install. I got a little tired of taking pictures toward the end. I believe I got it all though.
This is the Kit that I got.
http://prlmotorsports.com/prlmotors...ion2012civicsistockmanifold.aspx#.U2zEkK1dV5U
Make sure to have extra clutch fluid.
Step 1:
Perform all the steps for Resonator Delete. I left snorkel in because its out of the way.
Step 2:
Remove stock Manifold. See the 5 RED circles below.

Remove top of airbox with the two RED clamps and pull up on lower airbox where the BLUE is. It is only held down by rubber grommets at this point.

Remove battery to get to lower tubing.
There are 2 bolts holding the tubing in on the underside of the battery bracket marked by YELLOW. remove tubing. (All Stock intake should now be gone).
Step 3:
Now remove the Battery Tray. 3 visible RED bolts and 2 on the underside where PURPLE is. (Save bolts, they are reused with new kit.

Step 4:
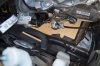
Time to remove old clutch line. Break this nut loose but do not fully remove. Then slide that silver clip out.

Loosen the the RED with 2 wrenches. Then remove the 2 bolts in YELLOW from the transmission (Save these 2 bolts). Take clutch line and bracket out at same time. Fluid will leak a little.
The Bleed valve is behind this tag in BLUE for after the new line is installed.
Step 5: Install Provided bracket and reuse bolts. Torque to 20Ft Lbs

Step 6:
Connect only this side of clutch line. Tighten all the way and add the silver clamp that was removed earlier back on.

Step 7:
Install battery relocation tray. This uses 3 of the previous 4 bolts and included the ECU bracket bolt.
Step 8:
Run clutch line up through rubber grommet and connect to female side of clutch line. Tighten all the way.

Step 8:
Bleed clutch.
I have read different things here. This is what I did.
-Removed gray cap, and rubber cap on bleed valve
-Pumped clutch about 3-4 times
-held clutch down with piece of wood
-broke open bleed valve
-closed bleed valve and repeated until the clutch felt right.
Make sure fluid is topped off or you will have to start over...
Note: After my install, my clutch was still wrong on my first drive. There is plenty of room to get in there after its installed.
Step 9:
Batter goes into the tray opposite of the way you removed. Positive side should be closes to front headlight.
The wiring harness must be loosened for it to reach. Dont forget to add the provided terminal extension to positive side.
Negative harness should reach just fine.
Use J Hooks from before for battery tie down in RED
The brown clip needs to be removed and moved to get enough slack in positive harness YELLOW
Battery tie down bolt needs to be replaced with the one provided with rubber on it. Place washer under rubber. GREEN
This is the Kit that I got.
http://prlmotorsports.com/prlmotors...ion2012civicsistockmanifold.aspx#.U2zEkK1dV5U
Make sure to have extra clutch fluid.
Step 1:
Perform all the steps for Resonator Delete. I left snorkel in because its out of the way.
Step 2:
Remove stock Manifold. See the 5 RED circles below.
Remove top of airbox with the two RED clamps and pull up on lower airbox where the BLUE is. It is only held down by rubber grommets at this point.
Remove battery to get to lower tubing.
There are 2 bolts holding the tubing in on the underside of the battery bracket marked by YELLOW. remove tubing. (All Stock intake should now be gone).
Step 3:
Now remove the Battery Tray. 3 visible RED bolts and 2 on the underside where PURPLE is. (Save bolts, they are reused with new kit.
Step 4:
Time to remove old clutch line. Break this nut loose but do not fully remove. Then slide that silver clip out.
Loosen the the RED with 2 wrenches. Then remove the 2 bolts in YELLOW from the transmission (Save these 2 bolts). Take clutch line and bracket out at same time. Fluid will leak a little.
The Bleed valve is behind this tag in BLUE for after the new line is installed.
Step 5: Install Provided bracket and reuse bolts. Torque to 20Ft Lbs
Step 6:
Connect only this side of clutch line. Tighten all the way and add the silver clamp that was removed earlier back on.
Step 7:
Install battery relocation tray. This uses 3 of the previous 4 bolts and included the ECU bracket bolt.
Step 8:
Run clutch line up through rubber grommet and connect to female side of clutch line. Tighten all the way.
Step 8:
Bleed clutch.
I have read different things here. This is what I did.
-Removed gray cap, and rubber cap on bleed valve
-Pumped clutch about 3-4 times
-held clutch down with piece of wood
-broke open bleed valve
-closed bleed valve and repeated until the clutch felt right.
Make sure fluid is topped off or you will have to start over...
Note: After my install, my clutch was still wrong on my first drive. There is plenty of room to get in there after its installed.
Step 9:
Batter goes into the tray opposite of the way you removed. Positive side should be closes to front headlight.
The wiring harness must be loosened for it to reach. Dont forget to add the provided terminal extension to positive side.
Negative harness should reach just fine.
Use J Hooks from before for battery tie down in RED
The brown clip needs to be removed and moved to get enough slack in positive harness YELLOW
Battery tie down bolt needs to be replaced with the one provided with rubber on it. Place washer under rubber. GREEN