Privman
Active Member
RBC Write Up
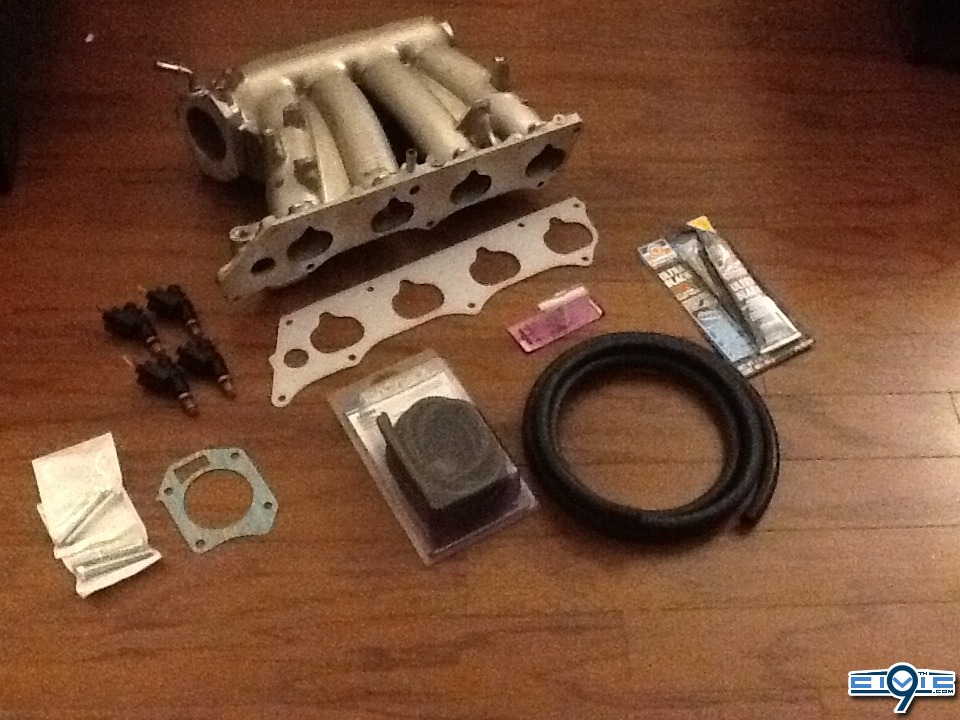
Part List:
RBC Manifold (06-11)
Honda RBC Intake Manifold - Ascension Motorsports
K24 Thermal Manifold Gasket
CorSport: Honda - 2012+ Honda Civic Si - P161
8th Gen Throttle Body Gasket (Thermal)
CorSport: Honda - 2006-2011 Honda Civic Si - P106
8th Gen 310cc Injectors (RSX-S works as well)
8-10ft Vacuum Hose (3/8)
Vacuum “T” Connector (3/8)
Wire Cover/Electrical Tape
Plug Bolt (15mm) or (rethread hole)
4 Shorter Bolts (M8-1.25 X 50mm or with TB Spacer M8-1.25 X 75mm)
Thread Tape/Thread Locker
RTV
Coolant
Now before I start I’ve never written a write up before so go easy on me… if you see somewhere I can improve or explain differently/in a better way PM me and let me know. I will be more than gladly to edit it! Understand this will most likely void your warranty with Honda. I’m not taking any responsibility in any mistakes or problems that this occurs with your car…. Do this at your own risk!
Tools I used:
Couple screwdrivers
8mm, 10mm, 12mm, and 13mm sockets
Couple extensions
Needle nose pliers
Wire cutters
Soldering iron
Intake Manifold:
The famous “Peanut” shaped coolant hole on the face of the manifold needs to be matched with the circle hole on the intake manifold gasket. The best way is to just take the gasket & manifold to a machine shop and have them match them both. If you keep the coolant hole "Peanut" shaped it'll leak coolant.
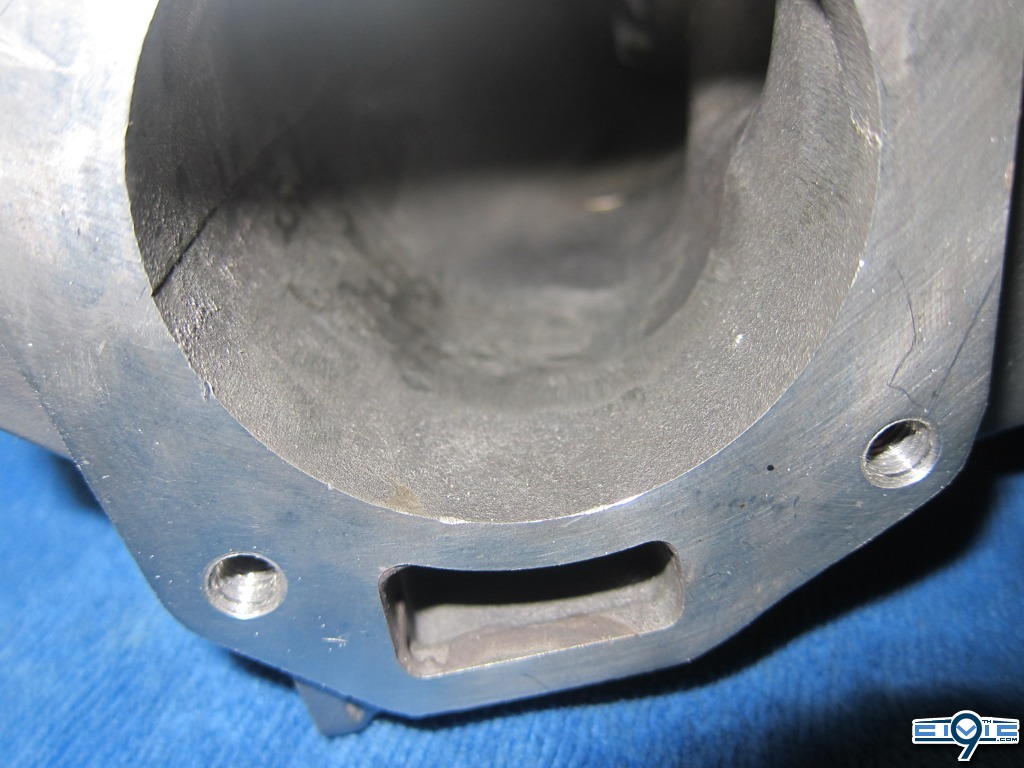
On the throttle body side there is a “ivac” hole that our TB doesn’t use. Some people have just closed it off on the manifold TB face side… But recently it’s been proven to flow much better if you close this hole off INSIDE the manifold… there is a small hole a couple inches inside the opening. I would also have the machine shop do this while it’s there. Most of them charge by hour so why not?
There is another port on top right of the manifold… Its circular, it needs to be plugged. The easiest way to plug it is to re thread the hole and just put a matching bolt in. I also used thread tape to wrap around the bolt before I put it in. another route you could go is having it welded up as well. It's your choice.
Between injectors 2 & 3 there is a port sticking up. This port is useless because our motor doesn’t use it. Just leave it there untouched. When the manifold its mounted the other end leads to nothing but gasket/motor.
On the left side of the manifold there is a vacuum port you’ll need to “T”. I'll explain how to later when putting this on. You'll use your "vacuum "T" along with your vacuum hose you purchased.
Most people will want to go ahead and have the manifold bored/ported while it’s off for later updating the TB. You can order a modified/unmodified from Ascension Motorsports - Ascension Motorsports
Plug hole on the right:
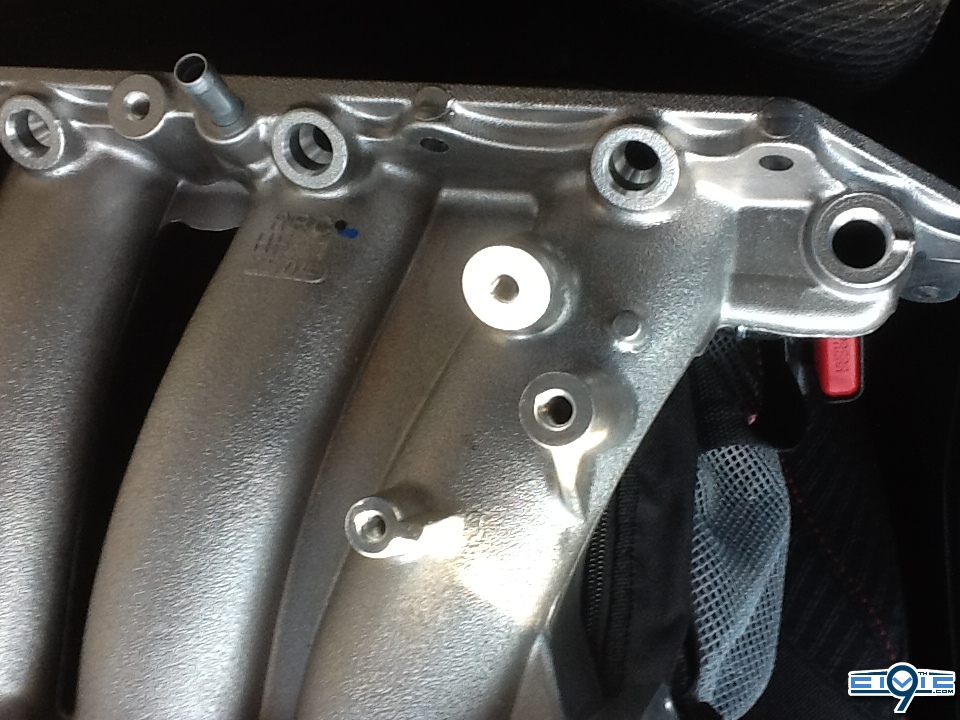
Stock:
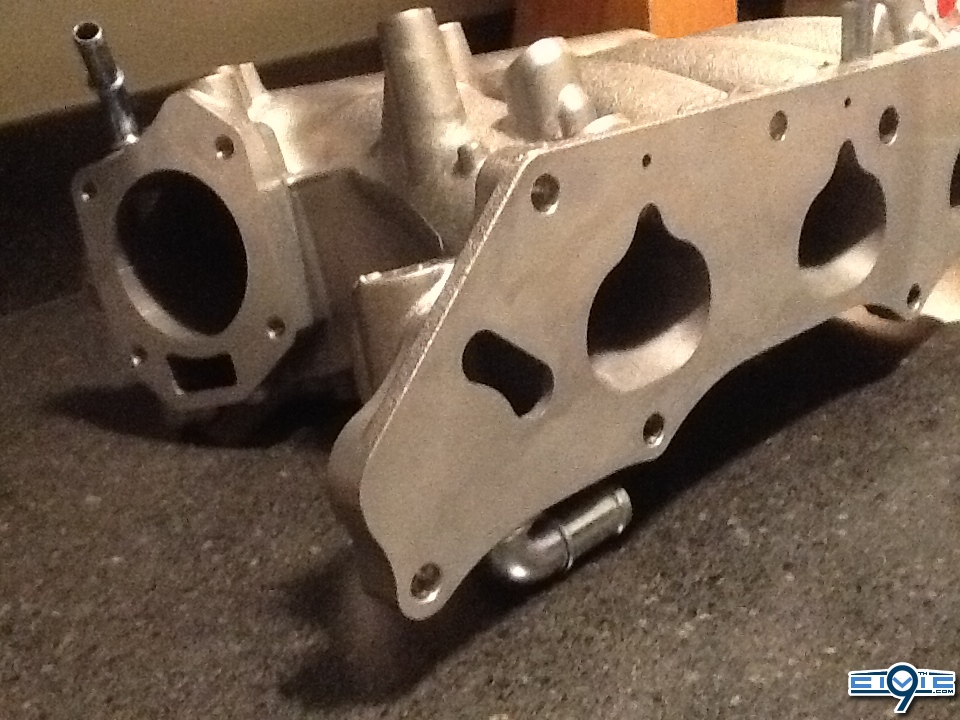
Modified:
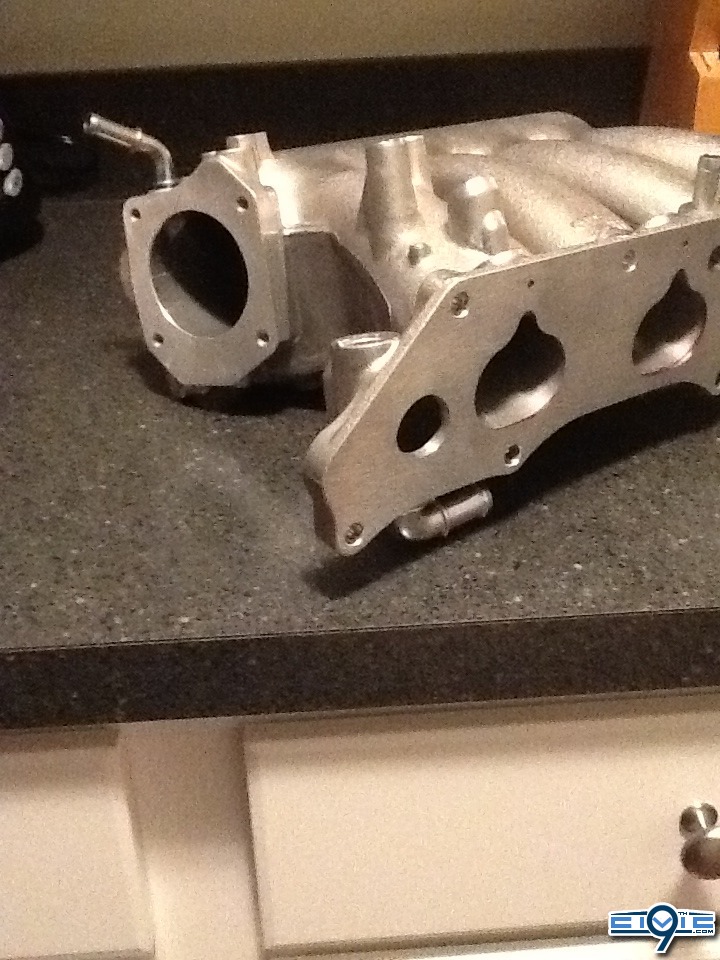
Modified on the inside:
Injectors:
The injector holes on the manifold are to small for our 9th Gen injectors.
In order to do this swap you’ll either need to do one of two things. A) Splice 8th Gen injectors/Clips into the existing harness or B) Have a machine shop open the holes to make your stock 9th Gen injectors fit… this is not recommended though. It’s much easier just to splice/solder the wires. If you want to use the stock injectors you will need to open up the ports as follows:
0.640" (16.3mm) Larger Fwd Bore
0.498" (12.7mm) Smaller Aft Bore
I bought mine for $50 shipped on 8th gen forum
Throttle Body:
Both Gens have a “Drive By Wire” throttle body. So the TB is a direct fit. As well as a plug & play.
You will need shorter bolts. I picked my bolts up at Lowes for .92$ a pack. (Needed 2 packs) M8-1.25 X 50mm. You can use stock bolts if you happen to have a TB spacer. M8-1.25 X 75mm
You can use a 8th Gen thermal TB gasket with this as long as you close the ivac hole one way or another.
Intake:
I used the stock intake but I had to buy a couple silicone pieces to make it work. The throttle body on the manifold sits over farther than the stock one. I know some people use injen and use the stock pipe to connect it together, Most people now are making custom intakes to go with the RBC. You have to relocate battery in most cases though if you’re making a custom intake. That’s all up to you, just know you have to customize any intake to make it work with the RBC in some way.
Gaskets:
I used a Manifold Thermal Gasket as well as a Thermal Throttle Body gasket. This will help with heat soak. They are a little more $$ but are be worth it! They are also reusable if you have to take Manifold/TB off for any reason.
Hoses/Connector:
You’ll need 3/8 of an inch hose to replace/shorten/lengthen vacuum/coolant hoses. Some people have found vacuum hose others just use fuel hose… both of them work just as well. I got 8ft of hose and had enough to do what I needed to do so you choose the amount you want. You might also need ¼ of an inch hose to connect from valve cover to intake hose. I used about a foot and a half for that.
Once you have all the parts/supplies & you’ve finished modifying the manifold you’re ready to start. Make sure your car is cold and remove the negative terminal from the battery; you will be unhooking electric wires throughout this process. Also, take manifold cover off.
==
Step 1
Take your intake system off. This should come off pretty easy. You should be able to undo 2 clamps; One on the throttle body side and one on the air box side. You will also have the clamps that attach the top part of the air box to the bottom. There is one on each side. Also, don’t forget to undo your mass air flow sensor wire from it.
Step 2
Next take your throttle body off. There are two hoses on the bottom of it so be careful. I took them off first after clamping them with vice grips.Then there will be 4 bolts attaching the throttle body to the stock manifold. You’ll need to take these out and then your TB/Gasket/Spacer will come off.
Step 3
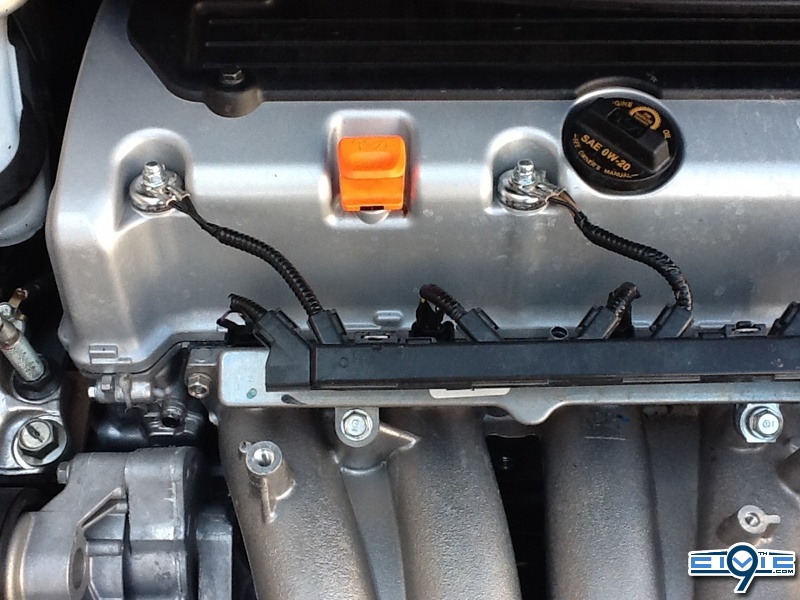
Now take your fuel rail off. This should be two bolts right on top of manifold. Make sure you unbolt the two ground wires that are attached to the rail as well. I didn’t disconnect my entire fuel rail, I just layed it to the side after unbolting it. Then remove each injector from each slot/clip. I cut the wire about an inch after the clip at this point but I didnt splice or solder the 8th Gen injectors just yet.
Step 4
The next thing to come off is the plastic part of the manifold. It will have two hoses connected to it as well as the electric wires on the right of it. Just unbolt the piece that holds down the wires and put it to the side. Undo the two hoses. One runs to the very front the other runs on the right of the manifold. When you pull the plastic piece of the manifold off now all you have left is a coolant hose and the aluminum runner piece. This is where your going to lose coolant. I undid the hose on the bottom right of the runners first. Draining that helped a little. Then there should be 8 bolts holding the runners on. Once you have them all undone pull the runners off and watch the coolant drain lol.
Note: Now that you have everything taken off its time to put everything back together including splicing/soldering the injector wires…
Step 5
At this point I put my thermal manifold gasket on the head with tracing the outline of the gasket with some RTV (Both sides). Make sure you connect the coolant hose to the bottom of the RBC before putting it back on. If you wait it’ll be pretty hard to get to and put back on. Next I traced the outline of the manifold itself with RTV and put it on as well. Next I put the 8 bolts back on to hold the manifold up to let the RTV settle.
Step 6
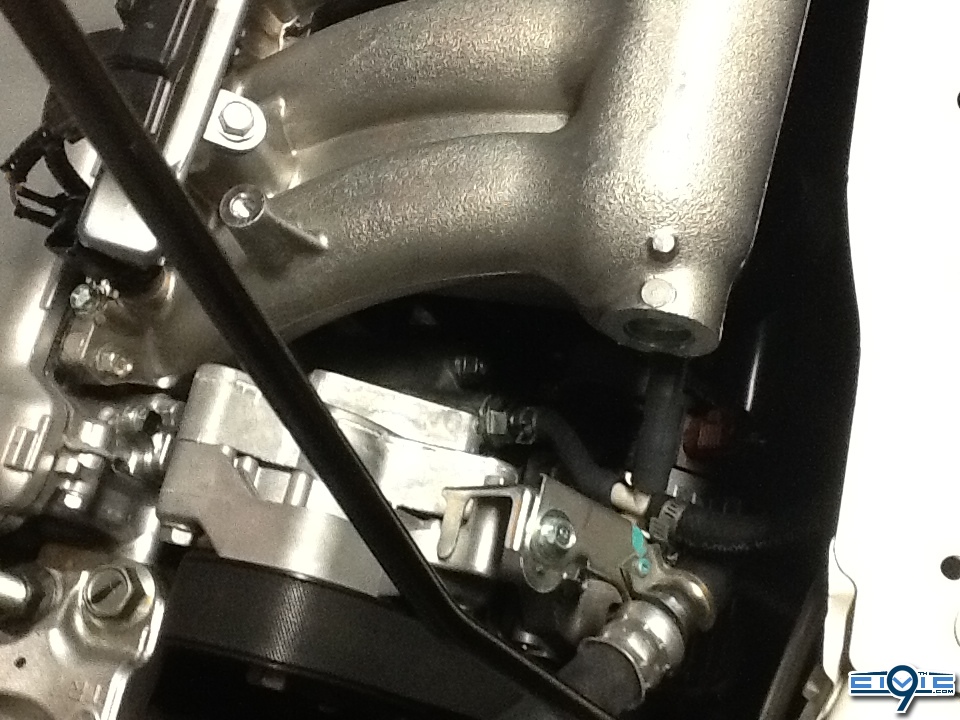
Now you can bolt the throttle body back to the manifold. Don’t forget to put your gasket and/or spacer back on at this time as well. You’ll use the new bolts you bought if you don’t have a spacer! If you do have the spacer you can use your stock bolts! When its on there will be two coolant ports on the bottom of it. There is a bottom and top coolant port. I ran the bottom port to the silver housing coolant port on the block. I ran the top port to the black metal housing pipe. Refer to the pictures below. Also, connect the electrical pin connector to the TB at this point.
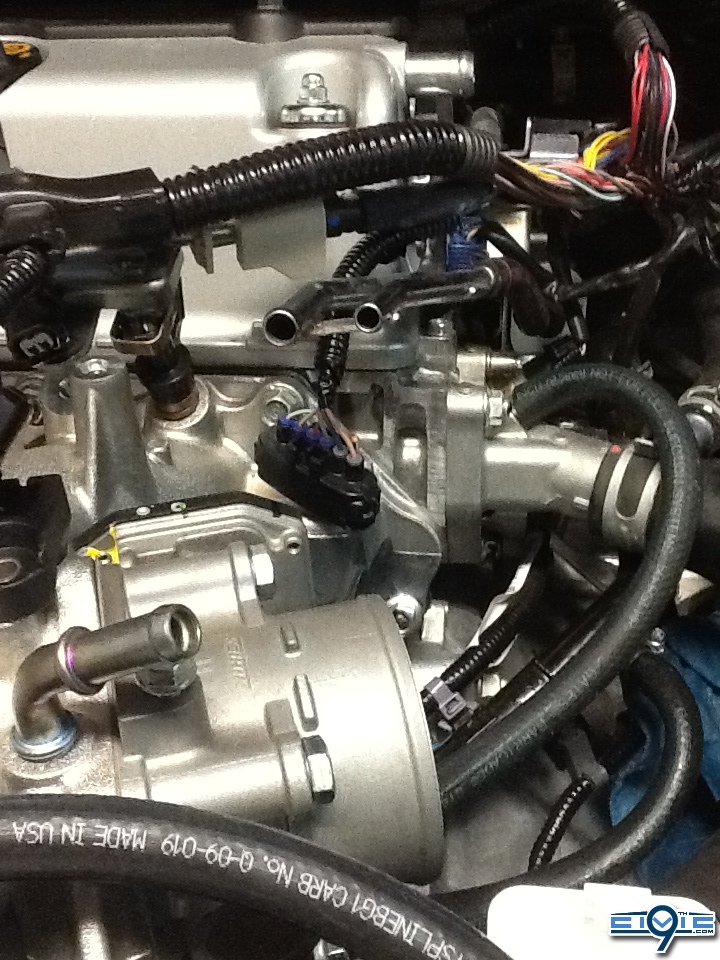
Top
Bottom
Step 7
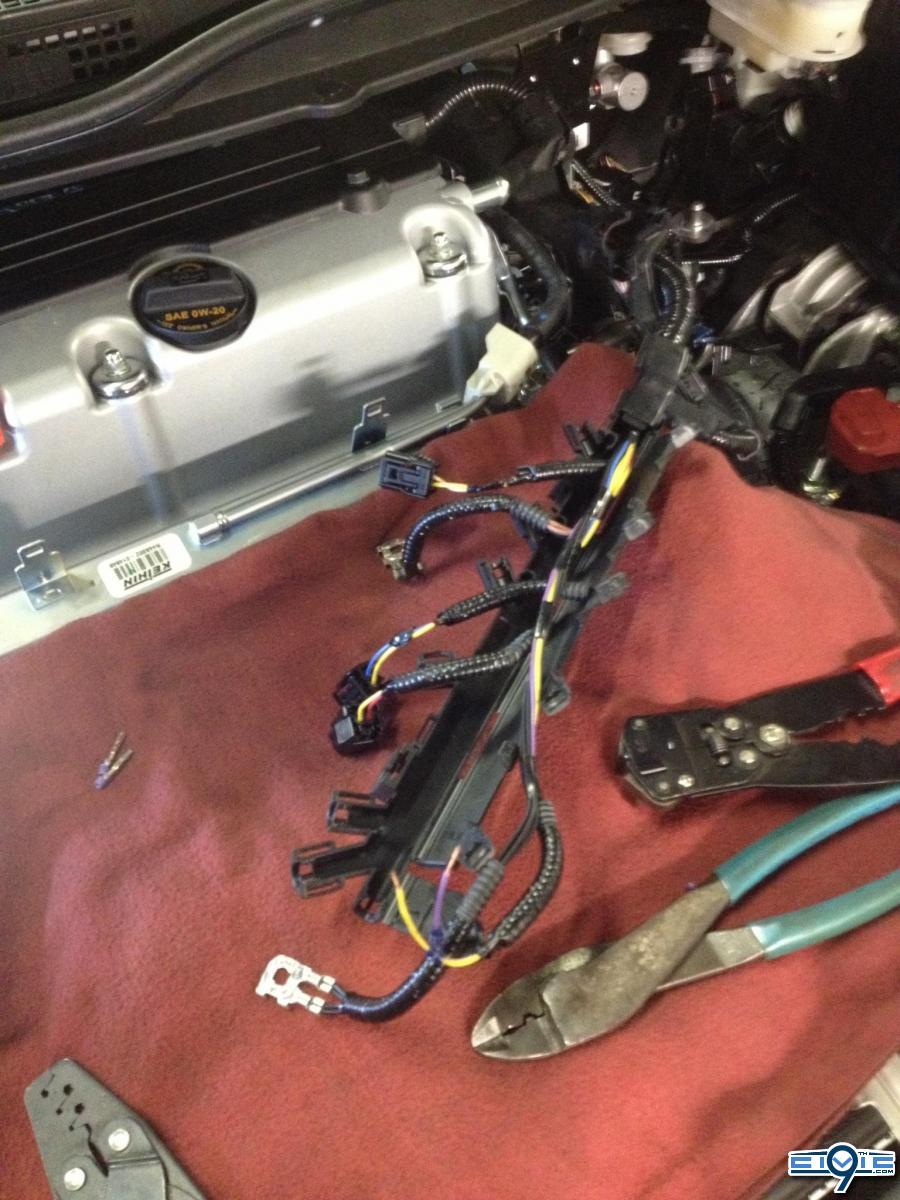
While the RTV settled/dried I spliced/soldered the injectors. I cut the stock clips about an inch left of wire. So if I ever wanted to return back to stock I could undo it and splice my 9th Gen ones back on. But anyways after splicing them, you’ll see there are two wires for one injector. Stock yellow wire goes to 8th gen colored wire….Stock colored wire goes to 8th gen striped one. The easiest way to remember is the stock yellow wires do NOT go to the 8th gen yellow wires!
Note: you might have to pull the black hard plastic wire covers off to extend the wires to make them reach the TB/Fuel rail etc. Some people had enough slack some didn’t.
When putting the whole injector assembly back together along with the ground wires make sure the ground wires are grounded somewhere other than the manifold itself. The thermal gasket used isolates it from the proper ground it needs to perform. I put mine on the bolts that hold the valve cover on... Picture is below.
"The ground wires MUST be moved to the head (either under a cam tower nut or to the head directly by one of the cam sensors) or you WILL have voltage drop issues" - VitViper
grounded pic -
Step 8
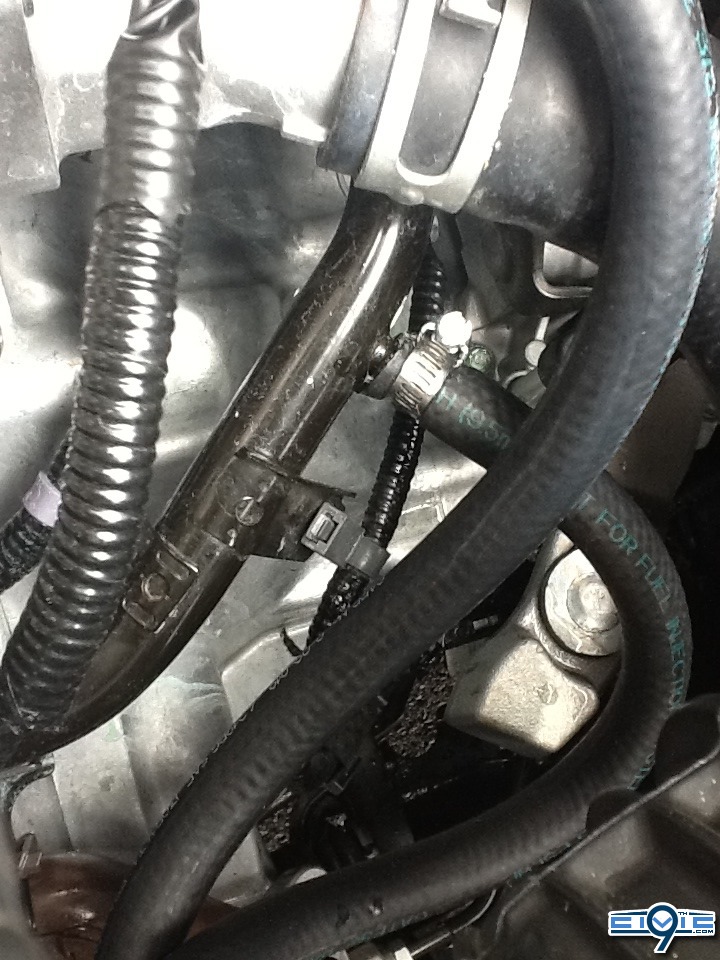
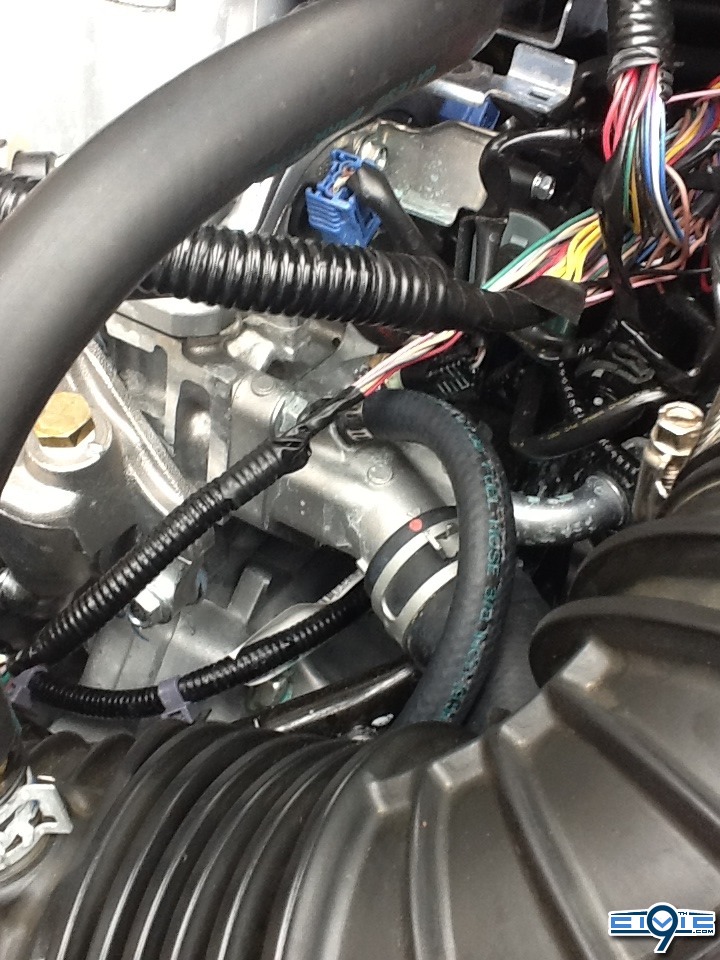
Now that the injectors are finished I went back to the manifold itself. I went around and made sure each bolt was fastened pretty tight. I don’t know the exact torque needed. Just fasten them pretty good and check after a day or two of driving. On the passenger side of the manifold (Left) there is a vacuum port on the manifold and on the block as well. This is where your going to use your “T” connector. I ran about 3inches from the block port and about 2 inches from the manifold connected the two with the “T” connector then ran a hose from the other part of the “T” underneath the RBC and up by TB to the silver hose port that it goes to. It goes to the silver port on the right (Driver Side) pictured below. The passenger side one (Left One) goes straight across to the port on top of manifold right before TB.
At this point in the swap you should have the manifold mounted, the left side “T”/ran, the throttle body mounted, the TB coolant hoses ran! You’re almost finished!
Step 9
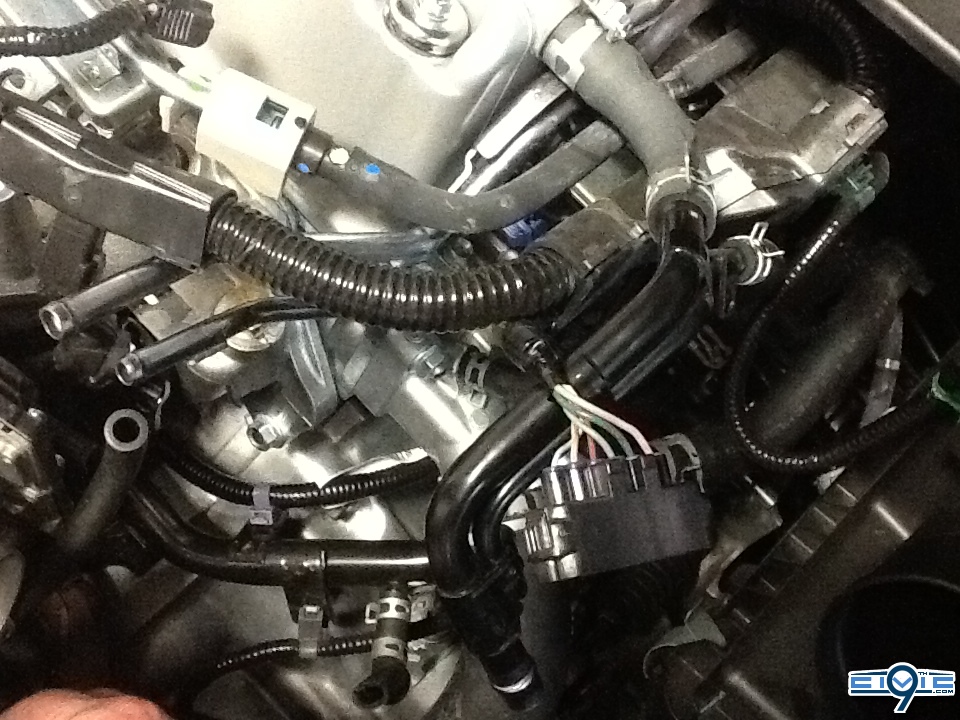
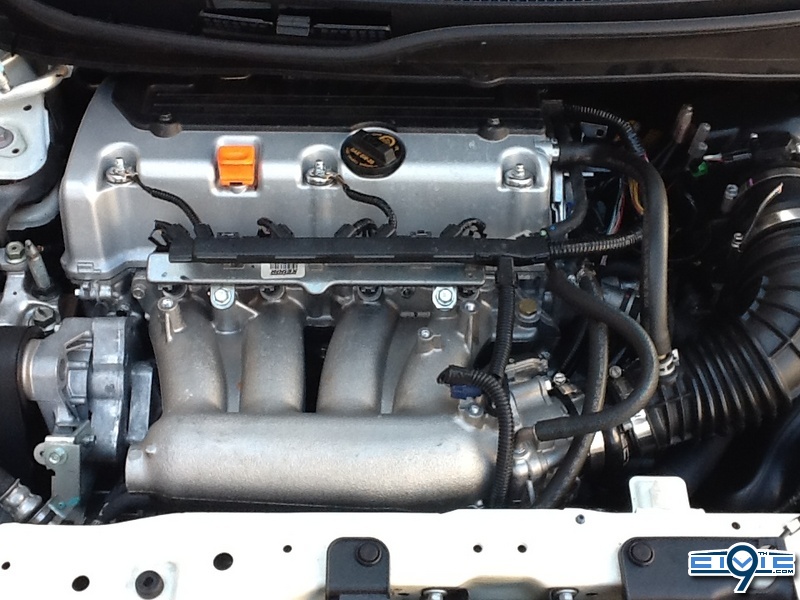
It’s time to mount the fuel rail and put the injectors in. You should be able to put the rail on the two mounts and then put the bolts in. You might need about a ½ inch spacer to put between the RBC and the holes on the rail. There is a little space between them when you try to mount it! Don’t forget the two ground pieces that require you to bolt them down. I ran both of mine to the LEFT and MIDDLE metal things by oil cap. Look at finished product picture for reference! Once its mounted then you’ll want to mount the plastic wiring/clip that runs off the rail that mounts to the TB. This is also pictured below in the finished product. You might have to pull the black hard plastic wire covers off to get some slack.
Step 10
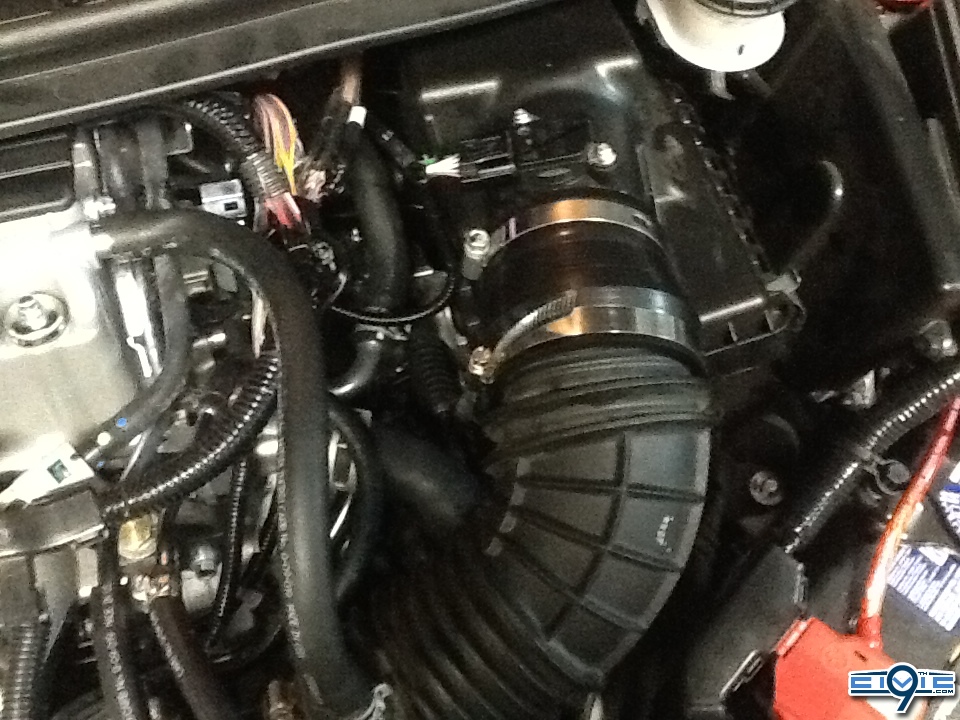
Last thing that should be done is putting intake back on. Now how/what you do from here will probably be different from what I did. I’ll explain what I did though. I used the stock intake and air box. Since the RBC sits the TB further than the stock manifold that means your going to have to cover more space with piping to connect the intake. Connect MAF wire back!
I bought 2 pieces from auto zone. I put one ne TB coming out then I connected it to the stock intake hose. I ran ¼ inch hose from valve cover to the hole in stock intake hose. Then the other piece I bought I ran from the end of the stock intake pipe to the air box itself. Clamped it then was finished!
Connect your battery, fill with coolant & burp a long time, drive & have fun… TUNE if possible.
Note: If you don’t burp the car with coolant afterwards you WILL have heat problems! I went a couple weeks without heat because I didn’t burp the car good enough. I only had heat when in acceleration! Now if you don’t tune this you’ll most likely get a CEL. If this happens get it checked, the only thing that should come up is your running rich in bank one.
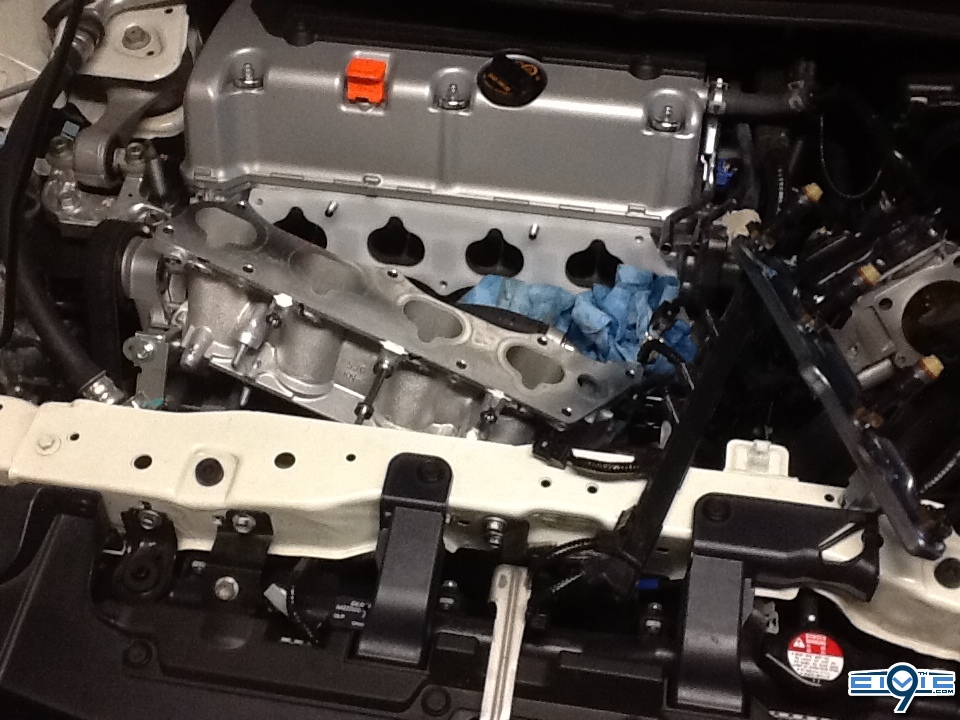
Finished Product!
I just wanted to say thanks for your time & reading! I hope this helps… If you have any questions don’t be afraid to ask the few that have already done it don’t mind helping at all! That’s what we are here for. They’ve helped me out a lot. I wasn’t the first to do it, hopefully not the last either! One last thing RBC …….. FTW!
