- Thread starter
- #261
Navigation
Install the app
How to install the app on iOS
Follow along with the video below to see how to install our site as a web app on your home screen.
Note: This feature may not be available in some browsers.
More options
You are using an out of date browser. It may not display this or other websites correctly.
You should upgrade or use an alternative browser.
You should upgrade or use an alternative browser.
Dar-Dar's 1995 Avus Blue E36 M3 Project Car
- Thread starter Dar-Dar
- Start date
- Thread starter
- #262

Sarcras
Well-Known Member
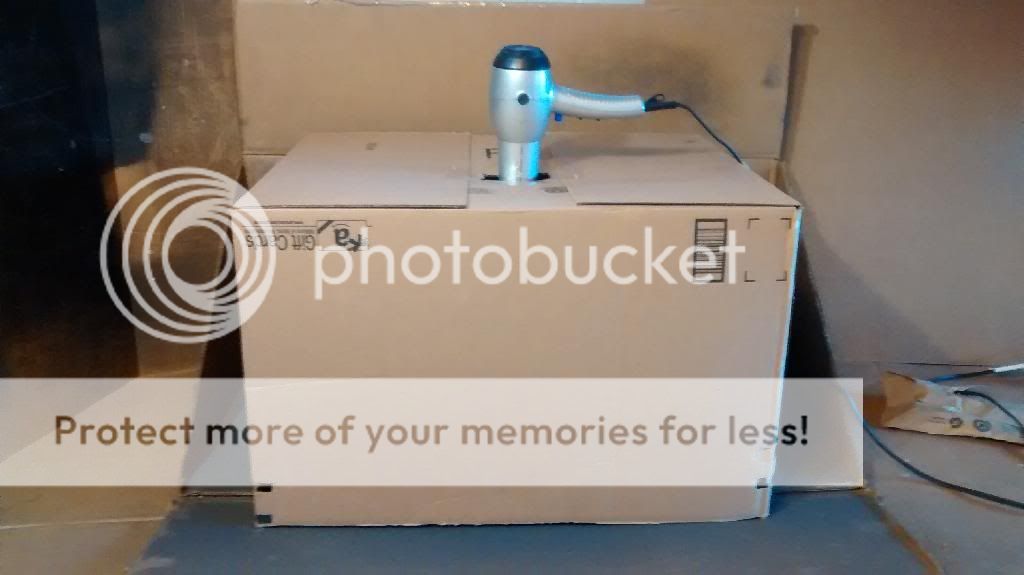
Some have adjustable settings. Like the one I have.Heat guns go for over 500F and will burn the paint. I doubt the temperatre in an enclosed box will go over 200F using a blow dryer. Here's a pic from years ago:
It's so simple and it works.

- Staff
- #264
- 57,217
- 24,355
Now that's fancy. Mine just has a high/low setting
- Thread starter
- #265
Sarcras
Well-Known Member
It is fancy but I got it for a good price at my local hardware store. They have a rewards program so every time I spend money I get a portion of it back in store credit.Now that's fancy. Mine just has a high/low setting
- Thread starter
- #267
Dar-Dar
Mordorator
- 19,329
- 9,901
- Vehicle Model
- Civic Si
- Body Style
- Fiji Blue Pearl Coupe Coolest Member Since: May 15, 2011
X Brace
I got a deal on this oem x-brace that was available on certain E36s/Z3s. The 1995s did not come with one.

I cleaned it up a bit with degreaser.

There's a diy on installing this and one step requires drilling larger holes on the front cross member/subframe so rivet nuts can be inserted. However, the rivet nuts I purchased slipped right through the holes without any drilling.

I'm going to try and mount the stock cross member (just a simple bar) somewhere closer to the rear end.
I got a deal on this oem x-brace that was available on certain E36s/Z3s. The 1995s did not come with one.
I cleaned it up a bit with degreaser.
There's a diy on installing this and one step requires drilling larger holes on the front cross member/subframe so rivet nuts can be inserted. However, the rivet nuts I purchased slipped right through the holes without any drilling.
I'm going to try and mount the stock cross member (just a simple bar) somewhere closer to the rear end.
Man that thing looks janky. I'm surprised you didn't strip and paint it. It has some rust on it!
Nice progress on the car overall too. Major work you are doing.
Nice progress on the car overall too. Major work you are doing.
mikey6p
Members Only
That's pretty cool. I guess.
- Thread starter
- #270
Dar-Dar
Mordorator
- 19,329
- 9,901
- Vehicle Model
- Civic Si
- Body Style
- Fiji Blue Pearl Coupe Coolest Member Since: May 15, 2011
Thanks.Man that thing looks janky. I'm surprised you didn't strip and paint it. It has some rust on it!
Nice progress on the car overall too. Major work you are doing.
The x-brace only has some minor surface rust. Mainly, on the seam welds and areas that ate the speed bumps. It came from Georgia.
Don't worry, I'll remove it and do some paint work. The car will remain suspended anyway until I install the rear sub frame, trailing arm bushings, etc. Basically, the entire rear end.
I really want to have fun driving it before summer comes around. I know I'll have fun driving it as it stands, but the trailing arm bushings are completely shot (poop handling and wonky alignment) and need to be replaced so I figured I'll do as much as I can on the rear end while I'm at it.
That's pretty cool. I guess.
For $100, it's basically free. The bushings alone go for over $100. Lol. I can't wait to install it. Fingers crossed for no cracked mounting points in the rear. These cars (the older they get) apparently have the tendency to crack on the trailing arm pocket, rear strut mount, sub frame mounting points. I'll be ready to do some welding.
Once the rear end is dropped (after welding or if welding isn't necessary), I'll do some rust repair and spray the entire area with more truck bed coating.
The next time i paint something I'm doing this. Hope my gf doesnt mind if i steal her hair dryer. I knew i kept a bunch of boxes around for a good reasonHeat guns go for over 500F and will burn the paint. I doubt the temperatre in an enclosed box will go over 200F using a blow dryer. Here's a pic from years ago:
It's so simple and it works.
- Thread starter
- #272
Dar-Dar
Mordorator
- 19,329
- 9,901
- Vehicle Model
- Civic Si
- Body Style
- Fiji Blue Pearl Coupe Coolest Member Since: May 15, 2011
Be sure you have exit vents so the blow dryer won't overheat.The next time i paint something I'm doing this. Hope my gf doesnt mind if i steal her hair dryer. I knew i kept a bunch of boxes around for a good reason
- Thread starter
- #273
Dar-Dar
Mordorator
- 19,329
- 9,901
- Vehicle Model
- Civic Si
- Body Style
- Fiji Blue Pearl Coupe Coolest Member Since: May 15, 2011
I would recommend Stromung, RCS36 Corsa, Eisenmann, UUC System U, Active Autowerke, Borla. (in order of my preference)
Must...resist...
https://jerseyshore.craigslist.org/pts/6076551832.html
- Staff
- #274
- 57,217
- 24,355
so his #1
- Thread starter
- #275
- Staff
- #276
- 10,437
- 7,079
- Vehicle Model
- Toyota Tacoma TRD Sport
- Body Style
- @bootyluvr hates hatches
They want that much and it looks like a partly polished turd? Damn!
- Thread starter
- #277
Dar-Dar
Mordorator
- 19,329
- 9,901
- Vehicle Model
- Civic Si
- Body Style
- Fiji Blue Pearl Coupe Coolest Member Since: May 15, 2011
It seems that the stromung exhaust is 'special order' only. So they are quite hard to get. I'm going to low ball this seller though. If I can get a deal between $400-$450, I'll be happy.
- Thread starter
- #278
Dar-Dar
Mordorator
- 19,329
- 9,901
- Vehicle Model
- Civic Si
- Body Style
- Fiji Blue Pearl Coupe Coolest Member Since: May 15, 2011
Front Downforce, Not Really
I installed a fiberglass front splitter that is similar in style as the M3 Lightweight. However, it isn't as functional since the ones you see in the Lightweights are mounted on the bumper support and will actually put some front down force. And this splitter is mounted on the lip of the bumper cover using twelve fender clips on the front and four nuts and bolts on the sides.
This and the stock lip were painted with Rustoleum Trim Paint (and Duplicolor adhesion promoter prior to painting).


Don't mind the battered up front emblem.
I installed a fiberglass front splitter that is similar in style as the M3 Lightweight. However, it isn't as functional since the ones you see in the Lightweights are mounted on the bumper support and will actually put some front down force. And this splitter is mounted on the lip of the bumper cover using twelve fender clips on the front and four nuts and bolts on the sides.
This and the stock lip were painted with Rustoleum Trim Paint (and Duplicolor adhesion promoter prior to painting).
Don't mind the battered up front emblem.
- Staff
- #279
- 10,437
- 7,079
- Vehicle Model
- Toyota Tacoma TRD Sport
- Body Style
- @bootyluvr hates hatches
Lip on lip? Looks a bit funky.....
- Thread starter
- #280